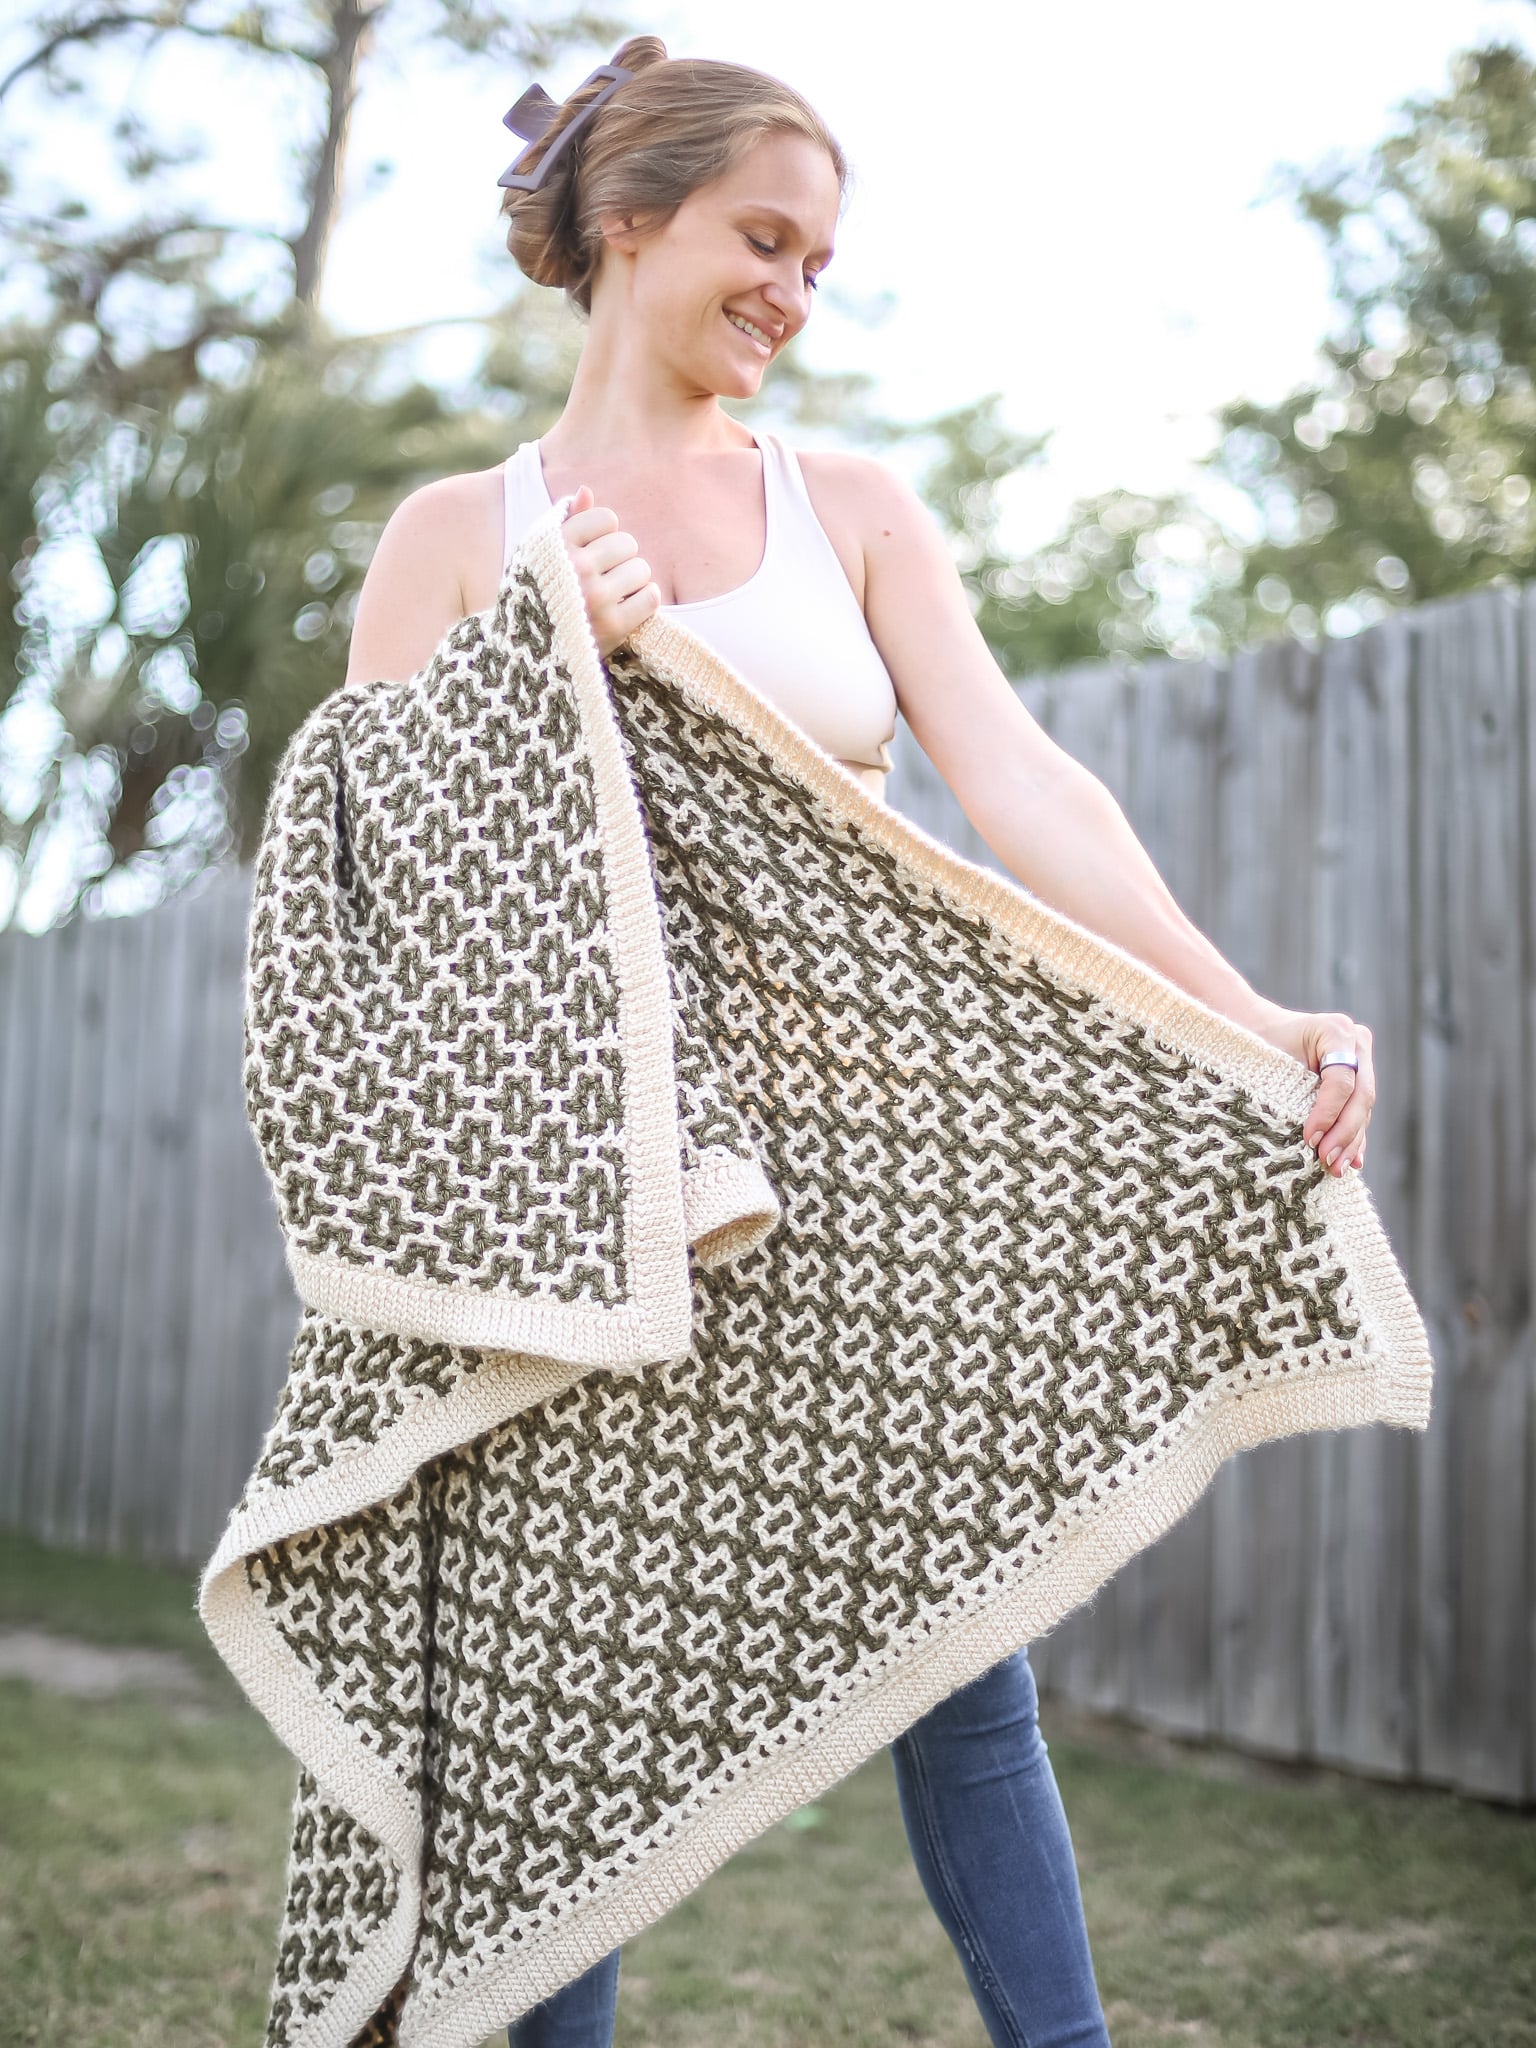
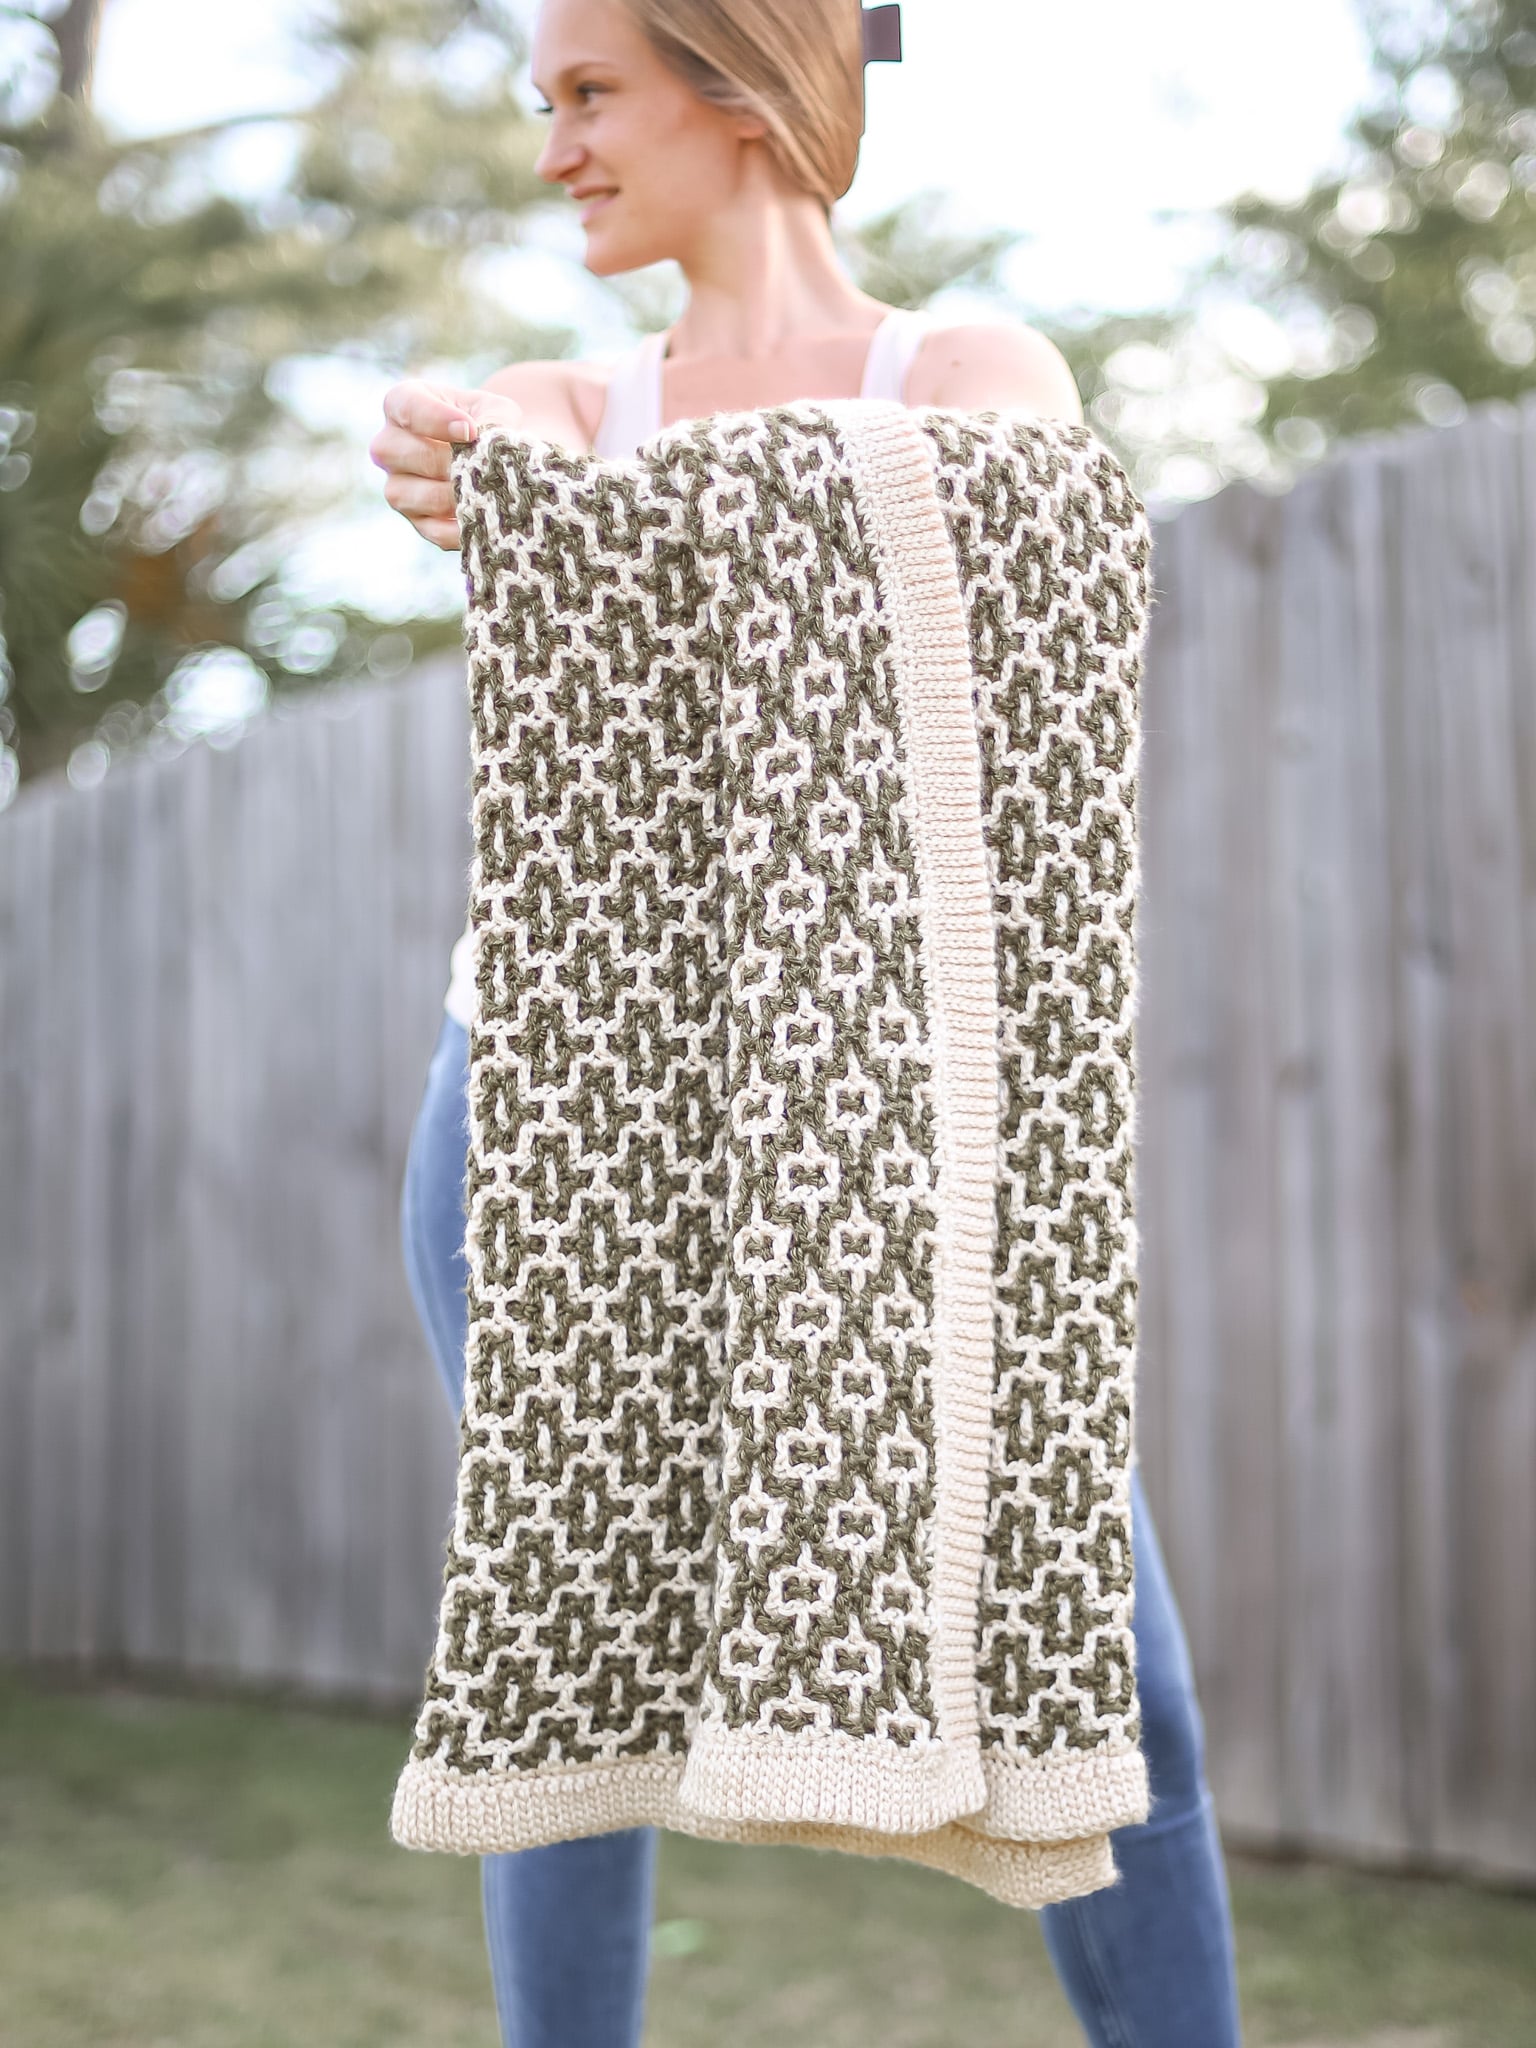
Gorgeous Double Sided Reversible Interlocking Crochet Blanket Pattern
Make a Double Sided Reversible Interlocking Crochet Blanket Pattern now using worsted weight yarn in two contrasting colors! The Woven Tiles Heirloom throw uses the interlocking crochet technique, sometimes called double filet crochet, to create a gorgeous blanket with a different pattern on each side.
Use the easy Table of Contents Below to read more about this reversible crochet blanket pattern, get your materials and start using the written instructions in this blog post, Happy Crocheting!
Best Bang for your Buck, get a Kit From Lion Brand includes a printable PDF ad-free pdf version of this pattern and Yarn!
Get a PDF Pattern on in my Etsy Shop or Ravelry!
More about this Reversible Blanket
This is an Advanced Skill Level Pattern since interlocked crochet stitches can be tricky, read this written pattern carefully.
Although this pattern does not used any increases or decreases you will have to manipulate two different strands of yarn by working in front, behind and through stitches.
To create this reversible fabric you only need knowledge of basic stitches like chains, double crochet stitches and slip stitches.
Stitch placement will be important for this free blanket pattern so be sure to read more in the notes below about this special crochet technique.
To add the ribbed knit look crochet border you will continue from the final row so that you add the ribbing seamlessly so that there are no separate pieces in this crochet project.
If you love this special technique for patterns with a strong contrast check out all of my Free Interlocking Crochet Patterns!
Created for a Collection
This interlocking crochet blanket pattern was created in collaboration with Lion Brand to bring you a collection of heirloom quality crochet pieces!
I believe crochet is meant to help you slow down, create with intention and help you to disconnect to reconnect. Yarn crafts have been experiencing some sort of a revival, especially among a younger generation searching for a tangible hobby.
I designed these 4 pieces to take my grandma hobby to the next level creating yet more advanced crochet patterns that allow my brain to stretch. I hope you enjoy all of them as much as I enjoyed creating them!
- Diamond Trellis Heirloom Blanket Wrap
- Garden Heirloom Baby Blanket
- Woven Tiles Heirloom Throw (that’s this one)
- Simple Diamond Heirloom Poncho
Yarn Substitutes
- Vanna’s Choice or Pound of love are great budget friendly options!
- Color Theory is another wonderful easy to care for acrylic with great color options.
- Pima Cotton would be a great swap for a super soft all natural fiber.
Come find me on…
- Like my Facebook Page
- Join my Facebook group!
- Subscribe to my YouTube Channel for Free Crochet Tutorials
- Get PDFs on Etsy
- Get PDFs on Ravelry
- Sign Up for the Life and Yarn Newsletter for more free crochet blankets!
- Please Note: Some links may be affiliate links that help to support the Life + Yarn Blog with a small commission at no added cost to you, thank you!
- Copyright 2026, Life and Yarn, Brianna Iaropoli. Pattern contents are NOT to be re-shared, DIRECT LINKS ONLY to this post for the pattern.
Materials
- Size 6.00mm crochet hook
- 5 Skeins of Lion Brand Heartland in Acadia – Color A
- 4 Skeins of Lion Brand Heartland in Joshua Tree – Color B
- #4 Worsted Weight Yarn – 1250 yards – Color A
- #4 Worsted Weight Yarn – 1000 yards – Color B
- Stitch Markers
- Darning Needle
Gauge
- Foundation Chain A 20 sts.
- Foundation Chain B 18 sts.
- Follow pattern repeat 2 times for 5 by 6.5 inches.
- Wether you are working with the recommended yarn, a yarn of similar fiber content or something different, gauge for this pattern along side your preferred blocking method is EXTREMELY important to make sure not only your blanket is the correct size but also to make sure you do not run out of yarn!
- Lion Brand’s Heartland can grow significantly depending on the stitch. This is one of those stitches. The weight of the material created really pulls the stitches allowing this blanket to grow.
- My PREBLOCKED gauge swatch is 5 by 6.5 inches.
- My BLOCKED gauge is 5.5 by 7 inches using a light steam blocking.
- Please note that the USED Gauge will be a bit more due to the weight of the final blanket fabric. This blanket will stretch!
- If using a different fiber, say wool for example, you may need to change your hook and/or blocking method to reach the same Blocked/Finished Gauge.
Sizing
- One Size: 52 x 48 inches
Stitch Descriptions and Abbreviations
- Chain Stitch – ch
- Stitch(es) – st(s)
- Space – sp
- Skip – sk
- Stitch Marker – SM
- Single Crochet – sc
- Double Crochet – dc
- Turning Chain – t-ch – The Turning Chain 4 counts as a Double Crochet and Chain 1, the row instructions tell you to use the 3rd chain for stitch placement.
- Double Crochet in Front – dcf – Work your double crochet as you normally would from the front. Sometimes this requires pulling the stitch through the corresponding window of the opposite color. To do this you will yarn over, bring your hook to the front, go through the window to pick up the dc needing to be worked on the back, insert your hook, pull the stitch through the window to the front, then complete your double crochet stitch as normal.
- Double Crochet in Back – dcb – Work your double crochet as your normally would from the back. Sometimes this requires pulling the stitch through the corresponding window of the opposite color. To do this you will yarn over, bring your hook to the back, go through the window to pick up the dc needing to be worked on the front, insert your hook, pull the stitch through the window to the back, then complete your double crochet stitch as normal.
Pattern Notes
- * Designates a repeat.
- “sc 1” means to single crochet in the next stitch.
- “sc 2” means to single crochet in each of the next 2 stitches.
- “2 sc” means to single crochet twice in the next stitch to create an increase.
- Ch 4 counts as first dc and ch-1 sp throughout.
- Final dc sts are placed in the 3rd chain of the t-ch.
- When working rows you will only work your stitches in the color you are currently using (ex. Color A only creates stitches in the previous Color A Row) and work through, in front or in back of the color you are not using, never around the other color.
- Foundation Row B is SHORTER than Foundation Row A so your Color B will be set in from the edge of Color A. Color A will almost create a “frame” around the blanket. This will stay true through the entire pattern.
- Row Instructions give two sets of instructions noted as Row “1A” and Row “1B”. The A and B Reference the color you are working with, so each row is really two rows worked in succession.
- Color A will always be worked first and will be the furthest to the edge.
What is Interlocking Crochet?
Interlocking Crochet is a technique that is also called mosaic crochet, double filet, interweave or intermeshing. However you call it, one thing is for sure, it is gorgeous! Who doest love a reversible fabric?!
This is a crochet technique where you create two layers of fabric (filet mesh) and work them together at the same time so that the rows are woven or interlocked! Each color will maintain its own row structure, the stitches never mix. So will need to work through windows of the opposite color to achieve the locked effect that creates the double sided pattern.
It is important to note that each row is actually two and the patterns are created by some stitches being worked in front and some in back but never mixing the stitches of your two separate colors. Be mindful go you tension, adjustments may be needed to keep your fabric flat because you will be working through stitches (windows).
I hope you enjoy this pattern and be sure to watch my YouTube Video (coming soon) if you need some help making your new favorite blanket!!
Double Sided Reversible Interlocking Crochet Blanket Pattern
Blanket Foundation Set-Up
Foundation Row A
Ch 156, dc in 6th ch from hook, *ch 1, sk 1, dc in next, repeat from * to end, place SM, turn.
Foundation Row B
Ch 154, dc in 6th ch from hook, *ch 1, sk 1, dc in next, repeat from * to end, place SM, turn.
Note: Lay Foundation Row A on top of Foundation Row B (making sure that both working yarns are on the same side) and begin working Row 1A, followed by Row 1B as instructed below.
Note: Be sure to keep the working yarn from Foundation Row B to the back so that you can work your Row 1B properly.
Note: Place a SM at the end of each row before starting the next so you do not lose stitches.
Blanket Row Repeats
Bring (or “Keep” from Foundation Set-Up) Color B Working Yarn to Back.
Row 1A
Ch 4, dcb in next dc, *ch 1, dcf in next dc, ch 1, dcb in next dc, repeat from * to last dc, ch 1, dcf in last dc (3rd ch of t-ch).
Note: When working this row for the first time the stitch placement can be tricky before the pattern be comes easy to see. The first stitch (dcb in next dc) will be picked up between the first and second dc of Foundation Row B then the rest of the stitch placements are easy.
Row 1B
Ch 4, dcf in next dc, ch 1, dcf in next dc, *(ch 1, dcb in next dc) 2 times, (ch 1, dcf in next dc) 2 times repeat from * to last dc, ch 1, dcb in last dc (3rd ch of t-ch).
Turn entire piece.
Bring Color B Working Yarn to Front.
Row 2A
Ch 4, dcb in next dc, *ch 1, dcf in next dc, ch 1, dcb in next dc, repeat from * to last dc, ch 1, dcb in last dc (3rd ch of t-ch).
Row 2B
Ch 4, dcb in next dc, ch 1, dcb in next dc, *(ch 1, dcf in next dc) 2 times, (ch 1, dcb in next dc) 2 times repeat from * to last dc, ch 1, dcf in last dc (3rd ch of t-ch).
Turn entire piece.
Bring Color B Working Yarn to Back.
Row 3A
Ch 4, dcb in next dc, *ch 1, dcf in next dc, ch 1, dcb in next dc, repeat from * to last dc, ch 1, dcf in last dc (3rd ch of t-ch).
Row 3B
Ch 4, dcb in next dc, ch 1, dcb in next dc, *(ch 1, dcf in next dc) 2 times, (ch 1, dcb in next dc) 2 times repeat from * to last dc, ch 1, dcf in last dc (3rd ch of t-ch).
Turn entire piece.
Bring Color B Working Yarn to Front.
Row 4A
Ch 4, dcb in next dc, *ch 1, dcf in next dc, ch 1, dcb in next dc, repeat from * to last dc, ch 1, dcb in last dc (3rd ch of t-ch).
Row 4B
Ch 4, dcf in next dc, ch 1, dcf in next dc, *(ch 1, dcb in next dc) 2 times, (ch 1, dcf in next dc) 2 times repeat from * to last dc, ch 1, dcb in last dc (3rd ch of t-ch).
Turn entire piece.
Rows 5 to 72 – Repeat Rows 1A/B to 4A/B (18) times total excusing the final Row 4B.
Finish Off Color B on the Final Row 3B Repeat.
Continue to the Final Row using Color A
Final Row with Color A
Ch 1, turn, sc in first dc of Color A, sc around ch-1 of Color A and in first dc of Color B, *sc in next dc of Color A and around next ch-1 of Color B, sc around next ch-1 of Color A and in next dc of Color B, repeat from * to end with last sc being placed in the 3rd ch of tch-4 then continue to Blanket Trim.
Blanket Trim Set Up
- Continuing from “Final Row” place 2 more sc in the last worked stitch.
- Turn your blanket clockwise 90 degrees and single crochet down the side using the Row Ends of Color A and B evenly to avoid any waving. I alternate between 2 or 3 single crochet per row end. Pick up Color B Row Ends using your best judgement.
- When you reach the Foundation Rows place 2 more sc sts in the last worked stitch of the side.
- Turn your blanket clockwise 90 degrees to single crochet together the foundation rows the same way you did the Final Row by working a double crochet around ch-sp of opposite color.
- When you reach the end of the Foundation Rows place 2 more sc sts in the last worked stitch.
- Turn your blanket clockwise 90 degrees and single crochet down the side using the Row Ends of Color A and B. Do this as evenly as possible to avoid any pinching or puckering. I alternate between 2 or 3 single crochet per row end.
- Place an additional 2 Single Crochet in the last worked stitch, slip stitch to join, do not finish off and continue to the Blanket Slip Stitch Trim.
Blanket Trim
- Chain 6, turn so that the right side (you choose) of the blanket is facing you, sl st in the second chain from the hook and each next chain back to the blanket. [5 total sl sts]
- Sl st in the next st of blanket, turn, skip first sl st, sl st blo next 5 sts.
- Turn, ch 1, sl st blo in next 5 sl sts.
- Sl st in the next st of blanket, turn, skip first sl st, sl st blo next 5 sts.
- Repeat Steps 3 and 4 to the last stitch.
- Rotate your blanket and repeat Steps 1 to 5 to work down the next side of the blanket.
- Repeat Step 6 two more times.
- Finish off.
If you loved this cozy throw check out all of my crochet blanket designs where I have so many other different patterns to find your next project!


