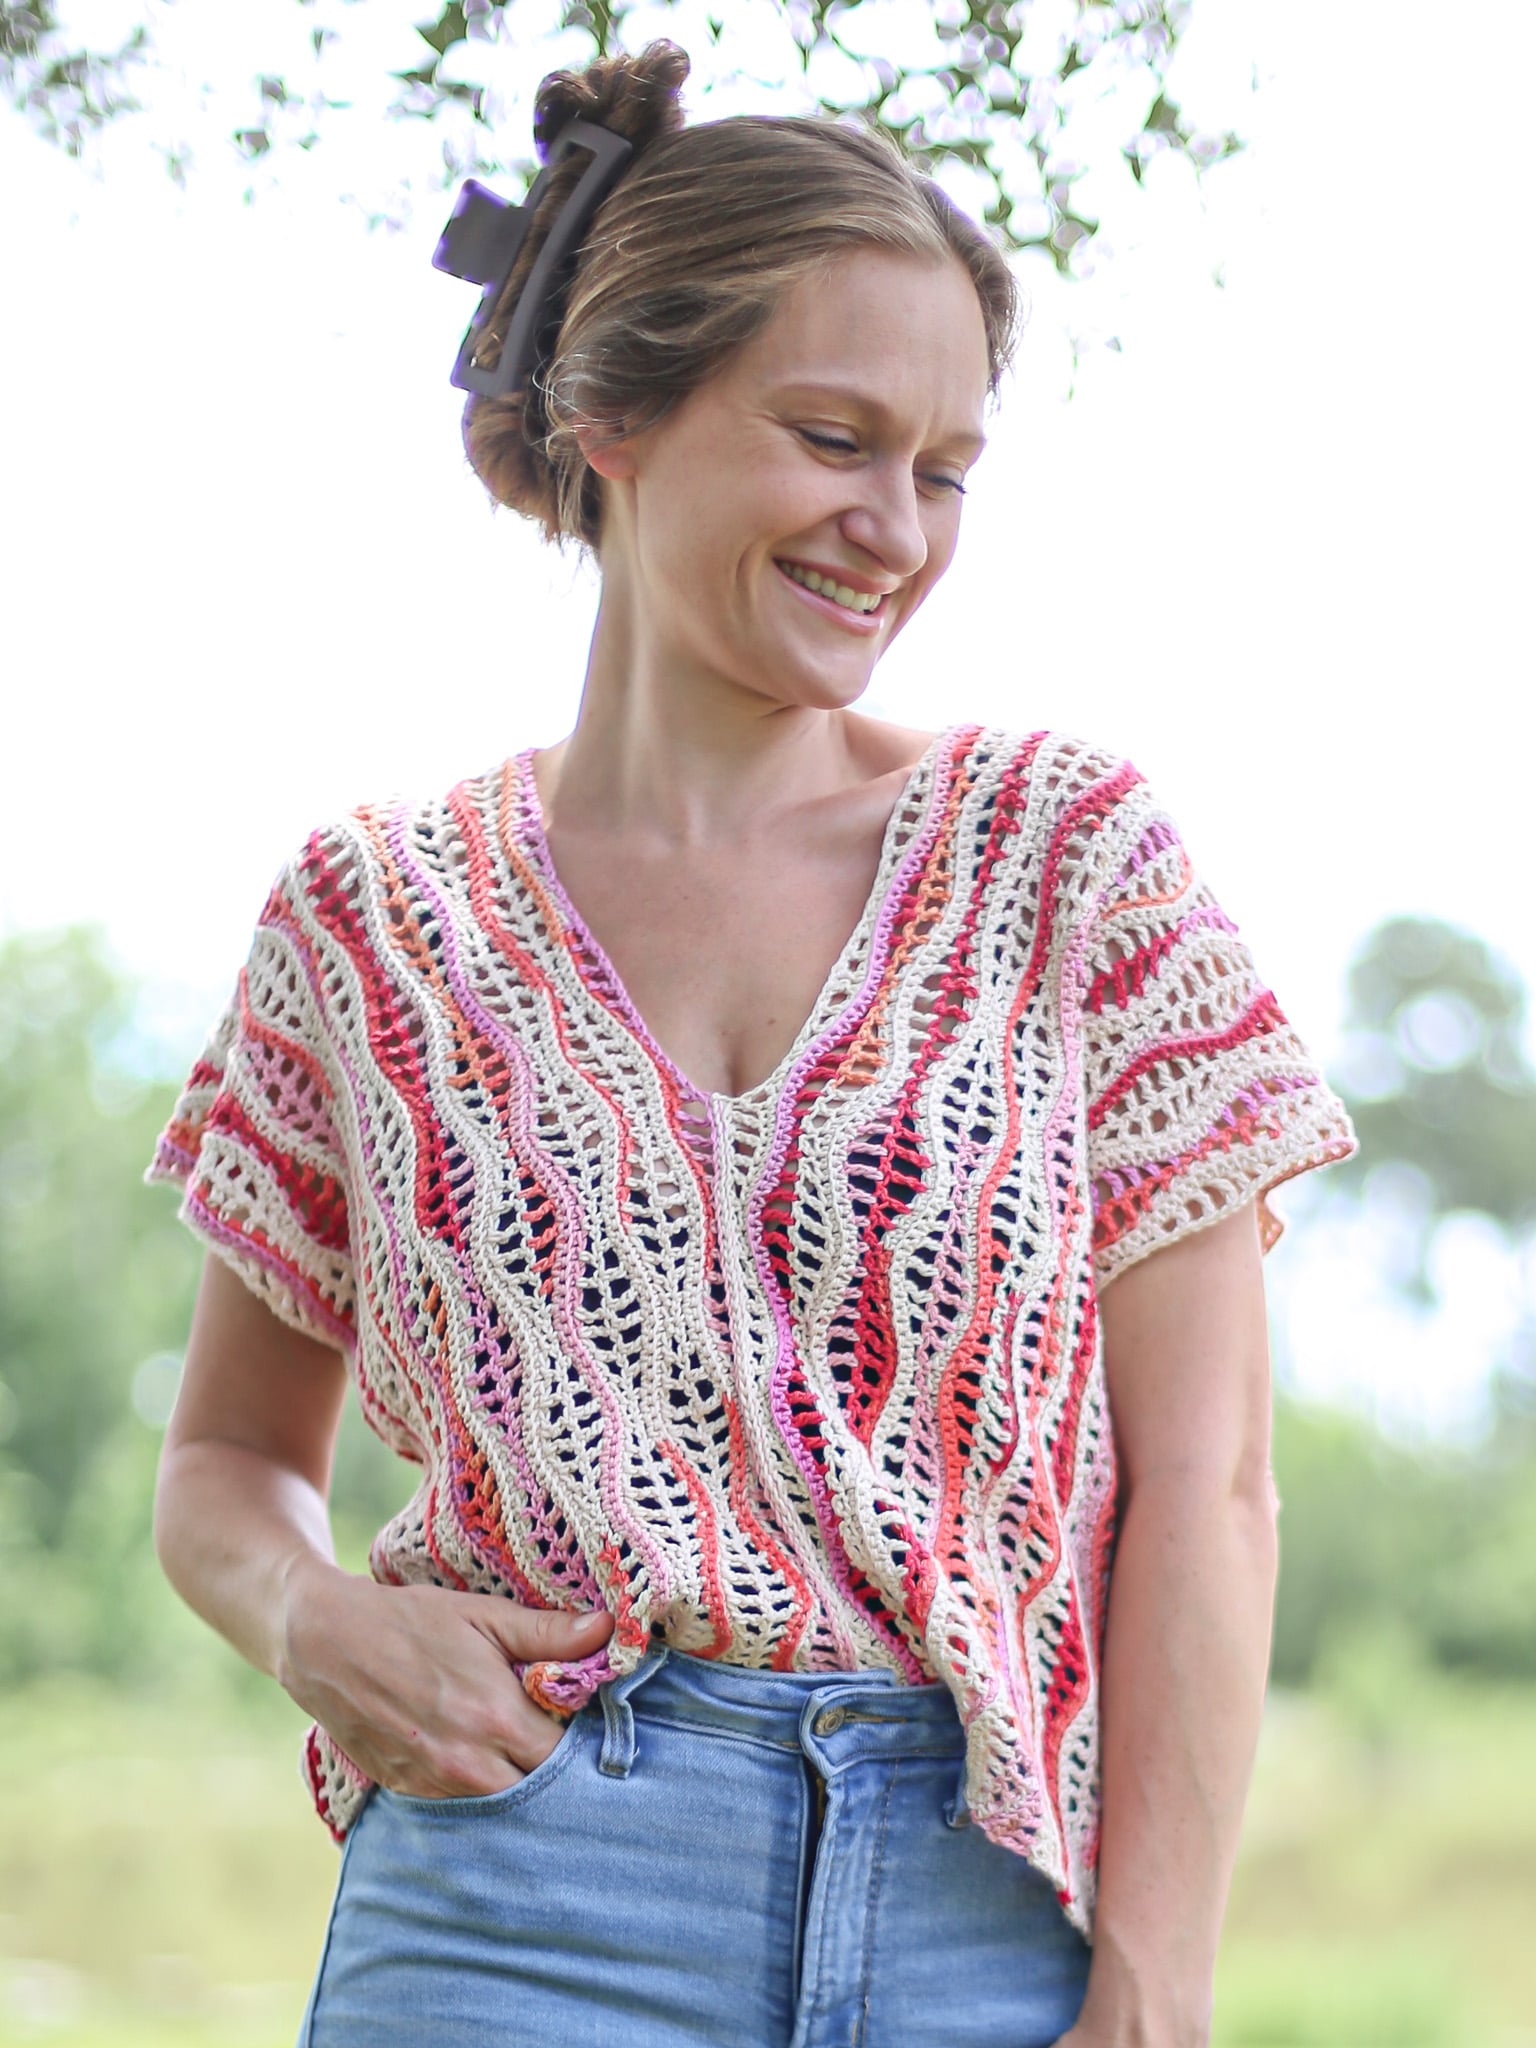
FREE Easy Summer Crochet Tee Pattern and Video Tutorial
If you can crochet a rectangle then you can make this simple crochet tee pattern! Grab your crochet hook, dk weight yarn, some stitch markers and watch the detailed step-by-step video tutorial to get stared on this top pattern now!
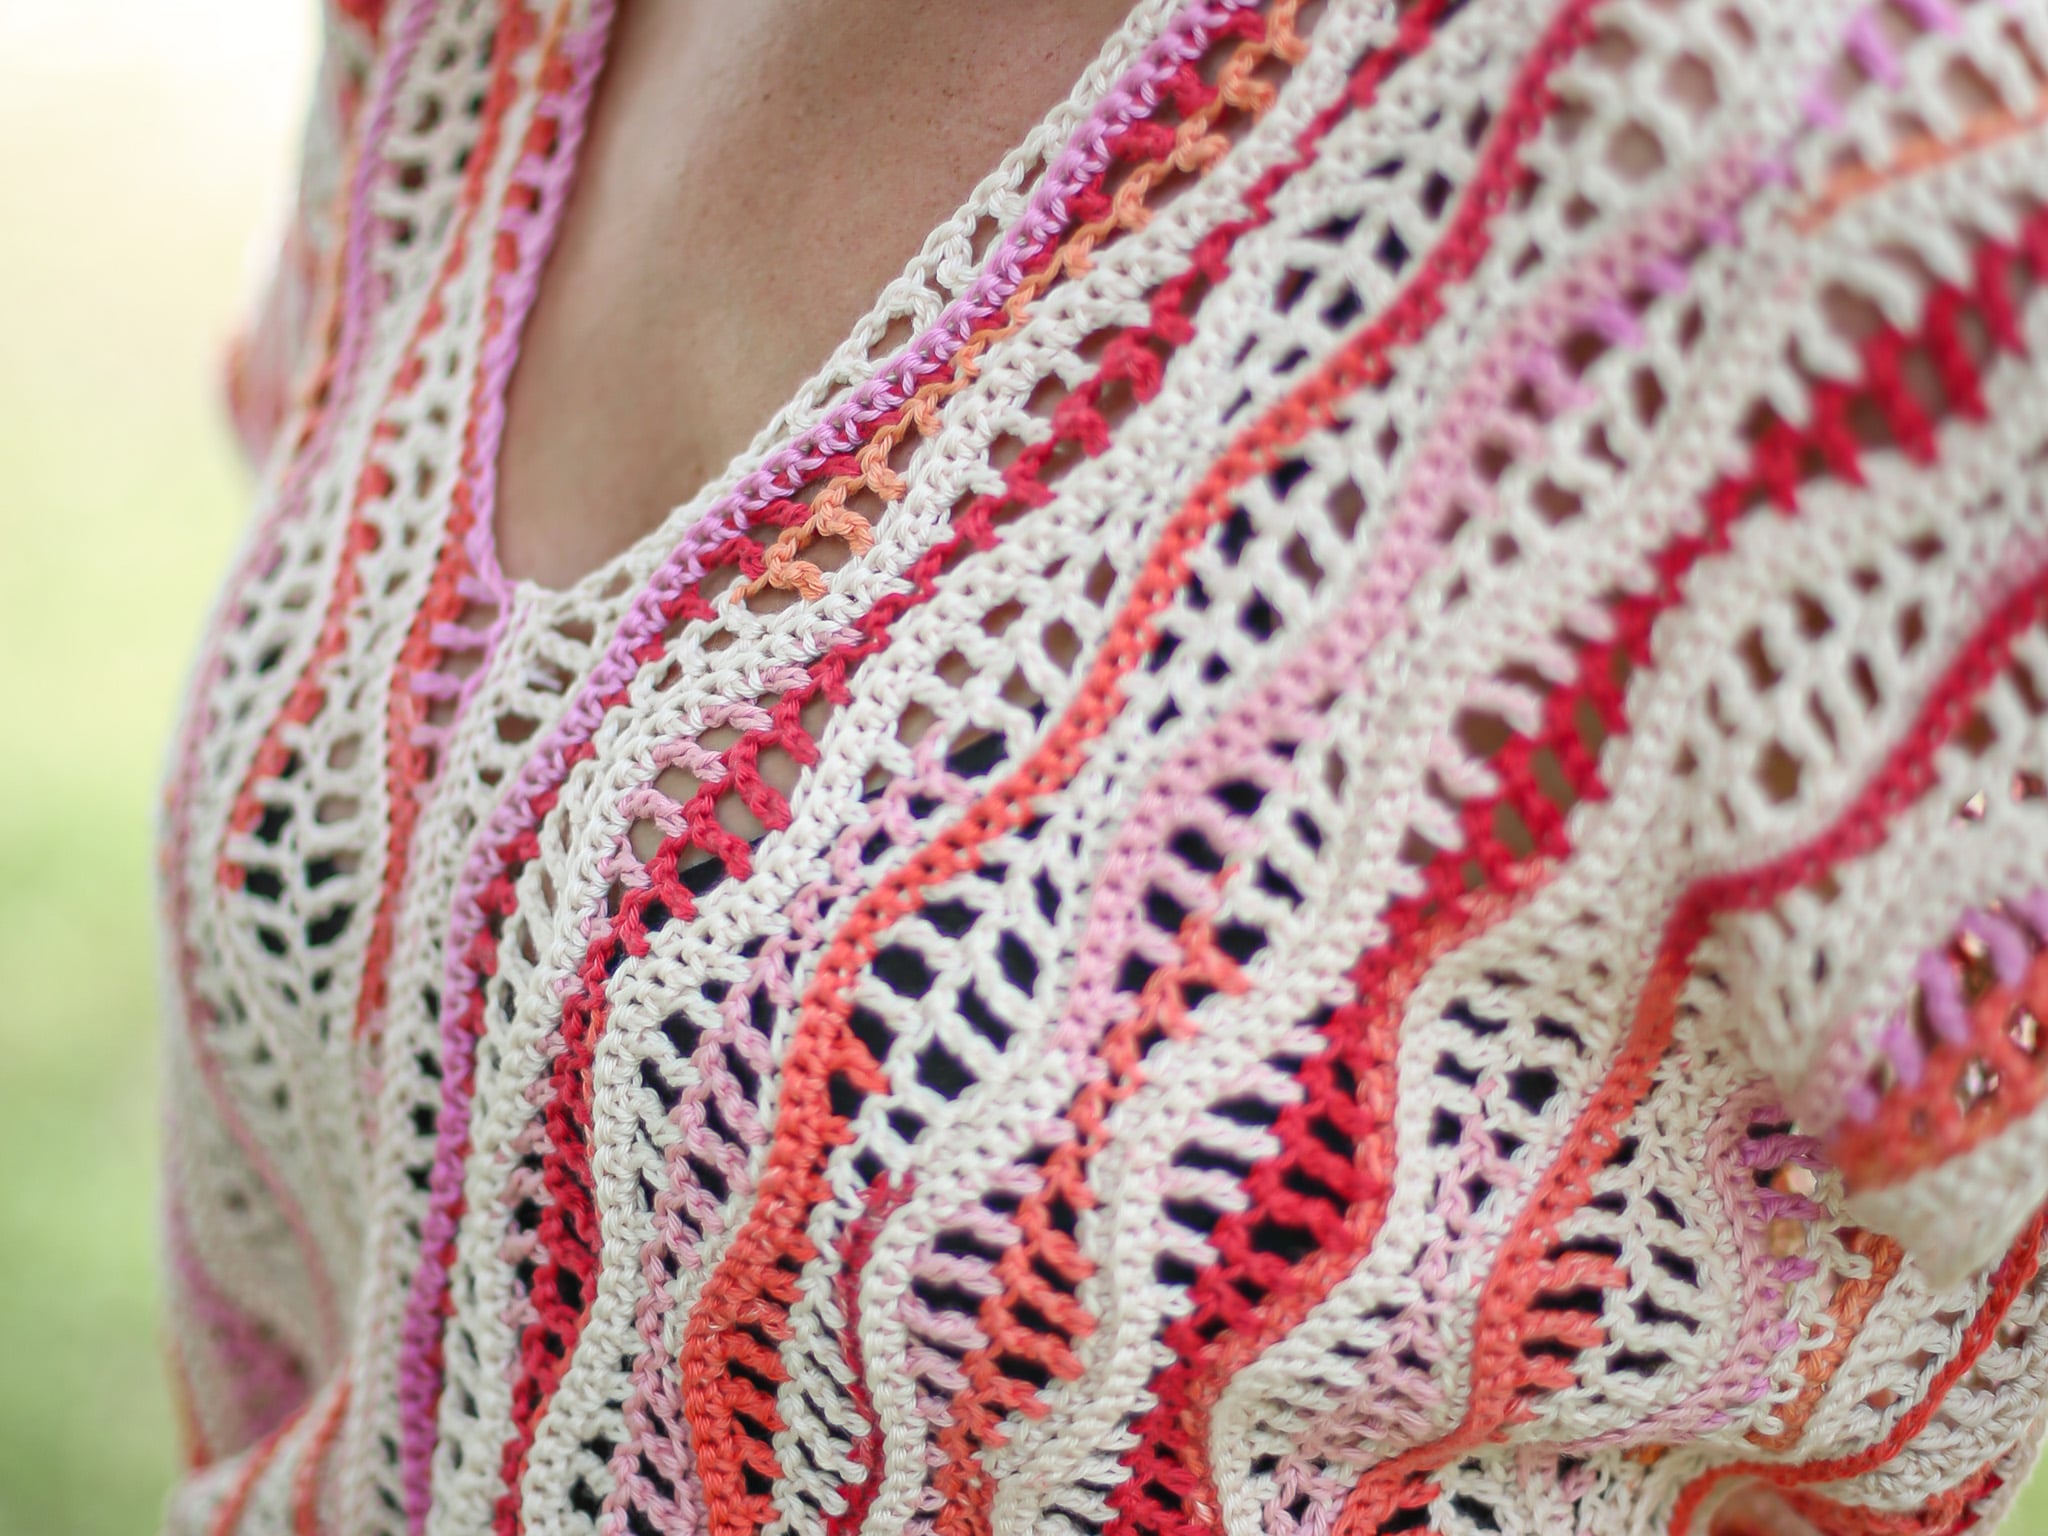
The Beachside Sunset Top is available in five size groupings covering nine sizes. Using a range of simple stitches you can create a beautiful waving crochet pattern and have a stunning crochet blouse!
Best Bang for your Buck, get a Kit From Lion Brand includes a printable PDF ad-free pdf version of this pattern and Yarn!
Get a PDF Pattern on in my Etsy Shop or Ravelry!
A Crochet Shirt with Simple Construction
If you are familiar with my Country Sunset Top then you might recognize the stitch used on this crochet tee shirt!
That top has been insanely popular with its simple construction BUT the issue for some has been wanting to make it in a slightly larger yarn weight and in a cotton or cotton blend yarn.
I heard you and did a full redesign on this relaxed fit top going from a super fine/fingering weight yarn to an easier to use dk weight yarn!
Increasing the yarn weight and hook size just a bit meant creating a new gauge, new stitch count and new row count to get you a similar size and fit of my other summertime tee perfect for the warmer months!
So, for my lovely makers that wanted a modification of the OG Sunset Top, you got it!
Same stitch, same two rectangle, all worked out and easy for you just grab your yarn and hook and not have to think through adjusting anything!
Better for Beginners
One issue that came up time and time again was that mandala string was hard to work with especially for beginner crocheters. The yarn is TINY and slippery making it difficult to work with. Even an experienced crocheter was frustrated!
By switching over to 24/7 Cotton DK both of those problems were solved! We went up two yarn weights and the 100% Cotton Yarn has a bit more grip so the skein doesn’t collapse and tangle.
This top, written in US terms, is noted as an Intermediate Skill Level only because there is a large mix of basic crochet stitches and if you don’t pay attention you can lose the waving pattern by skipping a stitch.
However, don’t let that deter you, this is a beginner-friendly top, just take your time and pay attention to different stitches.
Yarn Substitutes
- Mandala is a great option for another self striping ombre yarn.
- Truboo is soft and slinky, perfect for warm weather
- Cottino is a cotton wool blend that would turn this into a year around top.
- Coboo is another perfect cotton blend for the summer months.
Come find me on…
- Like my Facebook Page
- Join my Facebook group!
- Subscribe to my YouTube Channel for Free Crochet Tutorials
- Get PDFs on Etsy
- Get PDFs on Ravelry
- Sign Up for the Life and Yarn Newsletter for more free modern crochet patterns!
- Please Note: Some links may be affiliate links that help to support the Life + Yarn Blog with a small commission at no added cost to you, thank you!
- Copyright 2026, Life and Yarn, Brianna Iaropoli. Pattern contents are NOT to be re-shared, DIRECT LINKS ONLY to this post for the pattern.
Materials
- Size 4.00mm crochet hook
- 4 (4, 5, 6, 7) Skeins of Lion Brand 24/7 Cotton DK Prints in Flamingo [769-502G]
- Dk Weight No. 3 – 812 (928, 1160, 1392, 1624) yards
Gauge
- Make a starting chain of 34 and complete 19 rows for your gauge swatch.
- Then measure 20 sts by 15 rows on your swatch in pattern repeat. It will be 4 by 4(4.5) inches or Low Point(High Point)
- Blocking will open this stitch pattern mostly row-wise and minimally stitch-wise.
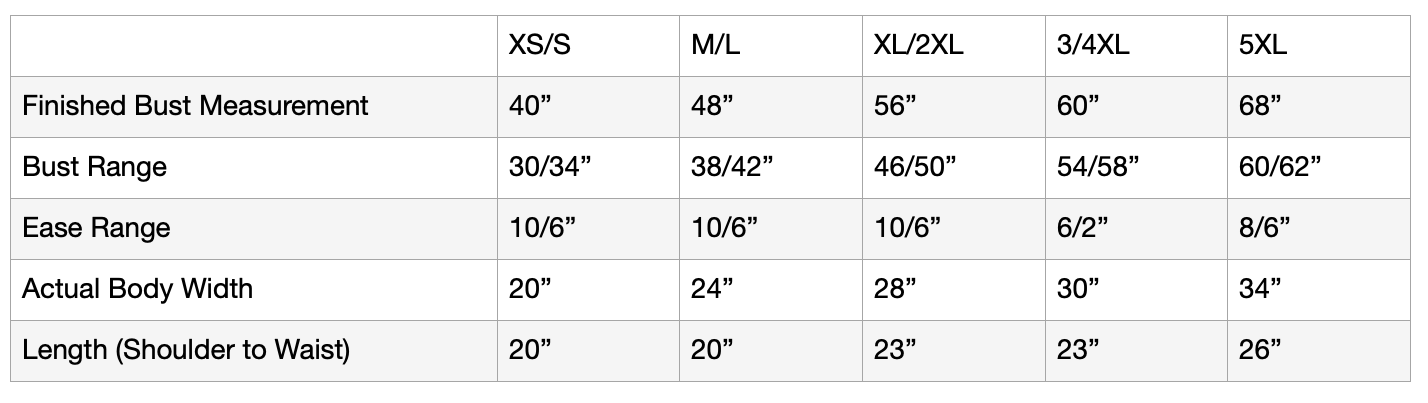
Sizing
- XS/S (M/L, XL/2XL, 3/4XL, 5XL)
Stitch Descriptions and Abbreviations
- Chain Stitch – ch
- Stitch(es) – st(s)
- Skip – sk
- Single Crochet – sc
- Half Double Crochet – hdc
- Double Crochet – dc
- Treble Crochet – tr
- Back Loop Only – blo – Work the designated stitch as normal but only use the back loop.
Pattern Notes
- * Designates a repeat.
- “sc 1” means to single crochet in the next stitch.
- “sc 2” means to single crochet in each of the next 2 stitches.
- “2 sc” means to single crochet twice in the next stitch to create an increase.
- The right side has the ridges formed by working in the blo.
- Stitch count is one less than the starting chain for each size. It does not change throughout the pattern. (Multiple of 16 + 2)
Gauge
- Wether you are working with the recommended yarn, a yarn of similar fiber content or something different, gauge for this pattern along side your preferred blocking method is EXTREMELY important to make sure your top is the right size, fits properly and you have enough yardage.
- Lion Brand’s 24/7 DK does/can block out significantly while other fibers might not.
- You will need to create a swatch larger than the given gauge to measure your gauge:
Make a starting chain of 34 and complete 19 rows. - My BLOCKED gauge is 20 sts by 15 rows in pattern repeat is 4 by 4(4.5) inches using a 4.00 mm hook The two measurements are due to the waving, uneven pattern of the stitch for the row height. Measure the Low Point(High Point)
- For this pattern I only did a light steam blocking to relax the fabric, open the stitches and straighten my edges.
- If using a different fiber, like wool or a cotton blend for example, you may need to change your hook and/or blocking method to reach the same Blocked/Finished Gauge.
Tips for Sizing
- How to Adjust the Length of the Body: The length of your body is dictated by the number of stitches in this pattern. To add length you will add/subtract stitches to the starting chain for the Body Panels by 16’s. Remember to add/subtract the same number of stitches to both panels. If you love beach cover-ups, this would be a great pattern to add length to!
- How to Adjust the Width of the Body: The width of your body is dictated by the number of rows in this pattern. To add/subtract width you will add/subtract rows, be sure to end on a Row 4 or 8 so that the stitch repeat aligns when seaming. Remember to add the same number of rows to both panels.
- How to Adjust the Neck Opening: To adjust the Neck Opening you just need to seam more or less stitches together in the side seam
- How to Adjust the Armhole Depth: To adjust the Armhole you just need to seam more or less stitches together.
- A Note on Yardage: This stitch is a yarn eater, so please be mindful of your gauge.
- IMPORTANT NOTE: Any changes to sizing will affect your yardage, buy an extra skein if you plan to adjust sizing to avoid running out of yarn or lot color variations.
Summer Crochet Top Pattern
Body Panels – Make Two
Chain 210 (210, 242, 242, 274)
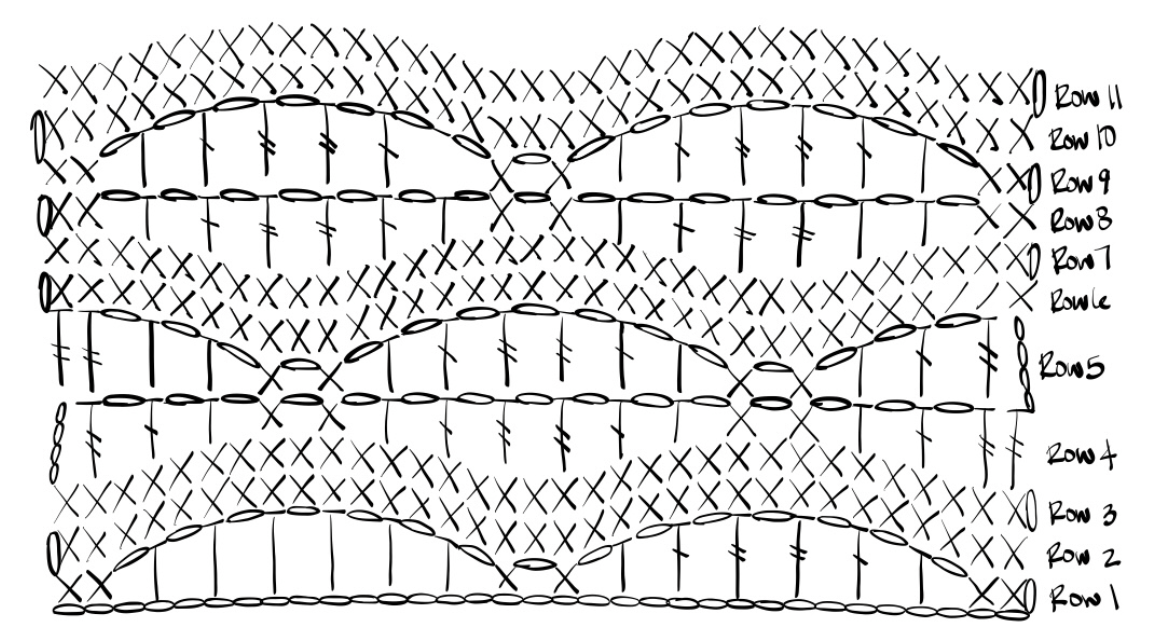
Row 1 – Sc in second chain from hook, *sc in next, (ch 1, sk 1), hdc in next, (ch 1, sk 1), dc in next, (ch 1, sk 1), tr in next, (ch 1, sk 1), tr in next, (ch 1, sk 1), dc in next, (ch 1, sk 1), hdc in next, (ch 1, sk 1), sc in next, (ch 1, sk 1)*, repeat from * to * until 1 sc remains, omit last ch 1 from repeat and sc in last ch.
Row 2 – Turn, ch 1, sc in each ch-1 sp and each st across.
Row 3 – Turn, ch 1, sc in first st, sc blo until 1 st remains, sc in last st.
Row 4 – Turn, ch 4, sk first sc, tr in next sc, (ch 1, sk 1), dc in next sc, (ch 1, sk 1) hdc in next sc, (ch 1, sk 1), sc in next sc, (ch 1, sk 1), *sc in next sc, (ch 1, sk 1), hdc in next sc, (ch 1, sk 1), dc in next sc, (ch 1, sk 1), tr in next sc, (ch 1, sk 1), tr in next sc, (ch 1, sk 1), dc in next sc, (ch 1, sk 1), hdc in next sc, (ch 1, sk 1), sc in next sc, (ch 1, sk 1)*, repeat from * to * until 8 sts remain, sc in next sc, (ch 1, sk 1), hdc in next sc, (ch 1, sk 1), dc in next sc, (ch 1, sk 1), tr in each of last 2-sc sts.
Row 5 – Turn, ch 4, sk first tr, tr in next tr, (ch 1, sk 1), dc in next dc, (ch 1, sk 1) hdc in next hdc, (ch 1, sk 1), sc in next sc, (ch 1, sk 1), *sc in next sc, (ch 1, sk 1), hdc in next hdc, (ch 1, sk 1), dc in next dc, (ch 1, sk 1), tr in next tr, (ch 1, sk 1), tr in next tr, (ch 1, sk 1), dc in next dc, (ch 1, sk 1), hdc in next hdc, (ch 1, sk 1), sc in next sc, (ch 1, sk 1)*, repeat from * to * until 8 sts remain, sc in next sc, (ch 1, sk 1), hdc in next hdc, (ch 1, sk 1), dc in next dc, (ch 1, sk 1), tr in each of last 2-tr sts.
Row 6 – Turn, ch 1, sc in each ch-1 sp and each st across.
Row 7 – Turn, ch 1, sc in first st, sc blo until 1 st remains, sc in last st.
Row 8 – Turn, ch 1, sc 2, (ch 1, sk 1), hdc in next sc, (ch 1, sk 1), dc in next sc, (ch 1, sk 1), tr in next sc, (ch 1, sk 1), tr in next sc, (ch 1, sk 1), dc in next sc, (ch 1, sk 1), hdc in next sc, (ch 1, sk 1), *sc in next sc, (ch 1, sk 1), sc in next sc, (ch 1, sk 1), hdc in next sc, (ch 1, sk 1), dc in next sc, (ch 1, sk 1), tr in next sc, (ch 1, sk 1), tr in next sc, (ch 1, sk 1), dc in next sc, (ch 1, sk 1), hdc in next sc, (ch 1, sk 1)*, repeat from * to * until 2 sts remain, sc in each of last 2 sts.
Row 9 – Turn, ch 1, sc 2, (ch 1, sk 1), hdc in next hdc, (ch 1, sk 1), dc in next dc, (ch 1, sk 1), tr in next tr, (ch 1, sk 1), tr in next tr, (ch 1, sk 1), dc in next dc, (ch 1, sk 1), hdc in next hdc, (ch 1, sk 1), *sc in next sc, (ch 1, sk 1), sc in next sc, (ch 1, sk 1), hdc in next hdc, (ch 1, sk 1), dc in next dc, (ch 1, sk 1), tr in next tr, (ch 1, sk 1), tr in next tr, (ch 1, sk 1), dc in next dc, (ch 1, sk 1), hdc in next hdc, (ch 1, sk 1)*, repeat from * to * until 2 sts remain, sc in each of last 2 sts.
Rows 10 to 34 (38, 44, 48, 54) – Repeat Rows 2 to 9, ending on a Row 4 (8, 4, 8, 4) Repeat, finish off.
How to Assemble your Crochet Tee
- Pre-block your panels before seaming, this stitch will open up quite a bit and if you do not steam you may have some pinching in your seams.
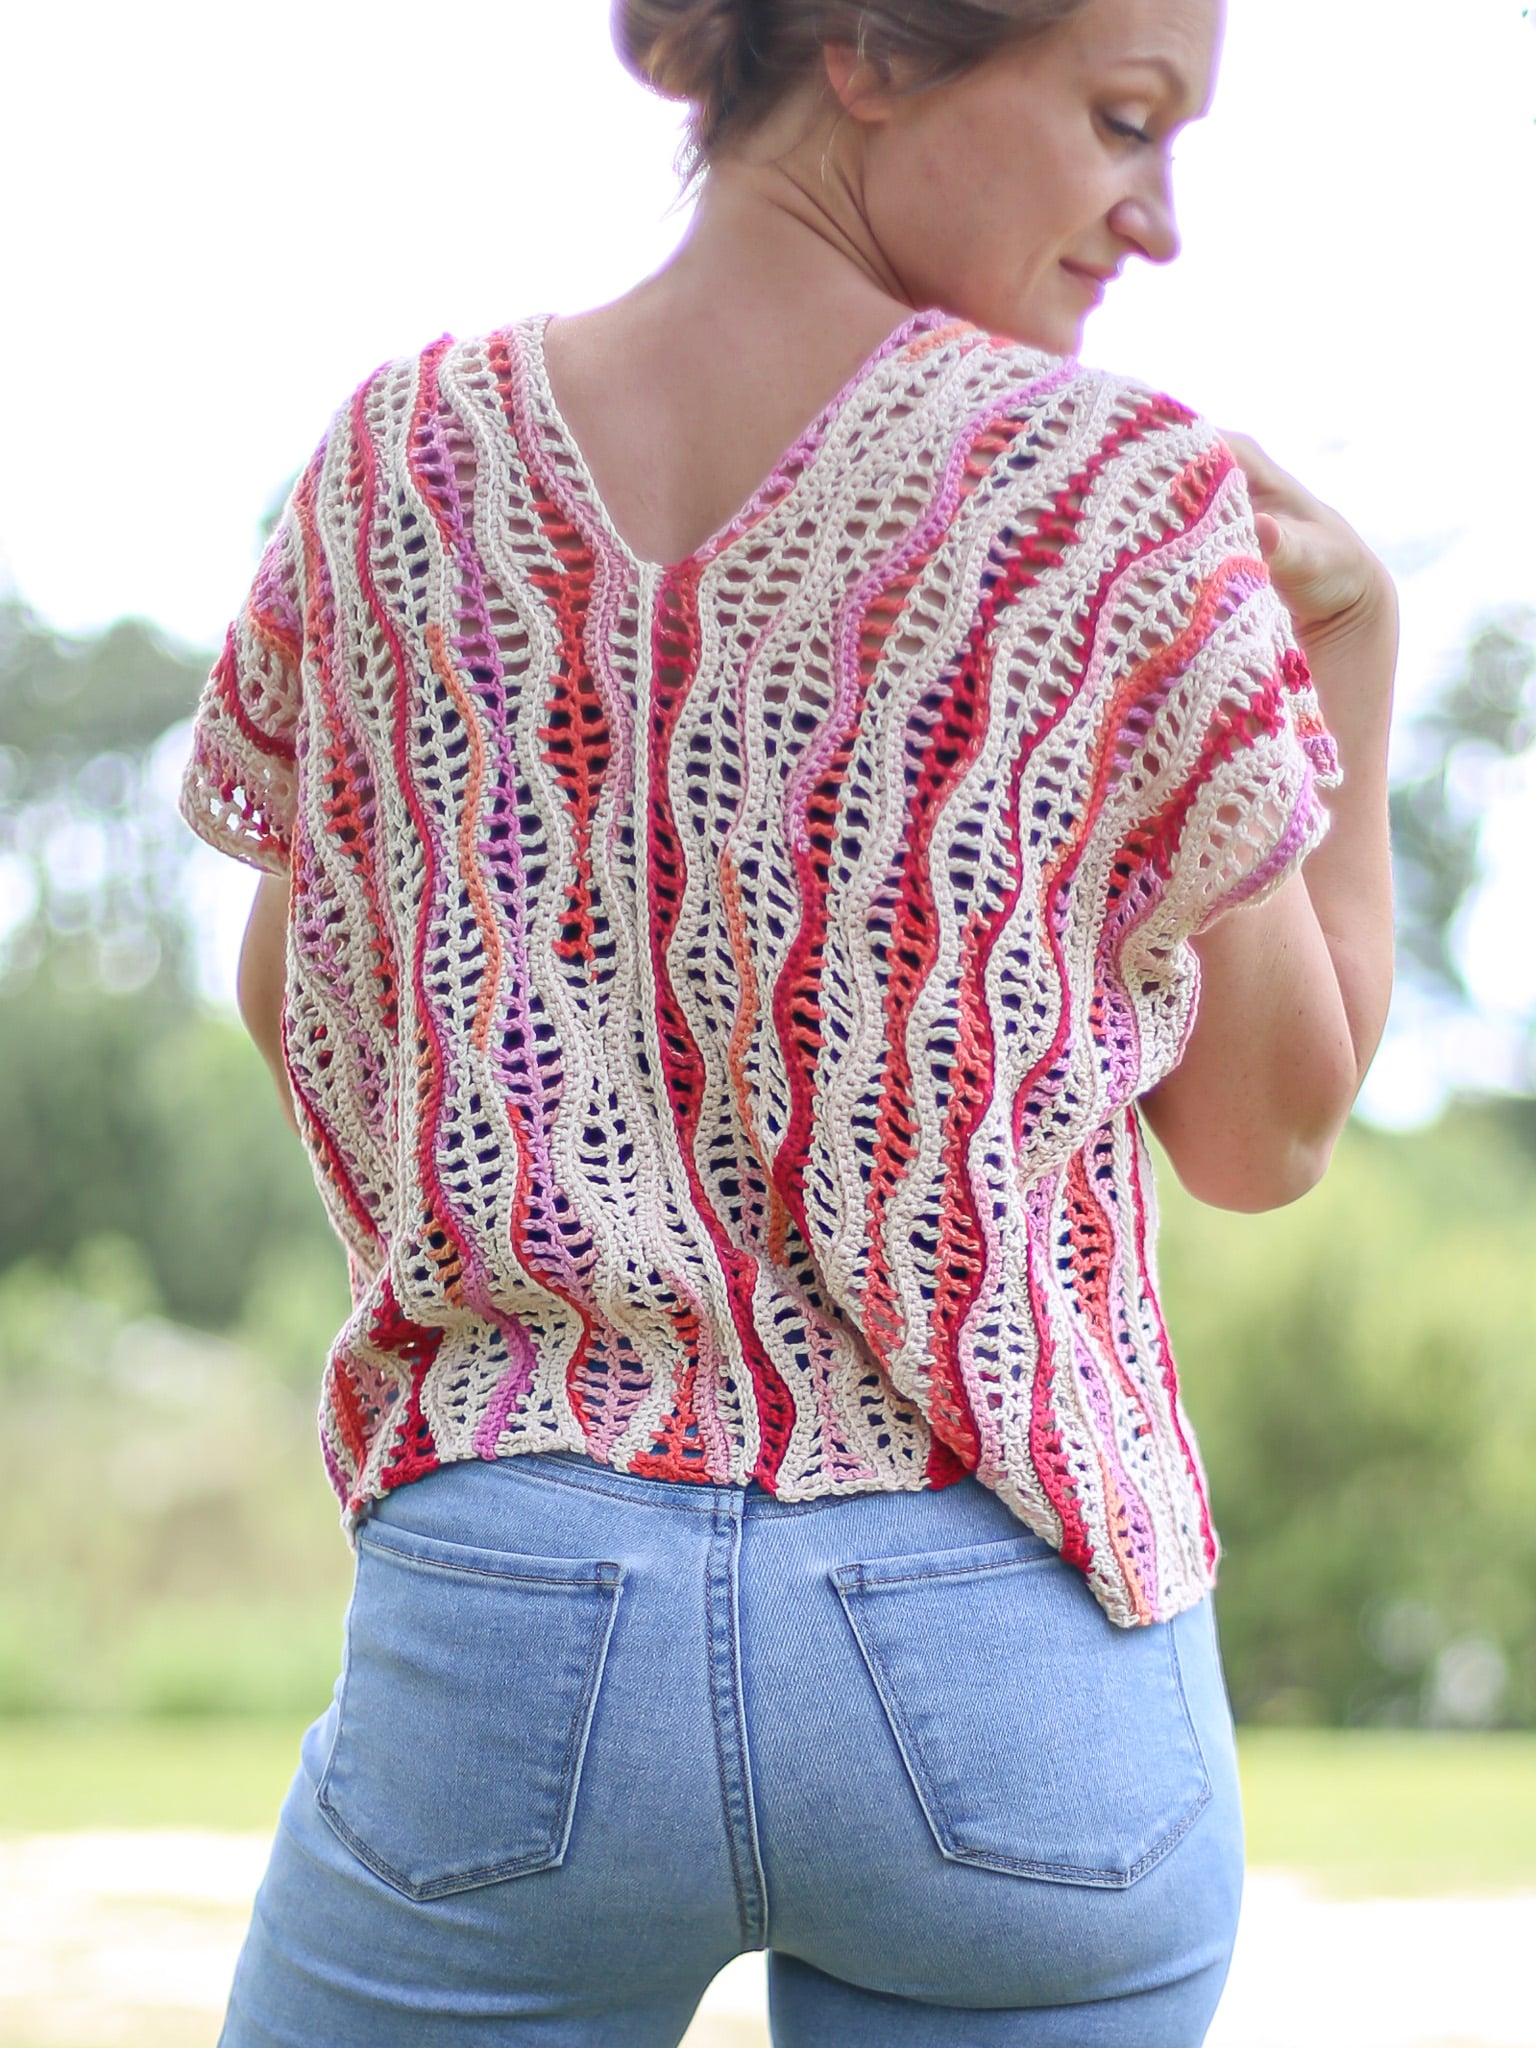
- Lay your panels flat with right sides facing so that your final rows are touching in the center to complete the open wave stitch pattern. If you are using self-striping yarn this will make the color pattern mirrored.
- Using the seam of your choice (I used a decorative flap zipper) seam from one end in 80 sts for the back, leave a long tail so you can adjust the neck opening.
- Repeat Step 3 on the other side, seaming up 58 sts for the front, this will leave an opening to complete the neck.
- Fold the panels in half and seam Row 1 together from the first and last stitch 64 sts to create an arm opening. Leave a long tail so you can adjust the arm opening.
- Repeat Step 5 on the other side to create the second arm opening.
- Weave in all ends and enjoy!
If you loved this top I have more perfect crochet garments for summer in my Shirts + Tops Category.


