Crochet a Lacy Lightweight Spring Cardigan Easy Free Pattern
Free Crochet Cocoon Pattern!!!
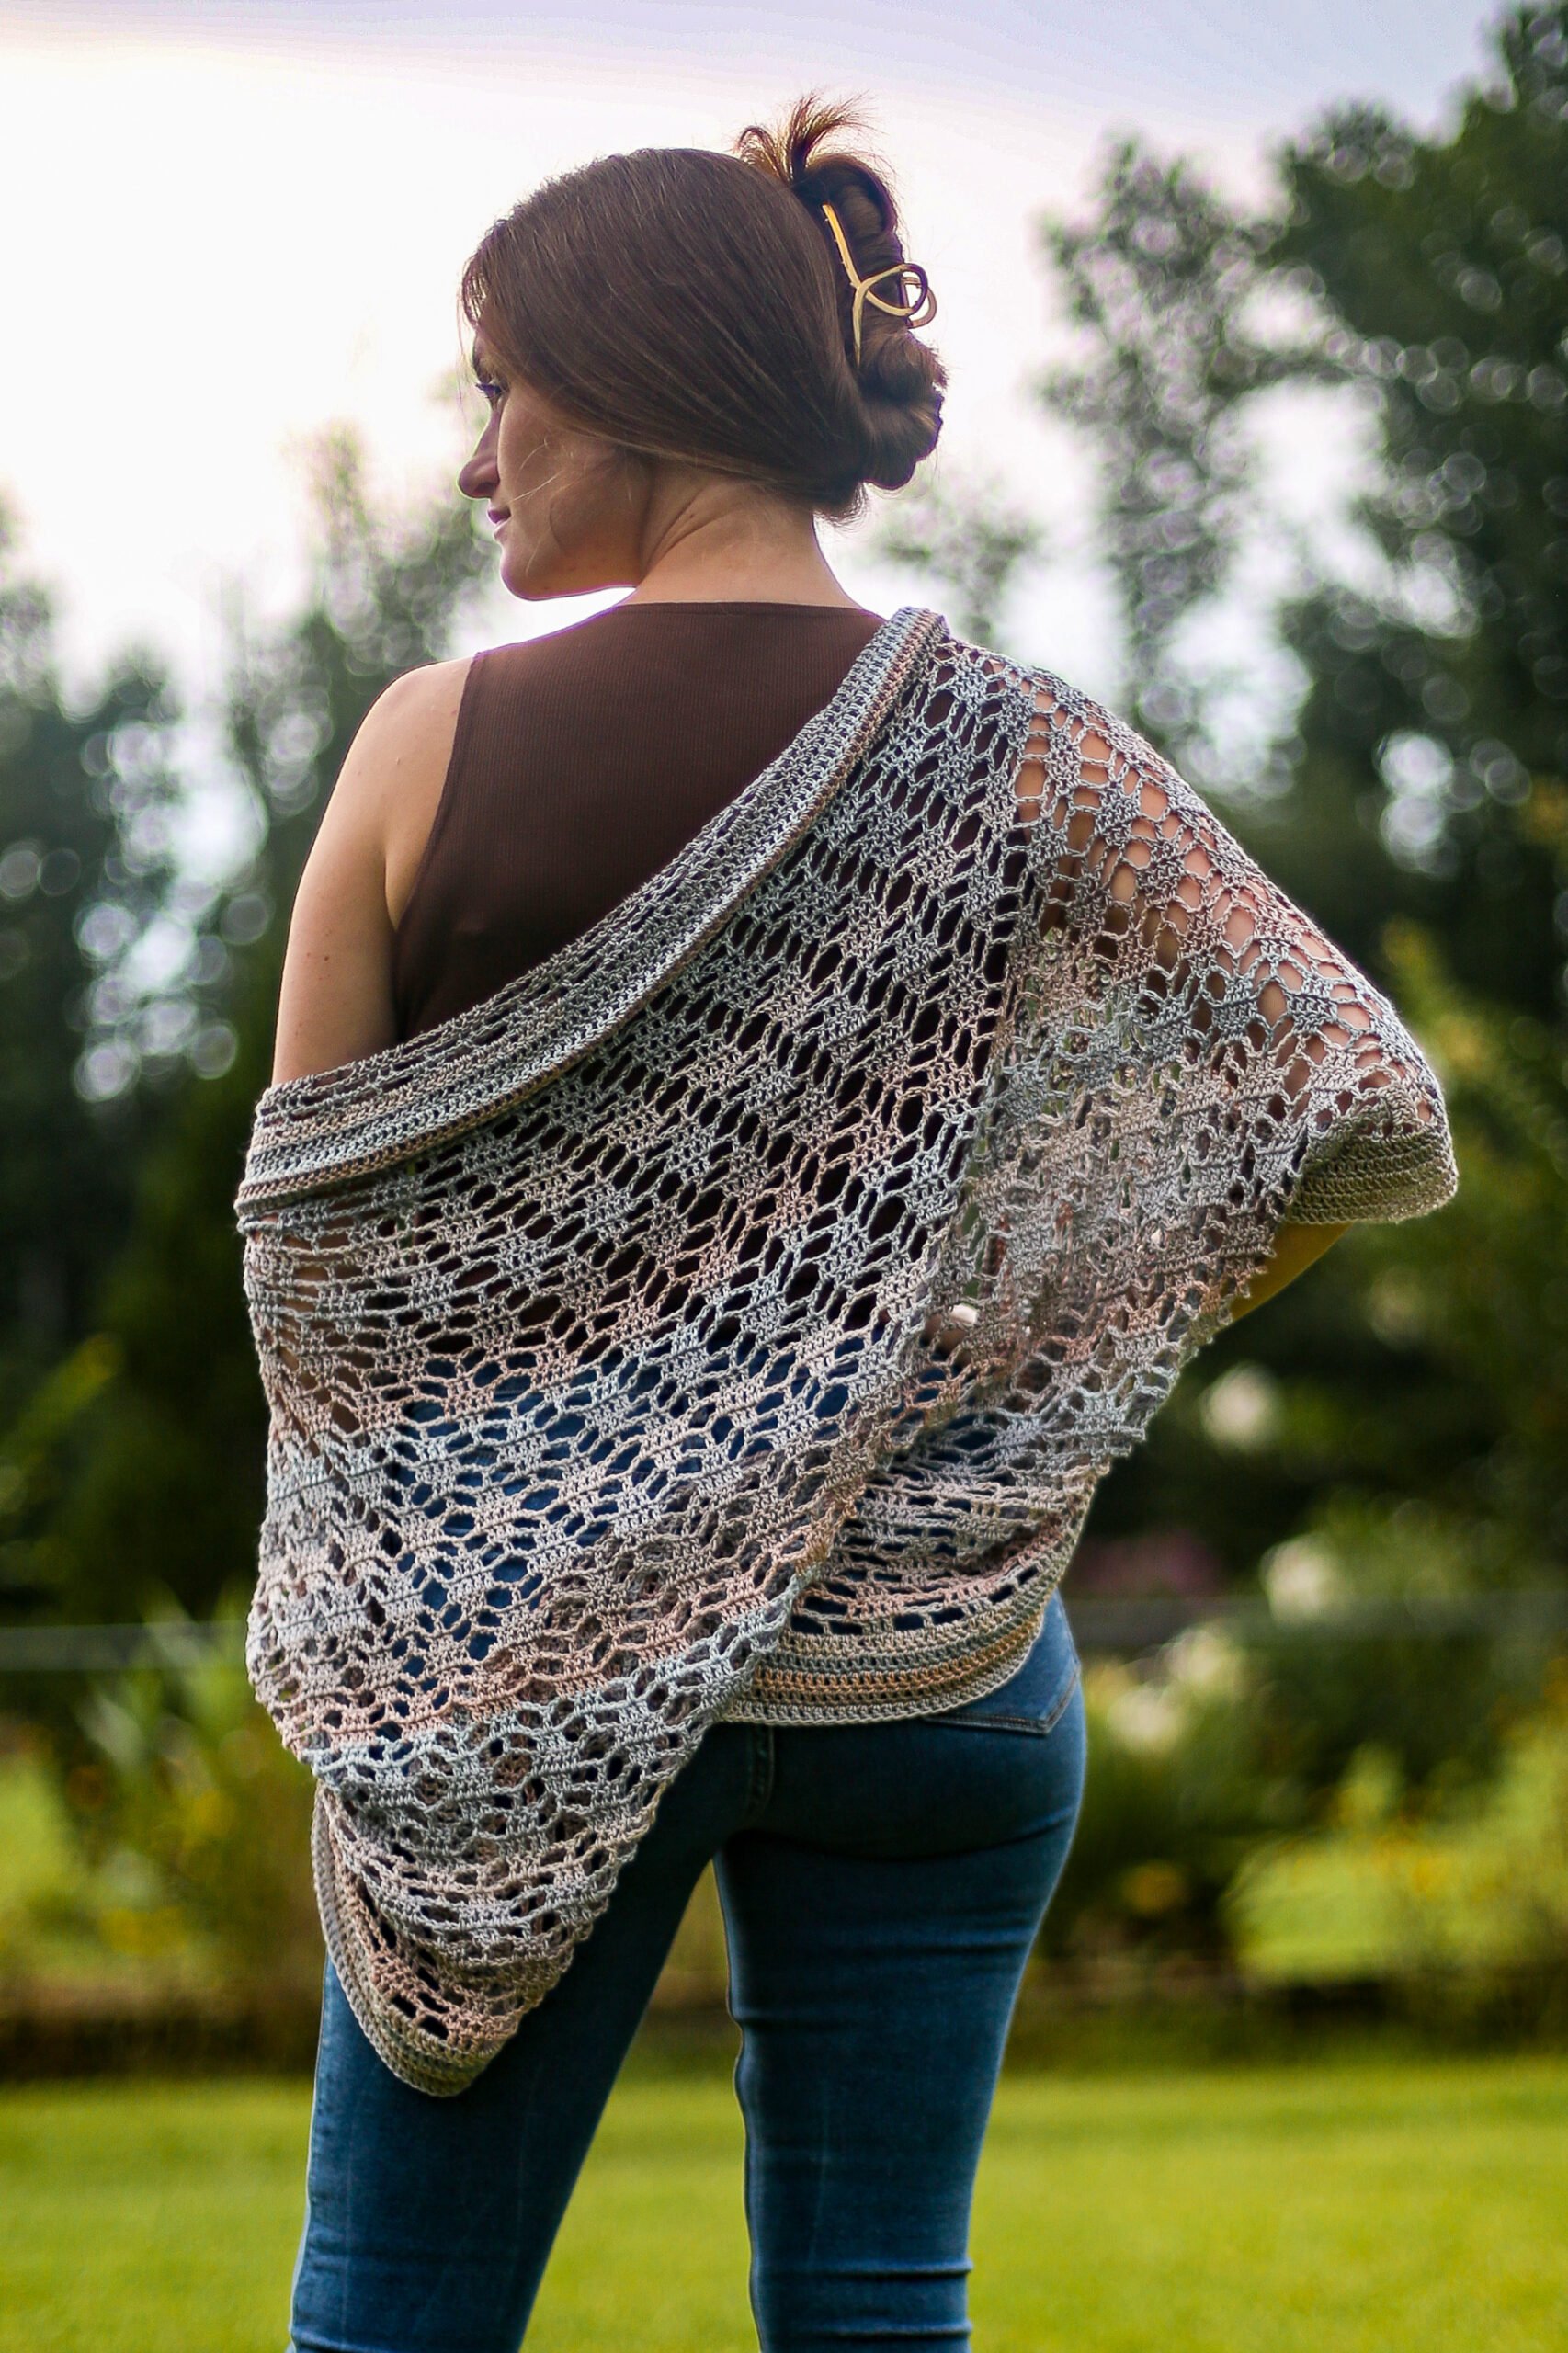
Start making this Lacy Crochet Cardigan Pattern that uses simple construction to create the perfect fit! This cocoon style cardigan has short sleeves and a loose, oversized fit.
Definitely a great beginner crochet cardigan pattern made in CYC 2 sport weight yarn. Designed in the size options of Petit, Standard and Plus, this Lacy Summer Cardigan is perfect for warm weather when using the recommended cotton yarn.

Sadly, the yarn I originally designed this summer crochet cardigan with has been discontinued, so I am substituting with Premier Cotton Fair which is a perfect choice for spring and summer crochet patterns.
This unique crochet pattern is designed by creating one rectangle using a lace stitch, creative folding and minimal seaming. Keep an eye out for a step by step video tutorial on my YouTube channel.
Can a Beginner Crochet a Cardigan?
If you are at a beginner skill level you can definitely make a cardigan with this free crochet pattern. This beautiful cardigan is made using simple construction and mostly double crochet stitches and chain stitches.
There is an easy to follow stitch diagram to guide you in your stitch placement as you make your first garment for your summer wardrobe! Happy crocheting!
Materials
- 5.00 mm Crochet Hook
- Scissors
- 800 (1,000, 1,200) Yards #2 Sport Weight
- Sample Made with PREMIER COTTON FAIR 3 (4, 4) Balls in Cream
- Yarn Needle
Gauge
8 Rows X 16 sts in dc is 4” x 4”
Stitches, Descriptions and Abbreviations
- Chain Stitch – ch
- Slip Stitch – sl st
- Double Crochet – dc
- Skip – sk
- Stitch(es) – st(s)
Sizing & Notes
- Main Panel – 35” (37.5”, 40”) wide x 28” (28”, 31”) long.
- * Designates a repeat.
- Turning Chains DO count as stitches in this pattern.
- Pattern is written for Petite, Average, and Plus Size with adjustments in parentheses: Petite (Average, Plus), use corresponding number for your size. Petite fits sizes XS-M, Average fits sizes M-L and Plus fits sizes L- 2X. Choose your size bracket based on desired fit.

Come find me on…
- Like my Facebook Page
- Join my Facebook group!
- Get PDFs on Etsy
- Get PDFs on Ravelry
- Sign Up for the Life and Yarn Newsletter
Body
Row 1
Ch 156 (176, 196) dc in tenth chain from hook, dc in next 2 chs, ch 3, skip 3 chs, dc in next ch, ch 3, skip 3 chs *dc in next 3 chs, ch 3, skip 3 chs, dc in next ch, ch 3, skip 3 chs. Repeat from * across, ending on 1 dc.
Row 2
Ch 5 (counts as 1 dc, ch 2), dc in next ch-3, dc in next 3 dc sts, dc in next ch, *ch 5, dc in next ch-3, dc in next 3 dc sts, dc in next ch. Repeat from * across ending with 1 dc in turning chain.
Row 3
Ch 6 (counts as dc, ch 3), skip next dc, dc in next 3 dc, skip next dc, ch 3, *dc in ch-5, ch 3, skip next dc, dc in next 3 dc sts, skip next dc, ch 3. Repeat from * across ending with 1 dc in turning ch-5.
Row 4
Ch 3 (counts as dc), dc in ch-3, ch 3, skip next dc, dc in next dc, skip next dc, ch 3, dc in next ch-3, *dc in next dc, dc in next ch-3, ch 3, skip next dc, dc in next dc, skip next dc, ch 3, dc in next ch-3. Repeat from * across, ending with a dc in turning ch-3.
Row 5
Ch 3 (counts as dc), dc in next dc, dc in next ch-3, ch 5, *dc in next ch-3, dc in next 3-dc sts, dc in next ch-3, ch 5. Repeat from * across placing last 3 dc sts in ch-3, dc, and turning ch-3.
Row 6
Ch 3 (counts as dc), dc in next dc, ch3, skip next dc, dc in ch-5, ch 3, skip next dc, *dc in next 3-dc, ch 3, skip next dc, dc in ch-5, ch 3, skip next dc. Repeat from * across placing last 2 sts in last dc and turning ch-3.
Row 7
Ch 6 (counts as dc, ch 3), *dc in ch-3, dc in next dc, dc in ch-3, ch 3, skip next dc, dc in next dc, skip next dc, ch 3. Repeat from * placing last dc in turning ch-3.
Rows 8 – 51 (51, 57)
Repeat Rows 2 – 7 ending on a repeat of Row 6.

Assembly
Lay your panel flat and fold your corresponding corners in to Point A and B.

Reattach your yarn at Point A and with a mattress stitch, seam in to Point C for 17 rows. Finish off and repeat from Point B to Point D.

Collar Trim
Reattach your yarn at Point A, ch 2 (does NOT count as a stitch for trim) and dc evenly around, 312 (352, 392) sts. *sl st to ch-2, ch 2, dc in each stitch. Repeat from * for 3 more rounds. (5 total rounds)
Sleeve Trim
Reattach your yarn at Point C, ch 2 (does NOT count as a stitch for trim) and dc evenly around, 51 (51, 69) sts. *sl st to ch-2, ch 2, dc in each stitch. Repeat from * for 1 more time. (3 total rounds)
Make More Spring Crochet Patterns


I really love this! Beautiful pattern, Brianna. ???
Thank you!!!!
I love this pattern. I used Shawl in a Ball from Lion Brand and it is gorgeous. I am trying to finish it. I stitched from A to C and B to D and did the border from A to A 4 rounds. I can’t figure out how to do the sleeves, there is nothing to go around at C and there is no arm hole. Help.
When you seam A-C and B-D you aren’t going all the way to the end. You should have an opening for the arm cuff…do you go all the way to the end by chance?
Oops. I was really tired when I did that, When I woke up this morning I instantly knew what I did wrong.
Hahahaha it happens to the best of us!
Does this start with a foundation chain first? I am new to crochet since this virus thing came out.
Nope! It started with a just a chain ?
I really want to make this in this gorgeous fingering weight yarn I have, do you have any suggestions on sizing that?
You should be able to need gauge with fingering on this project! Try a swatch first! ?