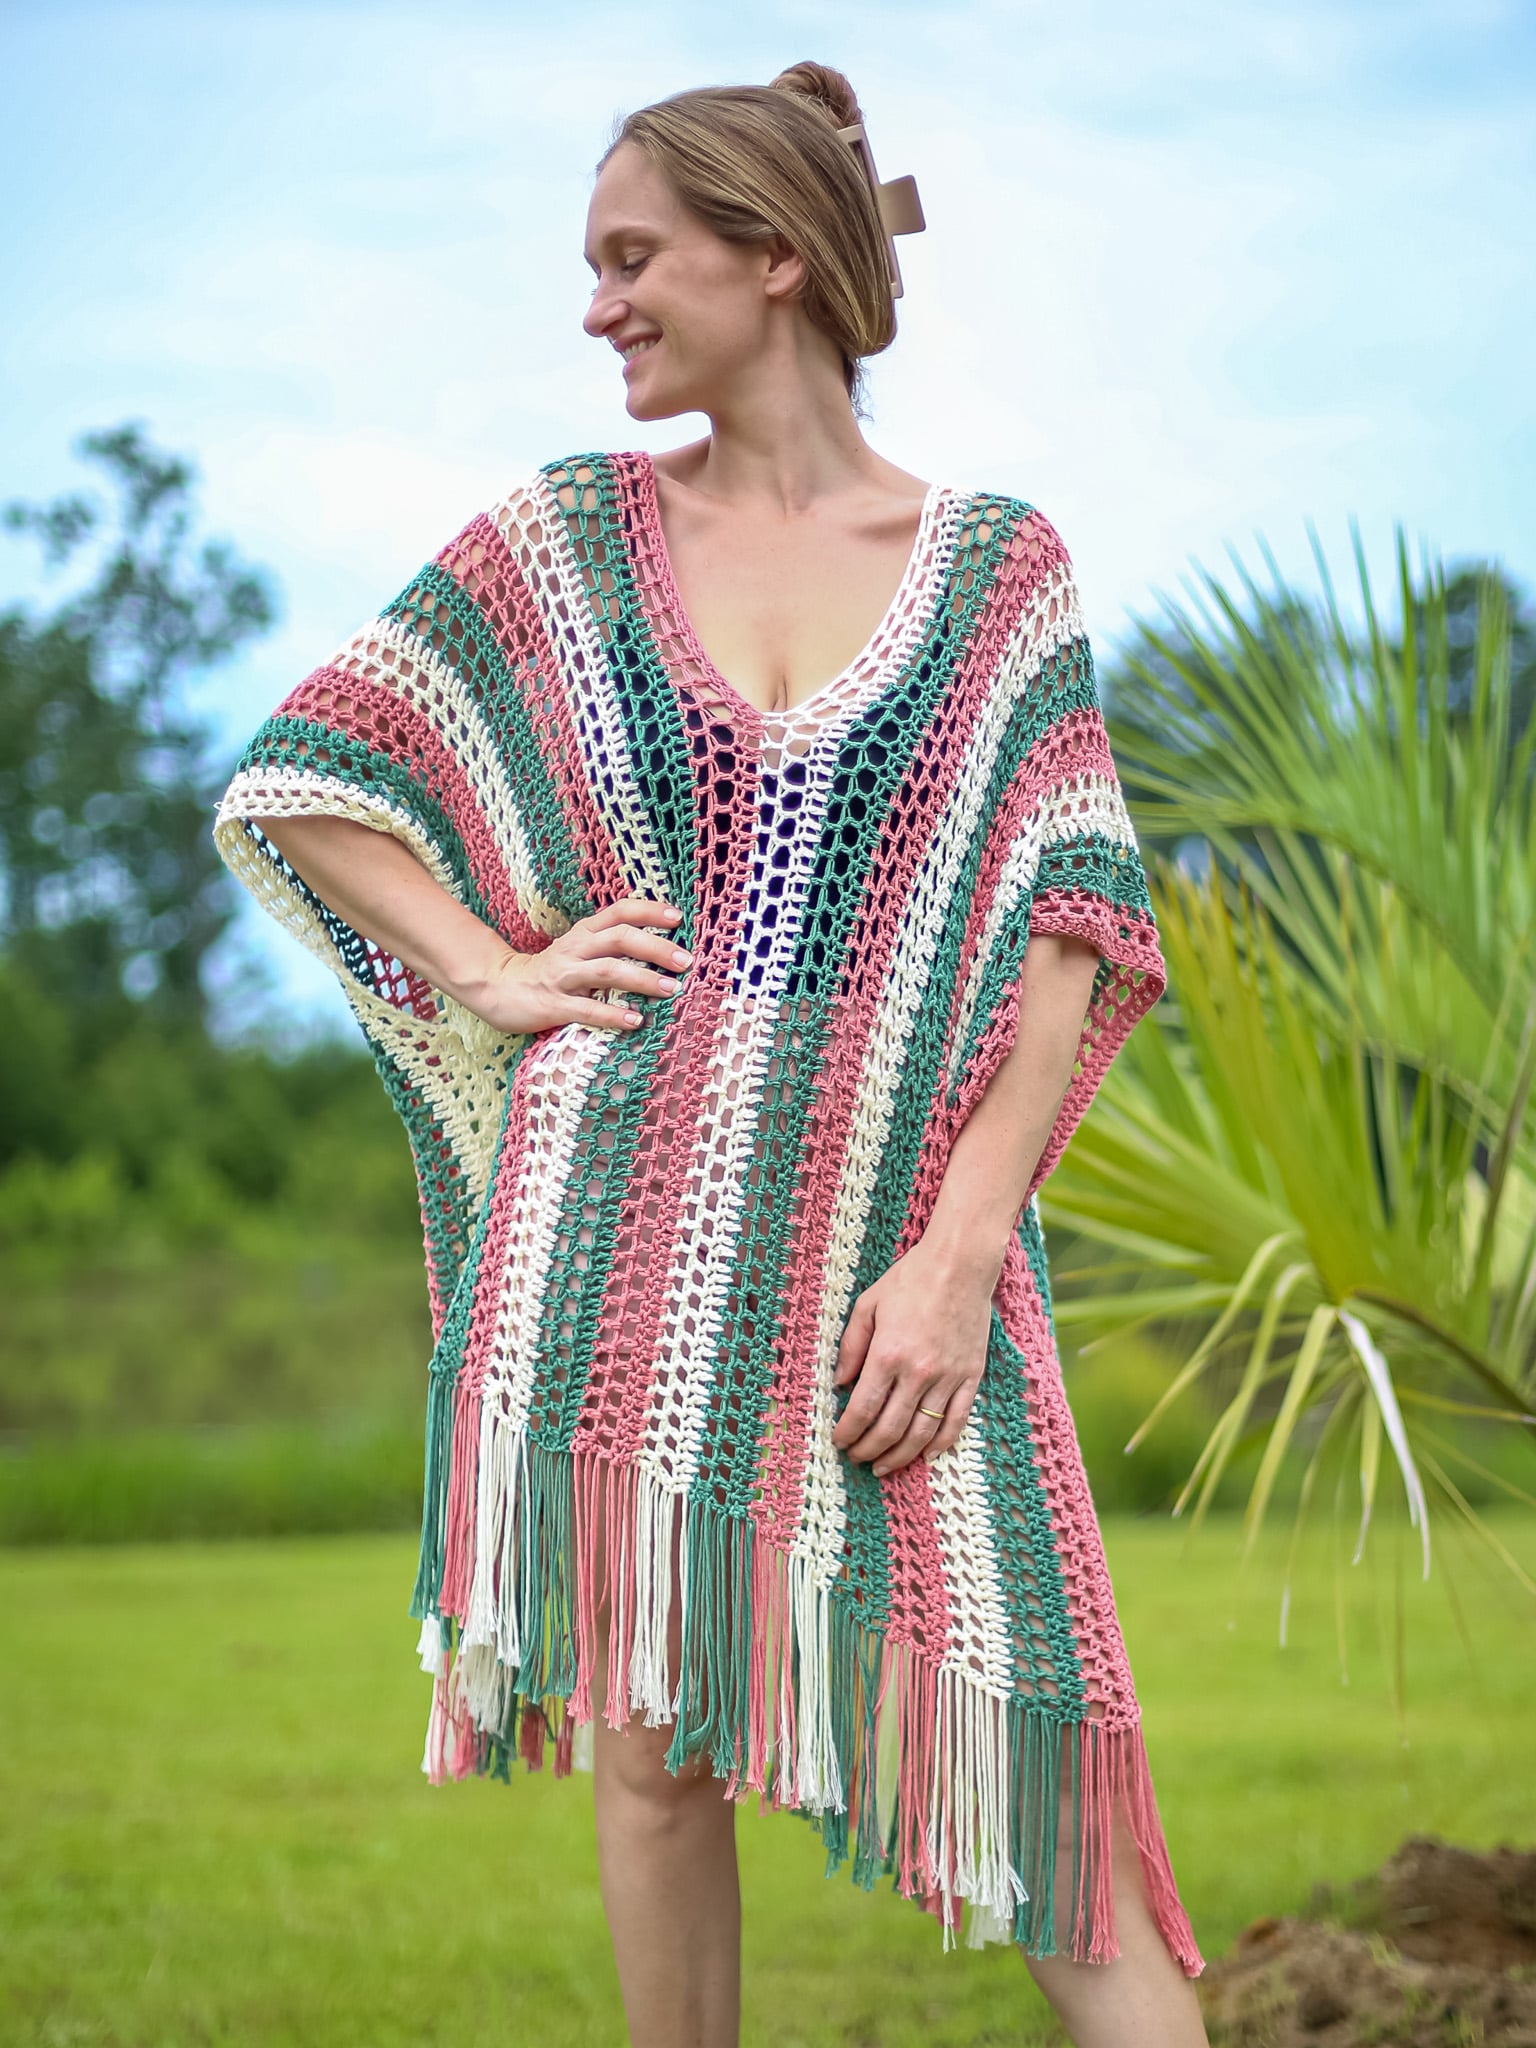
Crochet A Beach Cover Up
If you want to Crochet a Beach Cover Up that can double as a Crochet Summer Cardigan then this Cotton DK Weight Crochet Project is perfect! Crochet isn’t just for the chilly months, crochet is great for spring and summer too! Make this classy beach cover up with a solid yoke to protect your shoulders from the summer sun. The body and collar are made using a beautiful lacy shell stitch to help keep you cool but gives the right amount of modest coverage.
Get a PDF on Etsy or Ravelry!
Best Bang for your Buck, get a Kit From Lion Brand includes PDF and Yarn!

How to Crochet a Lace Shell Stitch?
A lace crochet shell stitch is an advanced beginner technique but simple after a few row repeats. The stitches themselves are simple, it’s the placement of the crochet stitches that you must pay attention to. The addition of chain sections to the shell stitch base creates this wonderful crochet lace used on this Free Pattern for a Crochet Beach Cover Up that can also be work as a Short Sleeve Cardigan!
How to Choose the Best Yarn for Summer Crochet Projects.
For summer projects cotton is the best and quickly followed by linen and bamboo! Cotton is the best choice because it is more readily available, although bamboo and linen options are growing without breaking the bank! These yarns are great because they are sustainable and feel wonderful on your skin! For this Crochet Beach Cover Up I used Lion Brand’s 24/7 Cotton DK, a newer yarn that comes in a handful of beautiful colors!

Come find me on…
- Like my Facebook Page
- Join my Facebook group!
- Get PDFs on Etsy
- Get PDFs on Ravelry
- Sign Up for the Life and Yarn Newsletter
Materials
- Size 4.00mm crochet hook
- #3 DK Wt. Yarn
10.3 (14, 18, 22.5) oz
805 (1092, 1405, 1750) yards total - Sample Made Using:
Lion Brand 24/7 Cotton DK Yarn
3 (4, 6, 7) Skeins – Cameo [769-101AO]
Gauge
- 20 sts x 22 rows in sc is 4 by 4”
Stitch Descriptions and Abbreviations
- Chain Stitch – ch
- Stitch(es) – st(s)
- Space(s) – sp(s)
- Slip Stitch – sl st(s)
- Single Crochet – sc
- Double Crochet – dc
- Foundation Single Crochet – Fsc –Chain 2, insert hook into 2nd chain from hook, yarn over and pull up a loop (2 loops on hook), yarn over, draw through 1 loop, (2 loops on hook with 1 ch created), yarn over, draw through all loops (1 loop on hook, 1 foundation single crochet with chain at the bottom). *Insert hook to the bottom of the stitch you just made, it will look like the top or “V” of a stitch, yarn over, pull up 1 loop (2 loops on hook), yarn over, draw through 1 loop (2 loops on hook with 1 ch created), yarn over, draw through all loops;* repeat from * to * for desired amount of stitches.
Pattern Notes
- Skill Level: Intermediate
- XS/S (M/L, XL/2XL, 3XL/4XL) – 34 (42, 50, 62)”
- Fits Bust Up To: 36 (44, 52, 64)”
- Circumference (actual measurement): 36 (44, 52, 64)” + 2 extra inches added by the collar.
- Length: 31 (32, 33, 34)”
- Arm Opening: 8 (10, 12, 14)”
- To Add Length in the Arm Openings: Continue the single crochet stitches on the Front and Back Panels using the final row count.
- To Add Length in the Body: Continue the Lace Shell Stitch section on the Front and Back Panels using the 3 Row Repeat.
- Construction Note: The single crochet section on the Front Panels is longer than the Back Panel to drop the neck opening for a more comfortable fit. When seaming, the final single crochet rows are to be lined up to be continuous.
- * Designates a repeat.
- “sc 1” means to single crochet in the next stitch.
- “sc 2” means to single crochet in each of the next 2 stitches.
- “2 sc” means to single crochet twice in the next stitch to create an increase.

Summer Beach Cover Up
Back Panel
Row 1 – Fsc 84 (108, 132, 156) sts.
Row 2 – Turn, sc across.
Row 3 to 40 (50, 60, 70)– Turn, sc across.
Next Row – Ch 5, sk 1, sc in next st, *ch 2, sk 3, 5 dc in next sc, ch 2, sk 3, sc in next sc, ch 5, sk 3, sc in next sc, repeat from * until 10 sc sts remain, ch 2, sk 3, 5 dc in next sc, ch 2, sk 3, sc in next sc, ch 2, sk 1, dc in last sc, turn.
[7 (9, 11, 13) total 5 dc shells]
Continuing on the Back Panel with the Lace Shell Stitch.
Next Row – Ch 1, sc in first dc, sk first ch-2 sp, *ch 2, sk sc and ch-2 sp, (dc, ch 1) in each of next 4 dc, dc in next dc, ch 2, sk ch-2 sp, sc in next ch-5 loop, repeat from * to end with last sc in turning chain, turn.
[7 (9, 11, 13) total (dc, ch 1) shells]
Next Row – Ch 3, sk ch-2 sp, *(dc, ch 2) in each of next 4 dc, dc in next dc, sk next 2 ch-2 sps, repeat from * to last ch-2 sps, (dc, ch 2) in each of next 4 dc, dc in next dc, dc in last sc, turn.
[7 (9, 11, 13) total (dc, ch 2) shells]
Next Row – Ch 5, *sc in next ch-2 sp, ch 2, sk next ch-2 sp, 5 dc in next dc, ch 2, sk next ch-2 sp, sc in next ch-2 sp, ch 5, repeat from * until 1 st remains, sc in next ch-2 sp, ch 2, sk next ch-2 sp, 5 dc in next dc, ch 2, sk next ch-2 sp, sc in last ch-2 sp, ch 2, dc in turning chain, turn.
[7 (9, 11, 13) total 5 dc shells]
Next Row – Ch 1, sc in first dc, sk first ch-2 sp, *ch 2, sk sc and ch-2 sp, (dc, ch 1) in each of next 4 dc, dc in next dc, ch 2, sk ch-2 sp, sc in next ch-5 loop, repeat from * to end with last sc in turning chain, turn.
[7 (9, 11, 13) total (dc, ch 1) shells]
Next Row – Ch 3, sk ch-2 sp, *(dc, ch 2) in each of next 4 dc, dc in next dc, sk next 2 ch-2 sps, repeat from * to last ch-2 sps, (dc, ch 2) in each of next 4 dc, dc in next dc, dc in last sc, turn.
[7 (9, 11, 13) total (dc, ch 2) shells]
Next 39 Rows – Repeat last 3 Rows for a total of 15 Lace Shell sets, finish off.
Front Panels
Reattach your yarn at one end of your Back Panel in Row 1.
Row 1 – Sc 24 (36, 48, 60) sts across in the base of the Fsc.
Row 2 – Turn, sc across.
Rows 3 to 30 (38, 46, 54) – Turn, sc across.
Row 31 (39, 47, 55) – Turn, sc across until 1 st remains, 2 sc in last st.
[25 (37, 49, 61) sts]
Row 32 (40, 48, 56) – Turn, sc across. [25 (37, 49, 61) sts]
Rows 33 (41, 49, 57) to 53 (61, 69, 77) – Repeat last 2 Rows with every other Row increasing by 1 st with the final Row Count ending with 36 (48, 60, 72) sts.
Next 12 (15, 18, 21) Rows – Turn, sc across. [36 (48, 60, 72) sts.]
Continuing on the Front Panel with the Lace Shell Stitch .
Next Row – Ch 5, sk 1, sc in next st, *ch 2, sk 3, 5 dc in next sc, ch 2, sk 3, sc in next sc, ch 5, sk 3, sc in next sc, repeat from * until 10 sc sts remain, ch 2, sk 3, 5 dc in next sc, ch 2, sk 3, sc in next sc, ch 2, sk 1, dc in last sc, turn.
[3 (4, 5, 6) total 5 dc shells]
Next Row – Ch 1, sc in first dc, sk first ch-2 sp, *ch 2, sk sc and ch-2 sp, (dc, ch 1) in each of next 4 dc, dc in next dc, ch 2, sk ch-2 sp, sc in next ch-5 loop, repeat from * to end with last sc in turning chain, turn.
[3 (4, 5, 6) total (dc, ch 1) shells]
Next Row – Ch 3, sk ch-2 sp, *(dc, ch 2) in each of next 4 dc, dc in next dc, sk next 2 ch-2 sps, repeat from * to last ch-2 sps, (dc, ch 2) in each of next 4 dc, dc in next dc, dc in last sc, turn.
[3 (4, 5, 6) total (dc, ch 2) shells]
Next Row – Ch 5, *sc in next ch-2 sp, ch 2, sk next ch-2 sp, 5 dc in next dc, ch 2, sk next ch-2 sp, sc in next ch-2 sp, ch 5, repeat from * until 1 st remains, sc in next ch-2 sp, ch 2, sk next ch-2 sp, 5 dc in next dc, ch 2, sk next ch-2 sp, sc in last ch-2 sp, ch 2, dc in turning chain, turn.
[3 (4, 5, 6) total 5 dc shells]
Next Row – Ch 1, sc in first dc, sk first ch-2 sp, *ch 2, sk sc and ch-2 sp, (dc, ch 1) in each of next 4 dc, dc in next dc, ch 2, sk ch-2 sp, sc in next ch-5 loop, repeat from * to end with last sc in turning chain, turn.
[3 (4, 5, 6) total (dc, ch 1) shells]
Next Row – Ch 3, sk ch-2 sp, *(dc, ch 2) in each of next 4 dc, dc in next dc, sk next 2 ch-2 sps, repeat from * to last ch-2 sps, (dc, ch 2) in each of next 4 dc, dc in next dc, dc in last sc, turn.
[3 (4, 5, 6) total (dc, ch 2) shells]
Next 39 Rows – Repeat last 3 Rows for a total of 15 Lace Shell sets, finish off.
Reattach your yarn at the opposite end that you just worked and repeat Front Panel Instructions.
Collar
Reattach your yarn on your Back Panel in Row 1. Use the last open stitch on either end where the neck opening was created by the completion of the Front Panels.
Row 1 – Ch 5, sk 1, sc in next st, *ch 2, sk 3, 5 dc in next sc, ch 2, sk 3, sc in next sc, ch 5, sk 3, sc in next sc, repeat from * until 10 sc sts remain, ch 2, sk 3, 5 dc in next sc, ch 2, sk 3, sc in next sc, ch 2, sk 1, dc in last sc, turn.
[3 total dc shells]
Row 2 – Ch 1, sc in first dc, sk first ch-2 sp, ch 2, sk sc and ch-2 sp, (dc, ch 1) in each of next 4 dc, dc in next dc, ch 2, sk ch-2 sp, sc in next ch-5 loop, turn.
[1 (dc, ch 1) shell]
Row 3 – Ch 3, sk ch-2 sp, (dc, ch 2) in each of next 4 dc, dc in sc, turn.
[1 (dc, ch 2) shell]
Row 4 – Ch 5, sc in next ch-2 sp, ch 2, sk next ch-2 sp, 5 dc in next dc, ch 2, sk next ch-2 sp, sc in next ch-2 sp, ch 2, dc in turning chain, turn.
[1 dc shell]
Row 5 – Ch 1, sc in first dc, sk first ch-2 sp, ch 2, sk sc and ch-2 sp, (dc, ch 1) in each of next 4 dc, dc in next dc, ch 2, sk ch-2 sp, sc in next ch-5 loop, turn.
[1 (dc, ch 1) shell]
Row 6 – Ch 3, sk ch-2 sp, (dc, ch 2) in each of next 4 dc, dc in sc, turn.
[1 (dc, ch 2) shell]
Rows 7 to 75 (81, 84, 90) – Repeat Rows 4 to 6, finish off.
Reattach your yarn on Row 1 using the first Ch-5 and continue from Row 2 above replacing “sc in first dc” as “sc in the first ch-5”.
Assembly
- Steam or block your panels really well to open up all the stitches, especially the Lace Shells.
- Starting from the bottom of your Beach Cover Up in the Lace Shells, begin by seaming the Front Panels to the Back Panels. Work your way up being VERY CAREFUL to align your rows, this is why steaming or blocking is so important.
- As you are working your way up be sure to check that you are aligning your Row Ends properly, your Lace Shells will ONLY seam to Lace Shells and your Single Crochet will only seam to sc on the Front and Back Panels.
- When you reach your Single Crochet, make sure to lay the Front and Back Panels on each other nicely. A portion of the Front Panel will be wrapped around to function as part of the Back Panel.
- Measure down 8 (10, 12, 14)” and place a stitch marker and seam to that point to create your Arm Opening. Remember, this is designed as a Drop Shoulder, if you would like you can increase or decrease the Arm Opening for a more custom fit by adjusting the seam.
- Finish off and weave in your end.
- Repeat Steps 1 to 6 on the other side seaming the Front Panel to the Back Panel.
- On the front of your Beach Cover Up, starting from the bottom, begin seaming your Front Panel to your Collar.
- Again, work your way up being VERY CAREFUL to align your Row Ends.
- You should have 15 sets of Lace Shells to match together on the Front Panel and Collar.
- Once you Reach your Single Crochet stitch on your Front Panel you will begin seaming the Lace Shells to the sc.
- Before you begin seaming the different stitches together, lay your beach cover up perfectly flat and run the Lace Shells evenly along the Single Crochet Row Ends. There will be shaping here that you need to match up with so that your Collar lays flat.
- If needed, place some stitch markers in your Collar and Front Panel to keep them aligned properly.
- Continue seaming your Front Panel to your Collar until you reach where they join the Back Panel.
- Finish off.
- Repeat Steps 8 to 15 on the other side seaming the Front Panel to the Collar.


Make Some More Summer Crochet Patterns
Just click on the photos below to make some of my other beginner friendly crochet patterns!