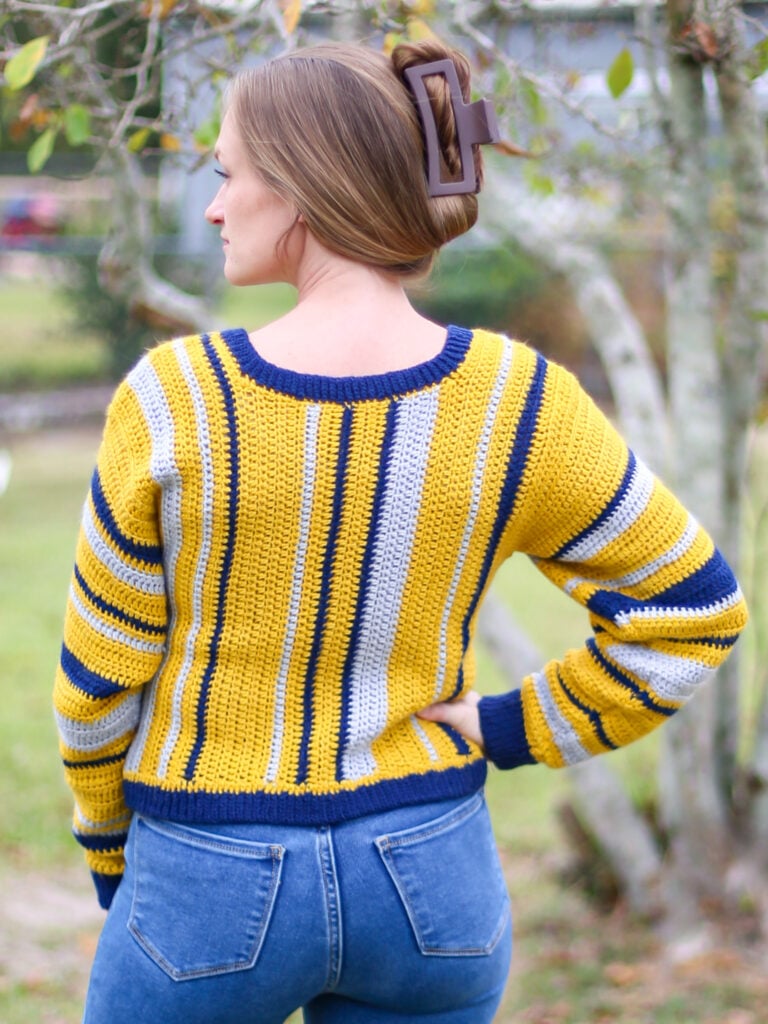
FREE Women’s Crochet Sweater Pattern with Stripes in DK Yarn
Do you love crochet patterns for sweaters? If you are looking for a women’s crochet sweater pattern that uses basic crochet stitches then you will love the Modern Varsity Sweater! This lovely sweater has a slightly oversized fit and is made from separate panels so that adjusting your size and fit are easy. Beginner Crocheters will love this cozy sweater with its simple stitch pattern to try as a first sweater!
Best Bang for your Buck, get a Kit From Lion Brand includes printable PDF and Yarn! Or get an ad-free PDF Version on Etsy or Ravelry!

About this Women’s Crochet Sweater Pattern
I love a Classic Varsity Sweater but this one has a modern twist! Vertical stripes are flattering and classic on this easy to customize modified drop shoulder pullover! Make your perfect striped sweater to stay cozy through the chilly season!
This dk weight pullover sweater is an Intermediate Skill Level that uses all basic stitches. The only stitch that may be new to you is the Foundation Half Double Crochet or the Extended Foundation Half Double Crochet, but I promise, they are easy to learn!
Made using half double crochet for all of the body and simple knit-look slip stitch ribbing makes this sweater a perfect addition to your collection of crochet clothes.
Half double crochet is my go-to stitch as it doesn’t have gaps like double crochet stitches but works up just a bit faster than single crochet stitches! It’s my happy medium stitch!
I made and designed this whole sweater in TWO weeks! You don’t need to use super bulky or bulky yarn to make a fast sweater, this one is quick!
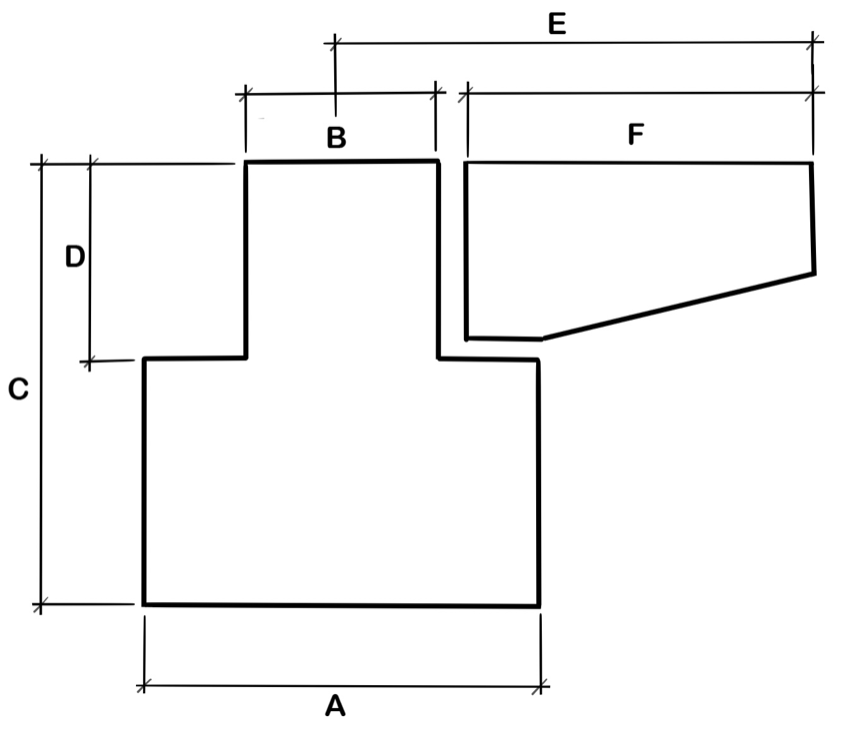
As I mentioned, this is a modified drop shoulder stylish sweater. What that means is while a classic drop shoulder is just simple rectangles, this one has a bit more shape to it.
When you look at the diagrams below you will see what I mean but essentially I have removed a portion of the body panels to make semi inset sleeves. This will bring the drop shoulder seam up to be more consistent through the sizes and reduce the bulk in the armpit area to give this sweater a more polished look.
There is plenty of information below on how to customize this sweater but be sure to have accurate body measurements when choosing your size and customizing it.
This sweater is designed with a crew neck yoke construction. So there are short rows on the front and back panel to drop the neckline.
It is important to note that the body panels are worked from side to side not top to bottom, be mindful of that when adjusting sizing and matching your gauge.
By using 3 colors to create this perfect pattern with stripes, the combination of yarn colors is endless without being too overwhelming!
Be sure to sign up for the Life + Yarn Newsletter if you want more sweaters like pullovers to cardigans and even tanks and short sleeve tops!. I also have turtleneck and V-neck designs filled with textured stitch patterns, color work and notes and suggestions for shaping details. Many teach techniques sing video tutorials and are perfect for a beginner or advanced crocheter!
Yarn Substitutes
Here are a few recommended yarns of you do not want to use Wool-Ease DK.
- 24/7 Cotton DK would make a great substitute for this crochet pattern to wear in warmer weather. However, from working with both your you will definitely need to adjust your hook to meet FINISHED gauge. A gauge swatch will very important is your switch to a cotton yarn for this pattern.
- Feels Like Alpaca
- Mandala would be a great sub and then skip the stripes!
- LB Superwash Merino
- Wool-Ease Recycled, technically a different yarn weight as it is classed as a worsted weight but I have used this yarn so much that I truly feel that it is closer to a dk. Again, check gauge but I think this one can work well for this pattern!
Come find me on…
- Like my Facebook Page
- Join my Facebook group!
- Subscribe to my YouTube Channel for Free Crochet Tutorials for my Free Patterns!
- Get PDFs on Etsy
- Get PDFs on Ravelry
- Sign Up for the Life and Yarn Newsletter for more free modern crochet patterns to find your next project!!
- Please Note: Some links may be affiliate links that are a great way to support the Life + Yarn Blog with a small commission at no added cost to you, thank you!
- Copyright 2025, Life and Yarn, Brianna Iaropoli. Pattern contents are NOT to be re-shared, DIRECT LINKS ONLY to this post for the pattern.
Materials
- Size 4.00 mm crochet hook
- (3, 3, 3) (3, 4, 4) (4, 5, 5) skeins Wool Ease DK in Goldenrod [636-158R] – Color A
- (1, 1, 1) (2, 2, 2) (2, 2, 2) skeins Wool Ease DK in Navy [636-110] – Color B
- (1, 1, 1) (1, 1, 2) (2, 2, 2) skeins Wool Ease DK in Quiet Grey [636-149AL] – Color C

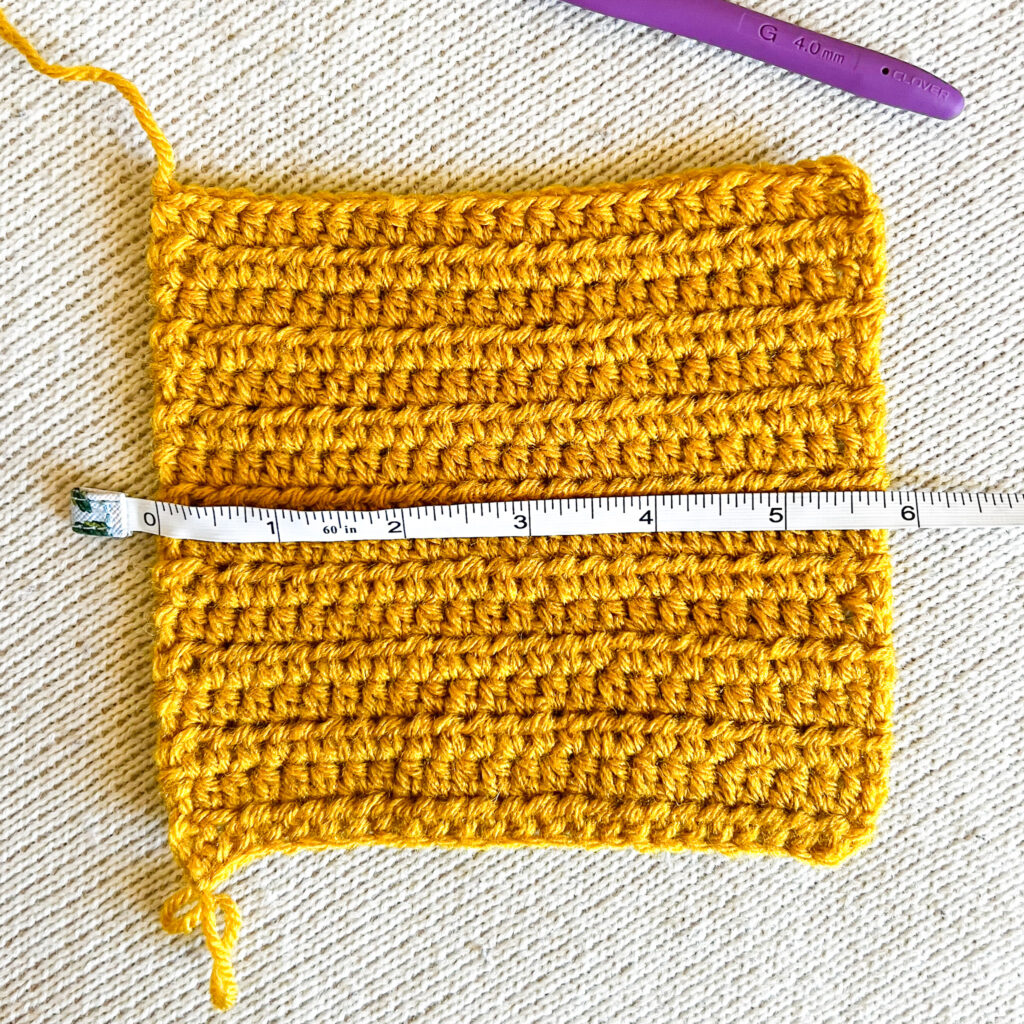
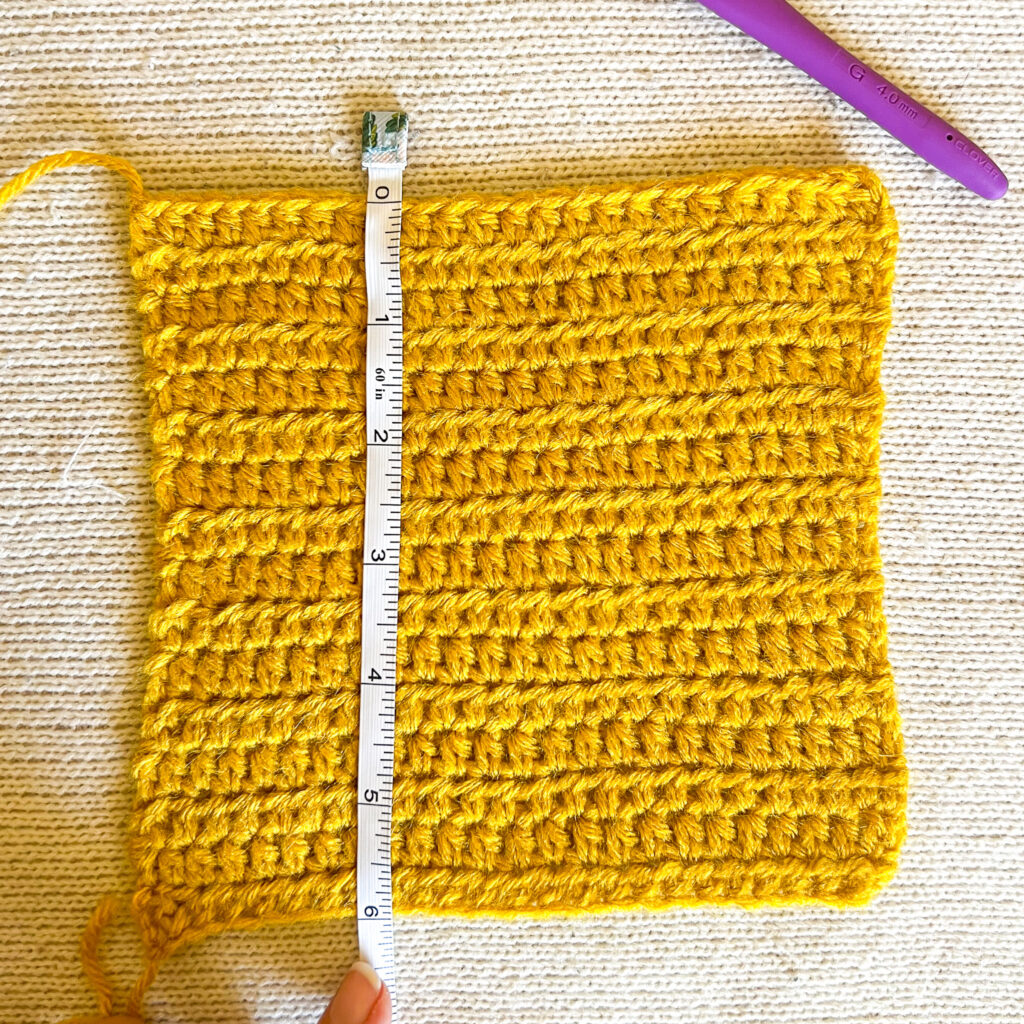
Gauge
- 24 sts by 16 rows is 6-1/4” by 6” in hdc.
- Read in depth gauge info below. Achieving correct gauge is EXTREMELY important for crochet garments to fit properly.
- Remember, if your finished gauge is too small you will need to make a new swatch and go up a hook size and if your finished gauge is too big you will need to make a new swatch a go down a hook size. Read more below.
Getting Proper Gauge
- If you are working with the recommended yarn, or a yarn of similar fiber content, then gauge for this pattern along side your preferred blocking method is EXTREMELY important.
- If you have not made crochet sweaters before DO NOT SKIP checking gauge. All cardigan, top and sweater designs need to be to to meet gauge in order to fit properly.
- Lion Brand’s Wool-Ease DK can block out significantly, as can any wool or wool blend.
- My PREBLOCKED gauge is 24 stitches by 16 rows is 5-3/4” by 5-1/4” in hdc using a 4.00 mm hook.
- My BLOCKED gauge is 24 stitches by 16 rows is 6-1/4” by 6” in hdc using a 4.00 mm hook.
- I used steam blocking to block my swatch, wet blocking may give you a larger gauge.
- In order for your sweater to be the proper size you must have a FINISHED Gauge that meets the BLOCKED Gauge.
- If using a different fiber, say cotton for example, you may need to change your hook and/or blocking method to reach the same Finished Gauge.
Pre Blocked Swatches

Blocked Swatches

Sizing
- (XS, S, M) (L, XL, 2XL) (3XL, 4XL, 5XL)
- Reference size chart below. Bust is max bust to give 2” positive ease.
- All other measurements are actual finished sweater measurements.
- Make sure you have accurate measurements for your body when choosing your size.

Tips For Sizing
- How to Adjust Bust: If you want to increase or reduce your bust you will need to add or subtract rows in the “First Under Arm Side Panel” section. You can also follow the instruction for one of the other bust sizes and then adjust your sleeve length accordingly. You must add or subtract rows by two’s so that you always have an odd number of rows. This is to ensure that your extensions and short rows are on the correct side of your work.
- How to Adjust Drop Shoulder Seam Location: To bring your drop shoulder seam down you will need to subtract rows from your “First Under Arm Side Panel” section and add rows to your “First Shoulder and Front Panel” section by 2 rows at a time. To bring your drop shoulder up you will add rows to your “First Under Arm Side Panel” section and subtract rows from your “First Shoulder and Front Panel” section by 2 rows at a time.
- How to Adjust the Length of the Body: If you like longer cardigans and sweaters here is how to do it on this crochet sweater pattern. The length of your body is dictated by the number of stitches in this pattern. To add length you will add stitches to the “First Under Arm Side Panel” section, then continue with the same ExFhdc in your “First Shoulder and Front Panel” section. However, the total number of stitches will increase depending on how many you added. Be sure to carry that increase through the rest and each of your Body Panels.
- How to Adjust the Neck Opening: To adjust the Neck Opening you will need to add or subtract rows from the “First Shoulder and Front Panel” and “Second Shoulder and Front Panel” again by two’s on EACH side so that your Short Rows and ExFhdc’s are on the correct side.
- A Note on Yardage: If you are changing any sizing your yardage per colors may be affected. If you become short in one color you will have extras in others. You may have to get creative with the Trim colors. For example, maybe your Cuffs will be in Color C instead of Color B.
Stitch Descriptions and Abbreviations
- Chain Stitch – ch
- Stitch(es) – st(s)
- Skip – sk
- Stitch Marker – SM
- Slip Stitch – sl st
- Back Loop Only – blo
- Single Crochet – sc
- Half Double Crochet – hdc
- Foundation Half Double Crochet – Fhdc – Chain 3, yarn over, insert hook into 3rd chain from hook, yarn over and pull up loop (3 loops on hook), yarn over, pull through 1 loop on hook (3 loops on hook), yarn over and pull through all loops, (1 foundation double crochet with chain at bottom) *Yarn over, insert hook to bottom of the stitch you just made. It will look like the top or “V” of a stitch. Yarn over and pull up loop (3 loops on hook), yarn over, pull through 1 loop (3 loops on hook), yarn over and pull through all loops.
- Extended Foundation Half Double Crochet – ExFhdc – Work a Fhdc as described above starting from * in the indicated stitch.
- Stacked Single Crochet STsc – STsc – insert your hook into the designated stitch, yarn over, pull up a loop, yarn over, pull through both loops, insert your hook into the second vertical bar on the stitch you just created, yarn over, pull up a loop, yarn over, pull though all loops.
Pattern Notes
- * Designates a repeat.
- “sc 1” means to single crochet in the next stitch.
- “sc 2” means to single crochet in each of the next 2 stitches.
- “2 sc” means to single crochet twice in the next stitch to create an increase.
- STsc counts as a stitch in this pattern.
- Gauge is extremely important, read more about how to get proper gauge below.
- The stripes are different on each sleeve, be sure to follow each separate set of striping instructions.
- This sweater uses a modified drop shoulder construction, meaning instead of 2 rectangles for body panels there is a small cutout for the sleeves to be set in. This helps to keep the drop shoulder seam in the same area on the arm for all sizes and reduce the bulk seen on traditional drop shoulder sweaters. See the Construction Diagrams below for clarity.
Modern Varsity Sweater Pattern
First Under Arm Side Panel
(Using only Color A)
Row 1 – Fhdc (35, 35, 33) (33, 31, 31) (29, 29, 27) sts.
Rows 2 to (3, 3, 5) (5, 7, 9) (9, 11, 13) – Turn, STsc in first st, hdc in each next st across.
First Shoulder and Front Panel
Continuing from “First Under Arm Side Panel” section:
Row 1 – Turn, STsc in first st, hdc in each next st across, ExFhdc (29, 31, 33) (35, 37, 39) (41, 43, 45) sts.
Rows 2 to (10, 10, 12) (14, 14, 14) (18, 18, 18) –
Turn, STsc in first st, hdc in each next st across. [(64, 66, 66) (68, 68, 70) (70, 72, 72) total sts]

Short Rows to Create Neck on Front Panel
Continuing from “First Shoulder and Front Panel” section:
Row 1 (Short Row) – Turn, STsc in first st, hdc in next (44, 46, 46) (48, 48, 50) (50, 52, 52) sts.
Rows 2 to (18, 20, 20) (20, 22, 22) (22, 22, 24) – Turn, STsc in first st, hdc in each next st across.
Second Shoulder and Front Panel
Continuing from “Short Rows to Create Neck on Front Panel” section:
Row 1 – Turn, STsc in first st, hdc in each next st across, ExFhdc 20 sts.
Rows 2 to (10, 10, 12) (14, 14, 14) (18, 18, 18) –
Turn, STsc in first st, hdc in each next st across. [(64, 66, 66) (68, 68, 70) (70, 72, 72) total sts]

Short Row to Create Second Under Arm Side Panel
Using only Color A and continuing from “Second Shoulder and Front Panel” section:
Row 1 (Short Row) – Turn, STsc in first st, hdc in next (34, 34, 32) (32, 30, 30) (28, 28, 26) sts.
Rows 2 to (3, 3, 5) (5, 7, 9) (9, 11, 13) –
Turn, STsc in first st, hdc in each next st across. [(35, 35, 33) (33, 31, 31) (29, 29, 27) total sts.] Finish off.
Back Panel Instructions
NOTE: All Color Changes are the same, reference previous charts for corresponding sections.
First: Follow “First Under Arm Side Panel” Instructions.
Next: Follow “First Shoulder and Front Panel” Instructions.
Next: Move to “Short Rows to Create Neck on Back Panel” Instructions below.
Short Rows to Create Neck on Back Panel
Row 1 – Turn, STsc in first st, hdc in next (54, 56, 56) (58, 58, 60) (60, 62, 62) sts.
Rows 2 to (18, 20, 20) (20, 22, 22) (22, 22, 24) – Turn, STsc in first st, hdc in each next st across.
Follow Color Changes in “Short Rows to Create Neck on Front Panel” Instructions.
Second Shoulder and Back Panel
Continuing from “Short Rows to Create Neck on Back Panel” section:
Row 1 – Turn, STsc in first st, hdc in each next st across, ExFhdc 10 sts.
Rows 2 to (10, 10, 12) (14, 14, 14) (18, 18, 18)
Turn, STsc in first st, hdc in each next st across. [(64, 66, 66) (68, 68, 70) (70, 72, 72) total sts]
Next: Follow “Short Row to Create Second Under Arm Side Panel” Instructions from Front Panel Ins.
Sleeves – Make Two
Follow Sleeve Color Changes in charts below.
Row 1 – Fhdc (35, 35, 35) (40, 40, 40) (45, 45, 45) sts.
Row 2 – Turn, STsc in first st, hdc again in first st for an increase, hdc in each next st across.
Rows 3 and on – Repeat Row 2 until you reach (57, 62, 66) (70, 74, 78) (82, 86, 90) total sts.
NOTE: Each Row will increase by 1 as you will be adding a stitch at the beginning of
Next Row – Turn, STsc in first st, hdc in each next st across. [(57, 62, 66) (70, 74, 78) (82, 86, 90) sts.]
Repeat Next Row until you reach a total of (52, 53, 55) (55, 53, 56) (52, 55, 55) rows to complete your sleeve. Finish off.
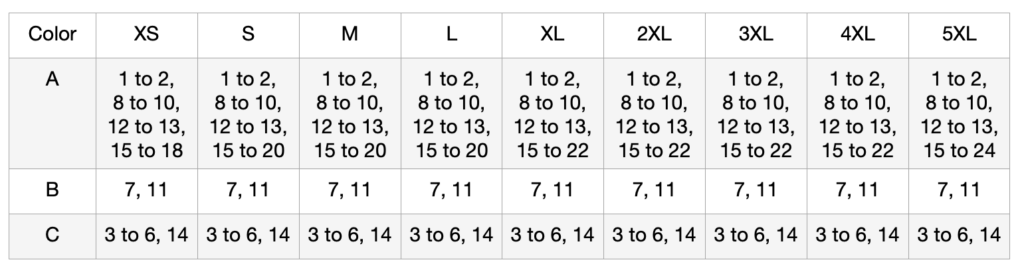
Color Changes – Sleeve A

Color Changes – Sleeve B
Assembly + Blocking Instructions
Step 1: Once you have all of your Body Panels and Sleeve Panels created you must block them in the method you used to obtain the correct FINISHED Gauge.
Step 2: Let your panels dry completely then weave in all of your ends. It is important to weave your ends in after blocking so that you do not create any points that can pinch or pucker.
Step 3: Once dry, seam your Front Panel to your Back Panel at the shoulders. I chose to use a mattress stitch, you may use your preferred seaming method.
Step 4: Next, seam your Sleeve Panels to your Arm Openings by seaming the final sleeve row to row ends of your arm hole opening created on your Body Panels.
Step 5: Next, fold your sweater in half so that the Front Panel lays on the Back Panel and your sleeves are now folded in half with the row ends aligned.
Step 6: Next, seam the Front Panel to the Back Panel from the waist up to the arm opening on both sides to form the Body of your sweater.
Step 7: Then continue your seam your along the row ends of your Sleeve Panels to the Wrist.
Step 8: Finally, lightly steam block your sweater to relax your seam and weave in all ends before moving onto Waist, Neck and Cuff Trims.

Waist Trim
First, place a round of Single Crochet around the Waist of your sweater in the row ends using Color A with the right side facing you. Do this as evenly as possible, slip stitch to join and finish off.
Reattach your yarn with Color B in any single crochet stitch and work trim with the right side facing.
Row 1 – Ch 8, turn and sl st in the second chain from the hook and each next chain back to the body of your sweater. [7 total sl sts]
Row 2 – Sl st in the next sc, turn, sk 1-sl st, sl st blo next 7 sts.
Row 3 – Turn, ch 1, sl st blo in next 7 sts.
Repeat Rows 2 and 3 until you reach the first Row of the Waist Trim, seam together with your darning needle and finish off.
NOTE: You can separate a few rows by 2 sl sts instead of 1 if you would like a tighter waist trim.
Cuff Trim
First, place a round of Single Crochet around the Wrist of your sweater using Color B with the right side facing you, slip stitch to join and move onto Row 1 Instructions.
Row 1 – Ch 11, turn and sl st in the second chain from the hook and each next chain back to the body of your sweater. [10 total sl sts]
Row 2 – Sl st in the next sc, turn, sk 1-sl st, sl st blo next 10 sts.
Row 3 – Turn, ch 1, sl st blo in next 10 sts.
Repeat Rows 2 and 3 until you reach the first Row of the Cuff Trim, seam together with your darning needle and finish off.
NOTE: You can separate a few rows by 2 sl sts instead of 1 if you would like a tighter waist trim.
Neck Trim
First, place a round of Single Crochet around the Neck of your sweater in the row ends and stitches using Color A with the right side facing you. In the corners place a hdc3tog to keep your neck shaped properly. Work as evenly as possible in the row ends, slip stitch to join and finish off.
Reattach your yarn with Color B in any single crochet stitch and work trim with the right side facing.
Row 1 – Ch 6, turn and sl st in the second chain from the hook and each next chain back to the body of your sweater. [5 total sl sts]
Row 2 – Sl st in the next sc, turn, sk 1-sl st, sl st blo next 5 sts.
Row 3 – Turn, ch 1, sl st blo in next 5 sts.
Repeat Rows 2 and 3 until you reach the first Row of the Neck Trim, seam together with your darning needle and finish off.
NOTE: You can separate a few rows by 2 sl sts instead of 1 if you would like a tighter waist trim. I made a did a few separated by 2 sl sts near each of the corners.
Again, weave in all ends and if you would like give another light steam blocking or pop on your brand new, perfectly stripe sweater and enjoy a warm cup of tea!
Want more sweaters? Check out my collection of free crochet sweater patterns! Prefer Cardigans? Look at these!


