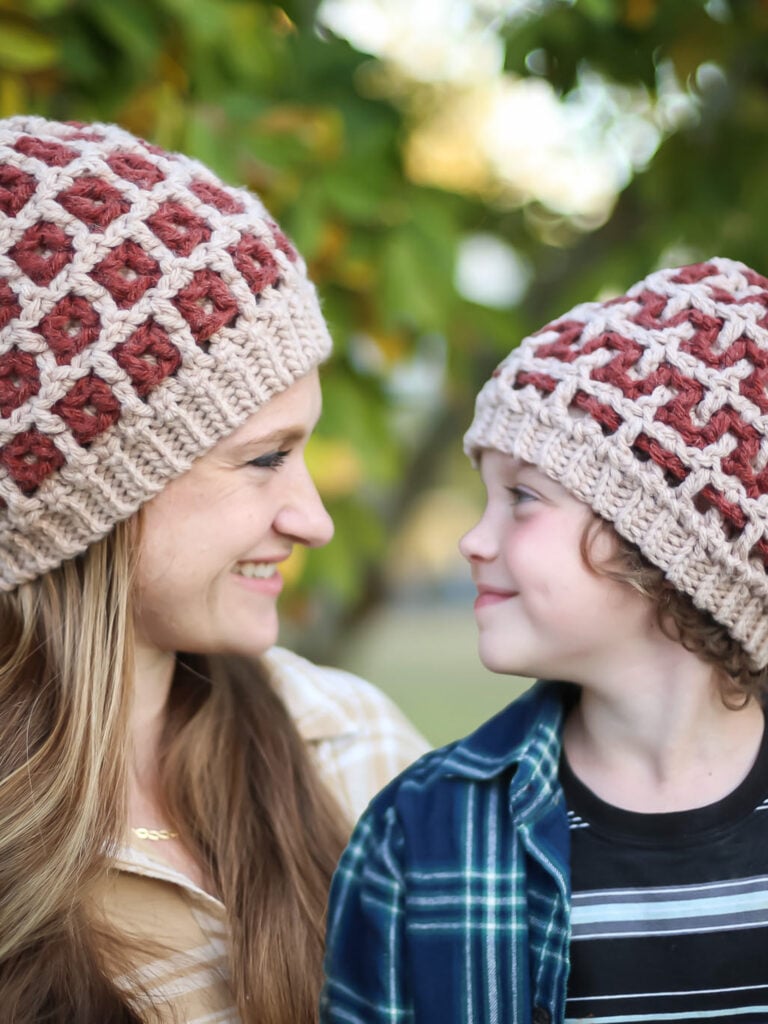
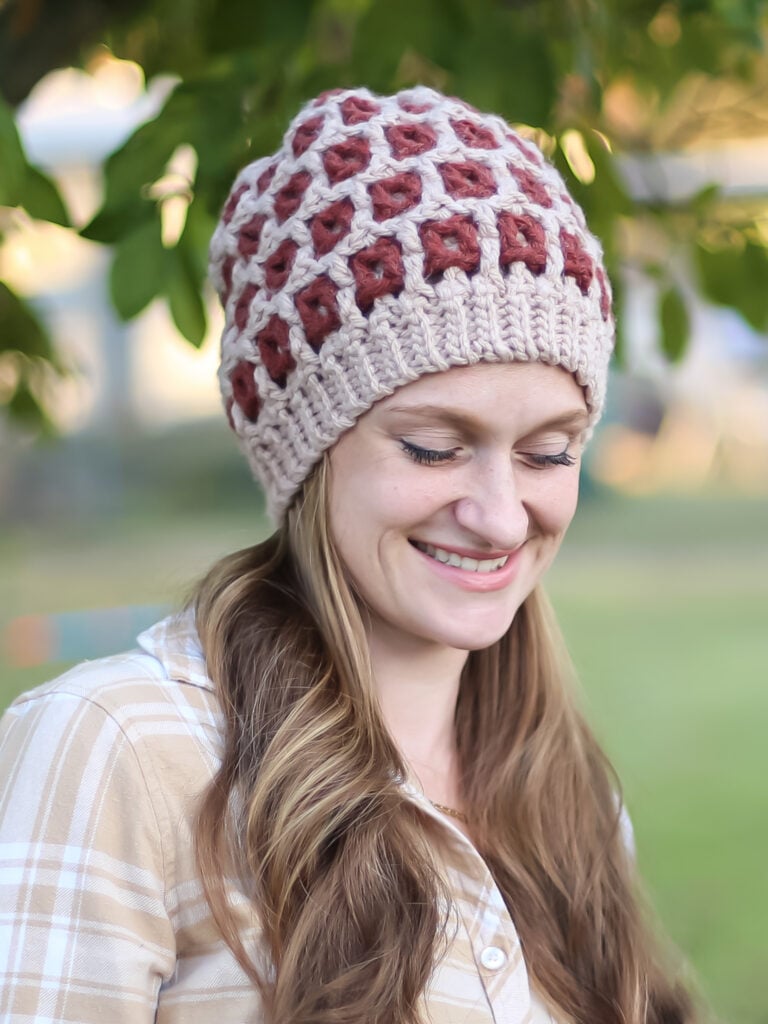
Super Quick Bulky Crochet Hat Pattern Free Reversible Beanie
Try interlocking crochet by making this chunky hat that is completely reversible and has a beautiful texture on both sides! This Bulky Crochet Hat Pattern that is Free is a perfect project fr a bedding to try double filet crochet!
This quick project is great for gift giving to keep your loved ones warm especially with the addition of a removable faux fur pom pom! Also perfect to sell at markets, this free crochet beanie pattern is great for last minute shoppers in need of a thoughtful present!
Best Bang for your Buck, get a Kit From Lion Brand includes printable PDF and Yarn!
Or get an ad-free PDF Version on Etsy or Ravelry!
More about this Free Crochet Pattern
To make this free pattern you need to have knowledge of a few basic crochet stitches and the confidence to try an advanced crochet technique called Interlocking Crochet!
This pattern is classed as an Advanced Skill Level Pattern since intermeshing crochet can be one of the more difficult crochet techniques. Read more below on what exactly Interlocking Crochet is.
However, since this chunky crochet beanie uses chunky or bulky yarn you will probably have an easier time creating this pattern if it is your first double meshed (interlocked crochet) pattern.
If you are familiar with this technique then you might find this stylish beanie to be an easy crochet hat pattern to make!
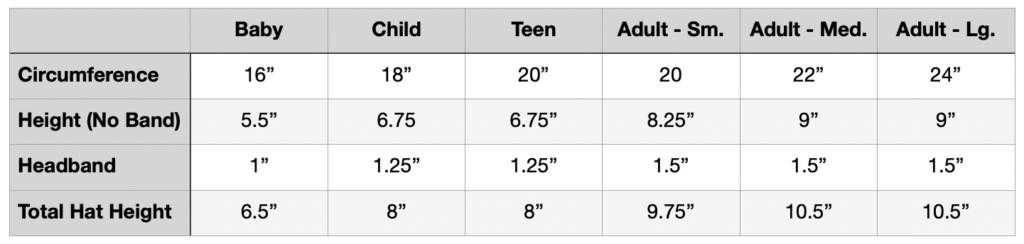
I wrote this pattern in 6 sizes, Baby, Child, Teen, Small, Medium and Large. If you use the suggested yarn, this pattern is set up so that you can make one of the adult sizes and one of the smaller sizes for children from the skeins listed.
To make this chunky hat pattern you will first make a hat panel, worked in back and forth rows. Then you will seam up your hat from the end of the row created last in Color A, you may use a whip stitch or mattress stitch.
When you reach your first row you will then cinch up your hat. Read more in detail in the Assembly Instructions below.
?Once seamed together, you will add a knit look ribbed hat brim using slip stitch in the back looks only.
Then weave in your ends and enjoy your finished hat!
What is Interlocking Crochet?
Interlocking Crochet is a technique that is some times confused with mosaic crochet. It is also known as double filet, interweave or intermeshing. However you call it, one thing is for sure, it is gorgeous!
This is a crochet technique where you create two layers of fabric (filet mesh) and work them together at the same time so that the rows are woven or interlocked! To make an interlocked pattern like this one you only need to be able to make double crochet stitches and chain stitches!
It is important to note that each row is actually two and the patterns are created by some stitches being worked in front and some in back but never mixing the stitches of your two separate colors.
I hope you enjoy this pattern and be sure to watch my YouTube Video (Coming SOON) if you need some help!
Love correct projects the use interlocking crochet? Check out my entire Interlocking Crochet Category!

Yarn Substitutes
Please note, this written pattern is not suitable for different yarn weights like super bulky yarn. However, if you want to do some stash busting you may be able to meet gauge by holding worsted weight yarn doubled.
- Lion Brand Wool-Ease Thick & Quick
- Mandala Impressions paired with a solid like Hue and Me
- Scarfie paired with a solid like Hue and Me
- If you are looking for other cozy hats to make take a look at my other free crochet hat patterns!
Come find me on…
- Like my Facebook Page
- Join my Facebook group!
- Subscribe to my YouTube Channel for Free Crochet Tutorials
- Get PDFs on Etsy
- Get PDFs on Ravelry
- Sign Up for the Life and Yarn Newsletter for more free modern crochet patterns!
- Please Note: Some links may be affiliate links that help to support the Life + Yarn Blog with a small commission at no added cost to you, thank you!
- Copyright 2025, Life and Yarn, Brianna Iaropoli. Pattern contents are NOT to be re-shared, DIRECT LINKS ONLY to this post for the pattern.
Materials
- Size 6.5 mm crochet hook
- 2 skeins Hue + Me in Desert [617-099U] – Color A
- 1 skein Hue + Me in Spicy [617-134R] – Color B
Note: Skeins listed above will give you enough yardage to make 2 hats, one in the child sizes (first set of brackets) and one in the adult sizes (second set of brackets). - #5 Bulky Weight Yarn
Color A – (53, 64, 75) (90, 100, 119) yds
Color B – (30, 37, 44) (63, 70, 75) yds - Yarn Needle
- 2 Stitch Markers
Gauge
- Foundation Chain A 16 sts.
- Foundation Chain B 14 sts.
- Follow pattern repeat 1 time for 4.25 by 4.25 inches (3 inches w/o Foundation Rows)
Sizing
- (Baby, Child, Teen) (Sm., Med., Lg.)
Stitch Descriptions and Abbreviations
- Chain Stitch – ch
- Stitch(es) – st(s)
- Space – sp
- Skip – sk
- Stitch Marker – SM
- Slip Stitch – sl st
- Back Loop Only – blo
- Single Crochet – sc
- Double Crochet – dc
- Double Crochet in Front – dcf – Work your double crochet as your normally would from the front. Sometimes this requires pulling the stitch through the corresponding window of the opposite color. To do this your will yarn over, bring your hook to the front, go through the window to pick up the dc needing to be worked on the back, insert your hook, pull the stitch through the window to the front, then complete your double crochet stitch as normal.
- Double Crochet in Back – dcb – Work your double crochet as your normally would from the back. Sometimes this requires pulling the stitch through the corresponding window of the opposite color. To do this your will yarn over, bring your hook to the back, go through the window to pick up the dc needing to be worked on the front, insert your hook, pull the stitch through the window to the back, then complete your double crochet stitch as normal.
Pattern Notes
- * Designates a repeat.
- “sc 1” means to single crochet in the next stitch.
- “sc 2” means to single crochet in each of the next 2 stitches.
- “2 sc” means to single crochet twice in the next stitch to create an increase.
- Ch 4 counts as first dc and ch-1 sp throughout.
- Final dc sts are placed in the 3rd chain of the t-ch.
- When working rows you will only work your stitches in the color you are currently using (ex. Color A only creates stitches in the previous Color A Row) and work through, in front or in back of the color you are not using, never around the other color.
- Row Instructions give two sets of instructions noted as Row “1A” and Row “1B”. The A and B Reference the color you are working with, so each row is really two rows worked in succession.
- IMPORTANT: Repeats are noted before the Row Repeat Instructions. Read your size first before beginning your project, enjoy!
IMPORTANT
Repeats are noted before the Row Repeat Instructions. Read your size first before beginning your project, enjoy!
Reversible Chunky Crochet Hat Pattern
Repeats (Hat instructions are below)
Baby: Repeat Rows 1A/B to 4A/B (1) time, then repeat Rows 1A/B finish off for color B, then repeat Row 2A, finish off leaving an 10” tail, continue to the Assembly Instructions below.
Child:Repeat Rows 1A/B to 4A/B (1) time total, then repeat Rows 1A/B to 3A/B, finish off for color B, then repeat Row 4A, finish off leaving an 14” tail, continue to the Assembly Instructions below.
Teen: Repeat Rows 1A/B to 4A/B (1) time total, then repeat Rows 1A/B to 3A/B, finish off for color B, then repeat Row 4A, finish off leaving an 14” tail, continue to the Assembly Instructions below.
Adult Small: Repeat Rows 1A/B to 4A/B (2) times total, then repeat Row 1A/B, finish off for color B, then repeat Row 2A, finish off leaving an 16” tail, continue to the Assembly Instructions below.
Adult Medium: Repeat Rows 1A/B to 4A/B (2) times total, then repeat Row 1A/B, finish off for color B, then repeat Row 2A, finish off leaving an 18” tail, continue to the Assembly Instructions below.
Adult Large: Repeat Rows 1A/B to 4A/B (2) times total, then repeat Row 1A/B, finish off for color B, then repeat Row 2A, finish off leaving an 18” tail, continue to the Assembly Instructions below.
Hat Panel
Foundation Row A
Ch (52, 60, 64) (68, 72, 80) dc in 6th ch from hook, *ch 1, sk 1, dc in next, repeat from * to end, place SM.
Foundation Row B
Ch (50, 58, 62) (66, 70, 78) dc in 6th ch from hook, *ch 1, sk 1, dc in next, repeat from * to end, place SM.
Note: Lay Foundation Row A on top of Foundation Row B with the working yarn at the same side so you may begin working Row 1A below followed by Row 1B.
Note: Be sure to take the working yarn from Foundation Row B and drop it to the front so that you can work your Row 1B on the Front (Right Side) of your project.
Note: Place a SM at the end of each row before starting the next.
Bring Color B Working Yarn to Front.
Row 1A
Ch 4, dcb in next dc, *ch 1, dcf in next dc, ch 1, dcb in next dc, repeat from * to last dc, ch 1, dcf in last dc (3rd ch of t-ch).
Note: When working this row for the first time the stitch placement can be tricky before the pattern be comes easy to see. The first stitch (dcb in next dc) will be picked up between the first and second dc of Foundation Row B then the rest of the stitch placements are easy.
Row 1B
Ch 4, dcf in next dc,*ch 1, dcf in next dc, repeat from * to end. Turn entire piece.
Bring Color B Working Yarn to Front.
Row 2A
Ch 4, dcf in next dc, *ch 1, dcb in next dc, ch 1, dcf in next dc, repeat from * to last dc, ch 1, dcb in last dc (3rd ch of t-ch).
Row 2B
Ch 4, dcf in next dc,*ch 1, dcf in next dc, repeat from * to end. Turn entire piece.
Bring Color B Working Yarn to Front.
Row 3A
Ch 4, dcf in next dc, *ch 1, dcb in next dc, ch 1, dcf in next dc, repeat from * to last dc, ch 1, dcb in last dc (3rd ch of t-ch).
Row 3B
Ch 4, dcf in next dc,*ch 1, dcf in next dc, repeat from * to end. Turn entire piece.
Bring Color B Working Yarn to Front.
Row 4A
Ch 4, dcb in next dc, *ch 1, dcf in next dc, ch 1, dcb in next dc, repeat from * to last dc, ch 1, dcf in last dc (3rd ch of t-ch).
Row 4B
Ch 4, dcf in next dc,*ch 1, dcf in next dc, repeat from * to end. Turn entire piece.
Assembly
- Thread your darning needle using the long tail of Color A.
- Bring your row ends together and using a mattress stitch, or seaming method of choice, seam together your hat aligning the row ends as best as possible.
- When you reach your foundation rows only seam your Color A together at the top of the beanie to cinch up your hat.
- Turn your hat inside out, thread your darning needle with Color B and cinch together Foundation Row B to form the top of the hat on the reverse side.
- Finish off and weave in all ends.
Hat Brim
Using Color A, reattach your yarn in the join.
- Chain (4, 5, 5) (6, 6, 6), turn and sl st in the second chain from the hook and each next chain back to the hat panel. [(3, 4, 4,) (5, 5, 5) total sl sts]
- Sl st in the next ch-sp, sl st in next Fdc-st, turn, sk 2-sl sts, sl st blo next (3, 4, 4,) (5, 5, 5) sts.
- Turn, ch 1, sl st blo in next (3, 4, 4,) (5, 5, 5) sl sts.
- Repeat Steps 2 and 3 until you reach the first Row of the Brim, seam together with your darning needle and finish off.
NOTE: You can separate a few rows by 1 sl st instead of 2 if you would like a looser brim.