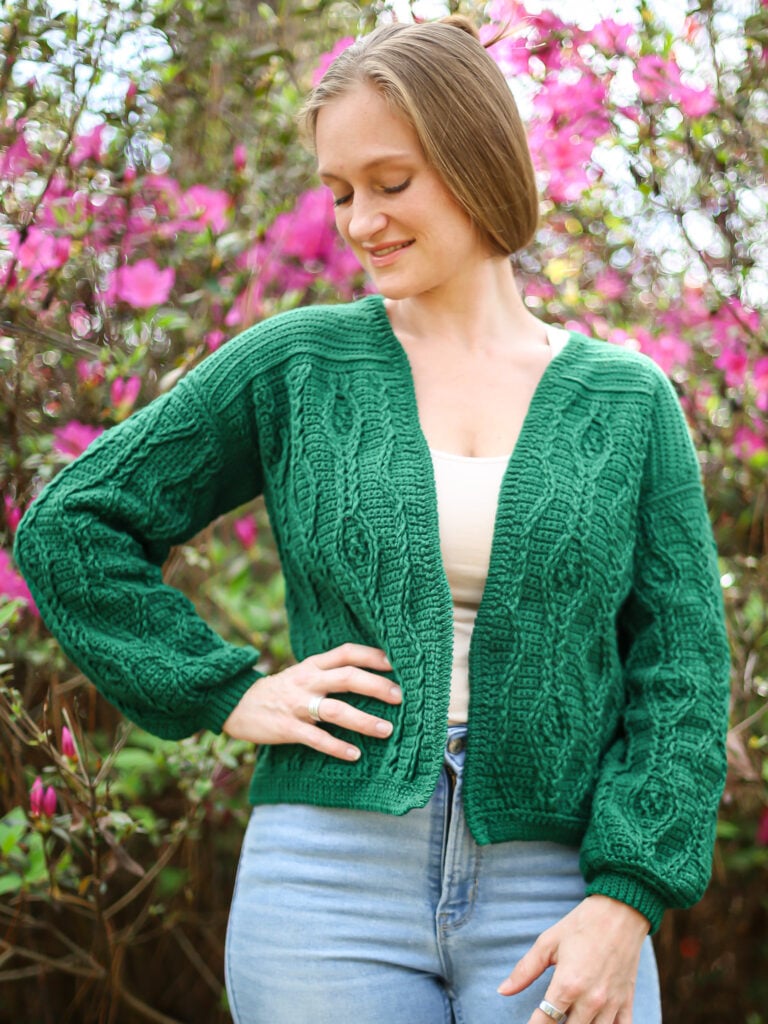
Best Cabled Crochet Cardigan Pattern – Crocheting a Cardigan Tutorial
Crocheting a Cardigan can be one of the most rewarding things to crochet! There are so many ways to crochet a cardigan but a drop shoulder made from simple rectangles is one of my favorites! Especially when it has a beautiful knit-look!
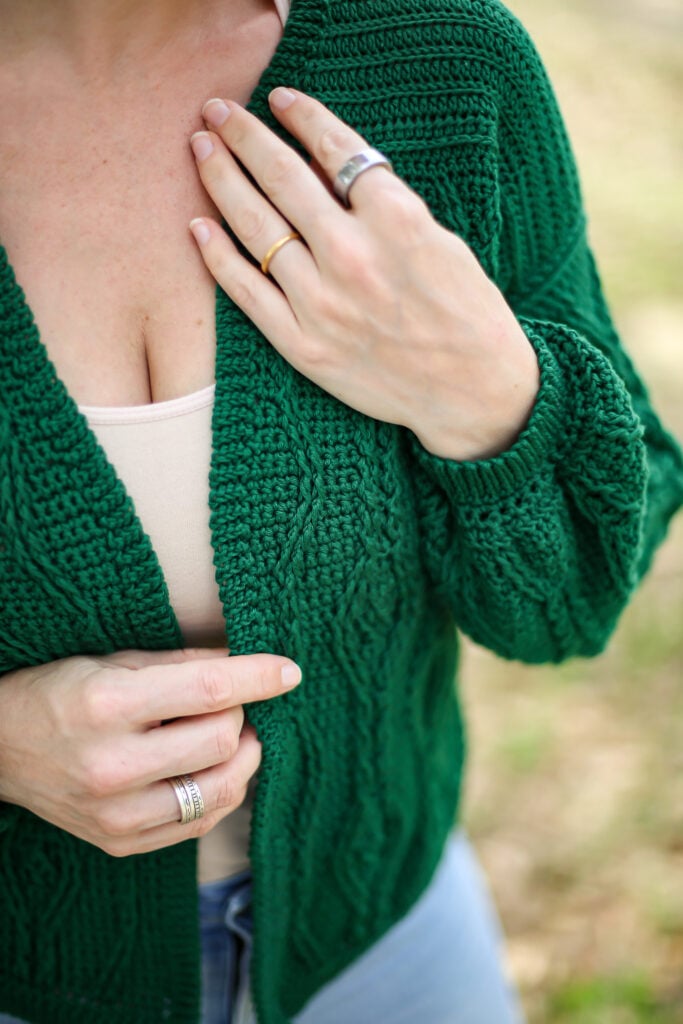
This Cabled Crochet Cardigan Pattern has a slightly oversized fit, beautiful ribbing and gorgeous trellising crochet cables! If you love detailed projects that can be conversation pieces then this free crochet pattern will definitely fit your personal style!
Best Bang for your Buck, get a Kit From Lion Brand includes an ad-free printable PDF and Yarn!
Get a PDF Pattern on in my Etsy Shop or Ravelry!

Crocheting a Cardigan Made From Rectangles
This free pattern is noted as an Advanced Skill Level Pattern that would be suitable for confident intermediate crocheters looking to try some more challenging crochet stitches to create a knit look sweater.
I would not advise this to be a first garment for a beginner crocheter, instead browse some of my other free crochet cardigan patterns and find one that better meets your skill level using more simple stitches.
This crocheted cardigan is made from just 5 rectangles making the construction very easy. The crochet stitches and techniques are the hard part of this pattern.
I have tried to include as much information as possible to help you crocheting a cardigan that is sure to be an instant heirloom. Be sure to read all of the information provided in this blog post so you can be successful in creating this great project!
Looking for something a bit different? Try this pullover sweater with cables!
Tips for Sizing this Crochet Cardigan
One of the great things about crocheting a cardigan with this pattern is that I have included this section on “Tips for Sizing” to help you customize this pattern to perfectly fit your body type!
- How to Adjust Bust: If you want to increase or reduce your bust you will need to add or subtract stitches at the beginning and end of your panels before and after the cable repeats.
- How to Adjust the Length of the Body: The length of your body is dictated by the number of rows in this pattern. To add length you will add rows to the Body Panels within the cable section. Remember to add the same number of rows to the Back and Front Panels so that you maintain the drop for the neckline on the back of your cardigan.
- How to Adjust the Neck Opening: To adjust the Neck Opening you will need continue the decrease rows in the Yoke section, this will make your neckline drop farther on the back if you do not add the same number of rows to your Back Yoke.
- A Note on Yardage: Cables eat a lot of yarn in crochet so please be mindful of your gauge.
- How to Adjust Sleeve: To adjust the length of your sleeves you will add more cable rows. To adjust the width you will need to add or subtract stitches at the beginning and end of your panels before and after the cable repeats.
- How to Adjust Trims: If you would like thicker trims add more chains before you start your slip stitches.
- IMPORTANT NOTE: Any changes to sizing will affect your yardage, buy an extra skein if you plan to adjust sizing to avoid running out of yarn or lot color variations.
Important Information on Crochet Cables
- Be mindful of when it is noted to work behind or in front of a FPdc when crossing sts.
- When a FPdc is created make sure to skip the single crochet stitches behind.
- You will have the same number of stitches in all cable rows as single crochet rows.
- To create the Row 3 FPdc sts you will work them in the Fsc Row. Each next cable row will work its FPdc sts in FPdc sts of the previous row.
- Rows 15 and 17 are exceptions and have FPdc sts worked in single crochet stitches so be mindful of your stitch placement in the rows and when to work in a single crochet. Use the stitch diagram for clarity.
- Reference the stitch diagram for the repeats and proper stitch placement, note that FPdc sts are worked in FPdc sts but for clarity the diagram does NOT show the overlap.
- NOTE: The Stitch Diagram shows 2 sets of repeats.
- The Stitch Diagram for Row Repeats has the order of the placement of the FPdc sts alphabetized if you prefer a visual. Be mindful of if you are working in FRONT or BEHIND of a FPdc.
- FPdc sts are always worked in FPdc sts with the exception of Row 3 where the FPdc sts are worked in the Foundation Single Crochet Stitches of Row 1.
Yarn Substitutes
- Wool-Ease DK
- 24/7 Cotton DK
- Mandala for some fun color play!
- Coboo
- 100% Superwash Merino LBC
Come find me on…
- Like my Facebook Page
- Join my Facebook group!
- Subscribe to my YouTube Channel for Free Crochet Tutorials
- Get PDFs on Etsy
- Get PDFs on Ravelry
- Sign Up for the Life and Yarn Newsletter for more free modern crochet patterns!
- Please Note: Some links may be affiliate links that help to support the Life + Yarn Blog with a small commission at no added cost to you, thank you!
- Copyright 2026, Life and Yarn, Brianna Iaropoli. Pattern contents are NOT to be re-shared, DIRECT LINKS ONLY to this post for the pattern.
- If crocheting a cardigan is your new favorite thing to do the browse all of my free crochet cardigan patterns!
Materials
- Size 4.50mm crochet hook
- 7 (8) (9) Skeins of Lion Brand Cottino in Racquet Club [614-174AJ]
- 2072 (2368) (2664) yards any DK #3 weight yarn that will meet gauge.
- Scissors
- Darning Needle
- Stitch Markers (optional but highly recommended)
Gauge
- 17 sts by 20 rows is 4” by 4” in sc.
- Wether you are working with the recommended yarn, a yarn of similar fiber content or something different, gauge for this pattern along side your preferred blocking method is EXTREMELY important to make sure your cardigan fits.
- Lion Brand’s Cottino does NOT block out significantly while other fibers might.
- My PREBLOCKED gauge is 17 stitches by 20 rows is 4” by 4” in sc using a 4.50 mm hook.
- My BLOCKED gauge once DRY was the same meaning the recommended yarn for this pattern has great memory!I used steam blocking.
- Please note that the WORN Gauge will be a bit more due to the weight of the final cardigan fabric.
- If using a different fiber, say wool for example, you may need to change your hook and/or blocking method to reach the same Blocked/Finished Gauge.
Sizing
- XS/S/M (L/XL/2XL) (3XL/4XL)

Stitch Descriptions and Abbreviations
- Chain Stitch – ch
- Stitch(es) – st(s)
- Skip – sk
- Slip Stitch – sl st
- Single Crochet – sc
- Half Double Crochet – hdc
- Back Loop Only – blo
- Front Loop Only – flo
- Front Post Double Crochet – FPdc -Work a double crochet as you normally would by placing your hook from front to back to front around the post of the designated stitch.
- Foundation Single Crochet – Fsc – Chain 2, insert hook into 2nd chain from hook, yarn over and pull up a loop (2 loops on hook), yarn over, draw through 1 loop, (2 loops on hook with 1 ch created), yarn over, draw through all loops (1 loop on hook, 1 foundation single crochet with chain at the bottom). *Insert hook to the bottom of the stitch you just made, it will look like the top or “V” of a stitch, yarn over, pull up 1 loop (2 loops on hook), yarn over, draw through 1 loop (2 loops on hook with 1 ch created), yarn over, draw through all loops;* repeat from * to * for desired amount of stitches.
- 3rd Loop – The 3rd loop is found on the back of a stitch just below the back loop. It can be worked with the right or wrong side facing you, but is always located on the back, or wrong side of the stitch to be used.
- Single Crochet 2 Together – sc2tog -Work two sc stitches together to create one stitch for a decrease.
- Half Double Crochet 2 Together – hdc2tog -Work two hdc stitches together to create one stitch for a decrease.
Pattern Notes
- * Designates a repeat.
- “sc 1” means to single crochet in the next stitch.
- “sc 2” means to single crochet in each of the next 2 stitches.
- “2 sc” means to single crochet twice in the next stitch to create an increase.
- There are NO chain 1’s in the cable section but there ARE chain 1’s in the trim rows/rounds.
- Pattern is designed using the Size Groupings “XS/S/M (L/XL/2XL) (3XL/4XL)” since the cable repeat is large and worked over 18 sts. Read more about customizing your size in the “Tips for Sizing” below.
- The Front Panels are slightly longer than the Back Panel to drop the neckline for a more comfortable fit. Be sure to read the Assembly and Seaming Instructions closely.
- Stitch count does not change from Row 1 unless noted.
- Watch the Video Tutorial for a close up to create invisible seams.
Diamond Trellis Heirloom Cardigan Free Crochet Pattern
Back Panel
Important Note: Rows 15 and 17 have FPdc sts worked in single crochet stitches so be mindful of your stitch placement in the rows and when to work in a single crochet. Use the stitch diagram for clarity.
Row 1 – Fsc 76 (94) (112)
Row 2 – Turn, sc across in each stitch.
Note: To create the Row 3 FPdc sts you will work them in the Fsc Row. Each next cable row will work its FPdc sts in FPdc sts of the previous row.
Row 3 – Turn, sc 2, *sc 3, FPdc in each of next 2-sc sts, sc 2, FPdc in each of next 4-sc sts, sc 2, FPdc in each of next 2-sc sts, sc 3, repeat from * across, sc 2 in remaining sts.
Row 4 – Turn, sc across in each stitch.
Row 5 – Turn, sc 2, *sc 2, FPdc in each of next 2-FPdc, sc 3, sk next FPdc, FPdc in next FPdc, FPdc in previous FPdc working behind the last FPdc created, sk next FPdc, FPdc in next FPdc, FPdc in previous FPdc working in front the last FPdc created, sc 3, FPdc in each of next 2-FPdc, sc 2, repeat from * across, sc 2 in remaining sts.
Row 6 – Turn, sc across in each stitch.
Row 7 – Turn, sc 2, *sc 1, FPdc in each of next 2-FPdc, sc 4, FPdc in each of next 4-FPdc, sc 4, FPdc in each of next 2-FPdc, sc 1, repeat from * across, sc 2 in remaining st.
Row 8 – Turn, sc across in each stitch.
Row 9 – Turn, sc 2, *FPdc in each of next 2-FPdc, sc 5, sk next FPdc, FPdc in next FPdc, FPdc in previous FPdc working behind the last FPdc created, sk next FPdc, FPdc in next FPdc, FPdc in previous FPdc working in front of the last FPdc created, sc 5, FPdc in each of next 2-FPdc, repeat from * across, sc 2 in remaining sts.
Row 10 – Turn, sc across in each stitch.
Row 11 – Turn, sc 2 *sk next FPdc, FPdc in next FPdc, FPdc in previous FPdc working in front of the last FPdc created, sc 4, FPdc in each of next 2-FPdc, sc 2, FPdc in each of next 2-FPdc, sc 4, sk next FPdc, FPdc in next FPdc, FPdc in previous FPdc working behind the last FPdc created, repeat from * across, sc 2 in remaining sts.
Row 12 – Turn, sc across in each stitch.
Row 13 – Turn, sc 2, *FPdc in each of next 2-FPdc, sc 3, FPdc in each of next 2-FPdc, sc 4, FPdc in each of next 2-FPdc, sc 3, FPdc in each of next 2-FPdc, repeat from * across, sc 2 in remaining sts.
Row 14 – Turn, sc across in each stitch.
Row 15 – Turn, sc 2, *sk next FPdc, FPdc in next FPdc, FPdc in previous FPdc working in front of the last FPdc created, sc 2, FPdc in each of next 2-FPdc, sc 2, sk next 2-sc, FPdc in next sc, FPdc in previous sk’d-sc working in front of the last FPdc created, sc 2, FPdc in each of next 2-FPdc, sc 2, sk next FPdc, FPdc in next FPdc, FPdc in previous FPdc working behind the last FPdc created, repeat from * across, sc 2 in remaining sts.
Row 16 – Turn, sc across in each stitch.
Row 17 – Turn, sc 2, *FPdc in each of next 2-FPdc, sc 2, FPdc in each of next 2-FPdc, sc 1, FPdc in next FPdc, FPdc back in sk’d-sc working in front of the last FPdc created, sk next FPdc, FPdc in next sc-st, FPdc in previous sk’d-FPdc working in front of the last FPdc created , sc 1, FPdc in each of next 2-FPdc, sc 2, FPdc in each of next 2-FPdc, repeat from * across, sc 2 in remaining sts.
Row 18 – Turn, sc across in each stitch.
Row 19 – Turn, sc 2, *sk next FPdc, FPdc in next FPdc, FPdc in previous FPdc working in front of the last FPdc created, sc 3, FPdc in each of next 2-FPdc, sc 1, sk next FPdc, FPdc in next FPdc, FPdc in previous FPdc working in front of the last FPdc created, sc 1, FPdc in each of next 2-FPdc, sc 3, sk next FPdc, FPdc in next FPdc, FPdc in previous FPdc working behind the last FPdc created, repeat from * across, sc 2 in remaining sts.
Row 20 – Turn, sc across in each stitch.
Row 21 – Turn, sc 2, *FPdc in each of next 2-FPdc, sc 4, FPdc in each of next 2-FPdc, sc 2, FPdc in each of next 2-FPdc, sc 4, FPdc in each of next 2-FPdc, repeat from * across, sc 2 in remaining sts.
Row 22 – Turn, sc across in each stitch.
Row 23 – Turn, sc 2 *sk next FPdc, FPdc in next FPdc, FPdc in previous FPdc working in front of the last FPdc created, sc 5, FPdc in each of next 4-FPdc, sc 5, sk next FPdc, FPdc in next FPdc, FPdc in previous FPdc working behind the last FPdc created, repeat from * across, sc 2 in remaining sts.
Row 24 – Turn, sc across in each stitch.
Row 25 – Turn, sc 2, *sc 1, FPdc in each of next 2-FPdc, sc 4, sk next FPdc, FPdc in next FPdc, FPdc in previous FPdc working behind the last FPdc created, sk next FPdc, FPdc in next FPdc, FPdc in previous FPdc working in front of the last FPdc created, sc 4, FPdc in each of next 2-FPdc, sc 1, repeat from * across, sc 2 in remaining sts.
Row 26 – Turn, sc across in each stitch.
Row 27 – Turn, sc 2, *sc 2, FPdc in each of next 2-FPdc, sc 3, FPdc in each of next 4-FPdc, sc 3, FPdc in each of next 2-FPdc, sc 2, repeat from * across, sc 2 in remaining sts.
Row 28 – Turn, sc across in each stitch.
Row 29 – Turn, sc 2, *sc 3, FPdc in each of next 2-FPdc, sc 2, sk next FPdc, FPdc in next FPdc, FPdc in previous FPdc working behind the last FPdc created, sk next FPdc, FPdc in next FPdc, FPdc in previous FPdc working in front the last FPdc created, sc 2, FPdc in each of next 2-FPdc, sc 3, repeat from * across, sc 2 in remaining sts.
Row 30 – Turn, sc across in each stitch.
Row 31 – Turn, sc 2, *sc 3, FPdc in each of next 2-FPdc, sc 2, FPdc in each of next 4-FPdc, sc 2, FPdc in each of next 2-FPdc, sc 3, repeat from * across, sc 2 in remaining sts.
Repeat Rows 4 to 31 – 1 MORE time for a total of 2 repeats, THEN repeat Rows 4 to 27 for a partial repeat. Continue to Back Panel Yoke Instructions below.
Total Rows: 83 in Cable Section

Back Panel Yoke
Row 1 – Turn, sc across in each stitch.
Row 2 – Turn, ch 1, hdc in every stitch across.
Row 3 – Turn, ch 1, hdc in 3rd loop in every stitch across.
Row 4 – Turn, ch 1, hdc in every stitch across.
Row 5 – Turn, sl st flo in every stitch across.
Row 6 – Turn, ch 1, hdc flo in every stitch across.
Rows 7 to 12 – Repeat Rows 5 and 6, finish off.
Note: The Back Panel is shorter than the Front Panels to drop the neckline for a more comfortable fit. More on this explained in the Assembly and Seaming Instructions below.
Front Left Panel
Row 1 – Fsc 40 (48) (58)
Important Note: On Size Group (L/XL/2XL) instead of a “sc 2” before and after the repeat you will do a “sc 6” to increase you panel size to meet your panel measurement.
Repeat “Back Panel” Instructions – Then continue to “Front Left Panel Yoke” instructions below.
Total Rows: 83 in Cable Section
Front Left Panel Yoke
Important Note: There are decreases at the END of the Rows for the Left Panel.
Row 1 – Turn, sc across in each stitch. [40 (48) (58) total sts]
Row 2 – Turn, ch 1, hdc in every stitch across.
Row 3 – Turn, ch 1, hdc in 3rd loop in every stitch across.
Row 4 – Turn, ch 1, hdc across until 2 sts remain, hdc2tog in last 2 sts. [39 (47) (57) total sts]
Row 5 – Turn, sl st flo in every stitch across.
Row 6 – Turn, ch 1, hdc flo across until 2 sts remain, hdc2tog flo in last 2 sts. [38 (46) (56) total sts]
Rows 7 to 18 – Repeat Rows 5 and 6 with every other row decreasing by 1 stitch.
Finish off with [32 (40) (50) total sts]
Front Right Panel
Row 1 – Fsc 40 (48) (58)
Important Note: On Size Group (L/XL/2XL) instead of a “sc 2” before and after the repeat you will do a “sc 6” to increase you panel size to meet your panel measurement.
Repeat “Back Panel” Instructions – Then continue to “Front Right Panel Yoke” instructions below.
Total Rows: 83 in Cable Section
Front Right Panel Yoke
Important Note: There are decreases at the BEGINNING of the Rows for the Right Panel.
Row 1 – Turn, sc across in each stitch. [40 (48) (58) total sts]
Row 2 – Turn, ch 1, hdc in every stitch across.
Row 3 – Turn, ch 1, hdc in 3rd loop in every stitch across.
Row 4 – Turn, ch 1, hdc2tog, hdc in every stitch across to end. [39 (47) (57) total sts]
Row 5 – Turn, sl st flo in every stitch across.
Row 6 – Turn, ch 1, hdc2tog, hdc flo in every stitch across end. [38 (46) (56) total sts]
Rows 7 to 18 – Repeat Rows 5 and 6 with every other row decreasing by 1 stitch.
Finish off with [32 (40) (50) total sts]
Sleeves Make – Make Two
Row 1 – Fsc 58 (76) (76)
Repeat “Back Panel” Instructions – 2(1)(1) MORE time(s) for a total of 3(2)(2) repeats. For XS/S/M move to “Sleeves – Top Edge” instructions below.
For (L/XL/2XL) and (3XL/4XL) continue as follows:
THEN repeat Rows 4 to (27)(21) for a partial repeat. Continue to to “Sleeves – Top Edge” instructions below.
Total Rows: 87 (83)(77) in Cable Section
Sleeves – Top Edge
Row 1 – Turn, sc across in each stitch.
Row 2 – Turn, ch 1, hdc in every stitch across.
Row 3 – Turn, ch 1, hdc in 3rd loop in every stitch across, finish off.
Assembly and Seaming Instructions
- First, block your Front Panels, Back Panel and Sleeve Panels the same way you blocked your swatch.
- Once dry begin by seaming your Front Panels to your Back Panel by using a mattress stitch or invisible join. Start from the Shoulder and seam your way in towards the neck making sure to keep your stitches aligned. Repeat on the other side to complete your shoulder seams. Finish off and weave in your ends.
- Then fold your cardigan in half with the wrong sides facing to align Row 1 on your panels creating the body.
- Starting from Row 1 on your Front Panel and Back Panel using a mattress stitch, seam up towards the armpit using the row ends. It is very important to keep your row ends aligned, remember the Front Panels are longer than the Back Panel so the Shoulder Seam created in Step 2 will be farther back on your cardigan when folded in half. When you seam up on both sides to form the body of your cardigan you will leave a 8 (10)(10) inch arm opening to attach the Sleeve Panel. Repeat on the other side.
- Fold your Sleeve Panels in half with wrong sides facing to align the row ends. Seam from Row 1 to your final row using a mattress stitch. Be sure to keep your rows aligned. Finish off and weave in your ends.
- Attach your Sleeves to the Body of your cardigan with the Sleeve seam joining at the side seam at where you will form the armpit. Work your way around the Arm Opening on the Body to join the Sleeve with a mattress stitch. Be sure to keep your pieces properly aligned to avoid and pinching or pulling. Finish off and weave in your ends.
Waist and Collar Trim
- Reattach your yarn in the Row 1 Fsc of your Front Left Panel so that the Right Side is facing you, chain 6, sl st in the second chain from the hook and each next chain back to the waist of your cardigan. [5 total sl sts]
- Sl st in the next st of the Fsc, turn, skip first sl st, sl st blo next 5 sts.
- Turn, ch 1, sl st blo in next 5 sl sts.
- Sl st in the next st of waist, turn, skip first sl st, sl st blo next 5 sts.
- Repeat Steps 3 and 4 until you reach the end of Row 1 of your Front Right Panel. You should be at the edge of the trim, not the waist side.
- Chain 4, sl st in the second chain from the hook and each next chain back to the trim of your cardigan. [3 total sl sts]
- Sl st in the next st, turn, skip first sl st, sl st blo next 3 sts.
- Turn, ch 1, sl st blo in next 3 sl sts.
- Repeat Steps 7 and 8 to create the collar of your cardigan working in the Row Ends and Final Row of the Back Panel.
- Finish off and weave in your ends.
Sleeve Cuffs
- With Right Sides facing reattach your yarn in a Fsc stitch of Row 1, ch 1, sc in that same stitch.
- *Sc2tog, sc, repeat from* around, sl st to first sc. [39 (51) (51) total sts]
- Ch 1, turn, *sc2tog, sc, repaet from * around, sl st to first sc. [26 (34) (34) total sts]
- Chain 6, sl st in the second chain from the hook and each next chain back to the sleeve of your cardigan. [5 total sl sts]
- Sl st in the next st, turn, skip first sl st, sl st blo next 5 sts.
- Turn, ch 1, sl st blo in next 5 sl sts.
- Repeat Steps 5 and 6 to create the cuffs of your cardigan, sl st together for a seam.
- Repeat for other cuff.
I hope you enjoyed making this cardigan and if you want to make more crochet clothes like cocoon cardigans, long cardigans or cropped cardigans check out my Cardigan Category!