Easy Scrap Yarn Crochet Cardigan Pattern For Every Leftover
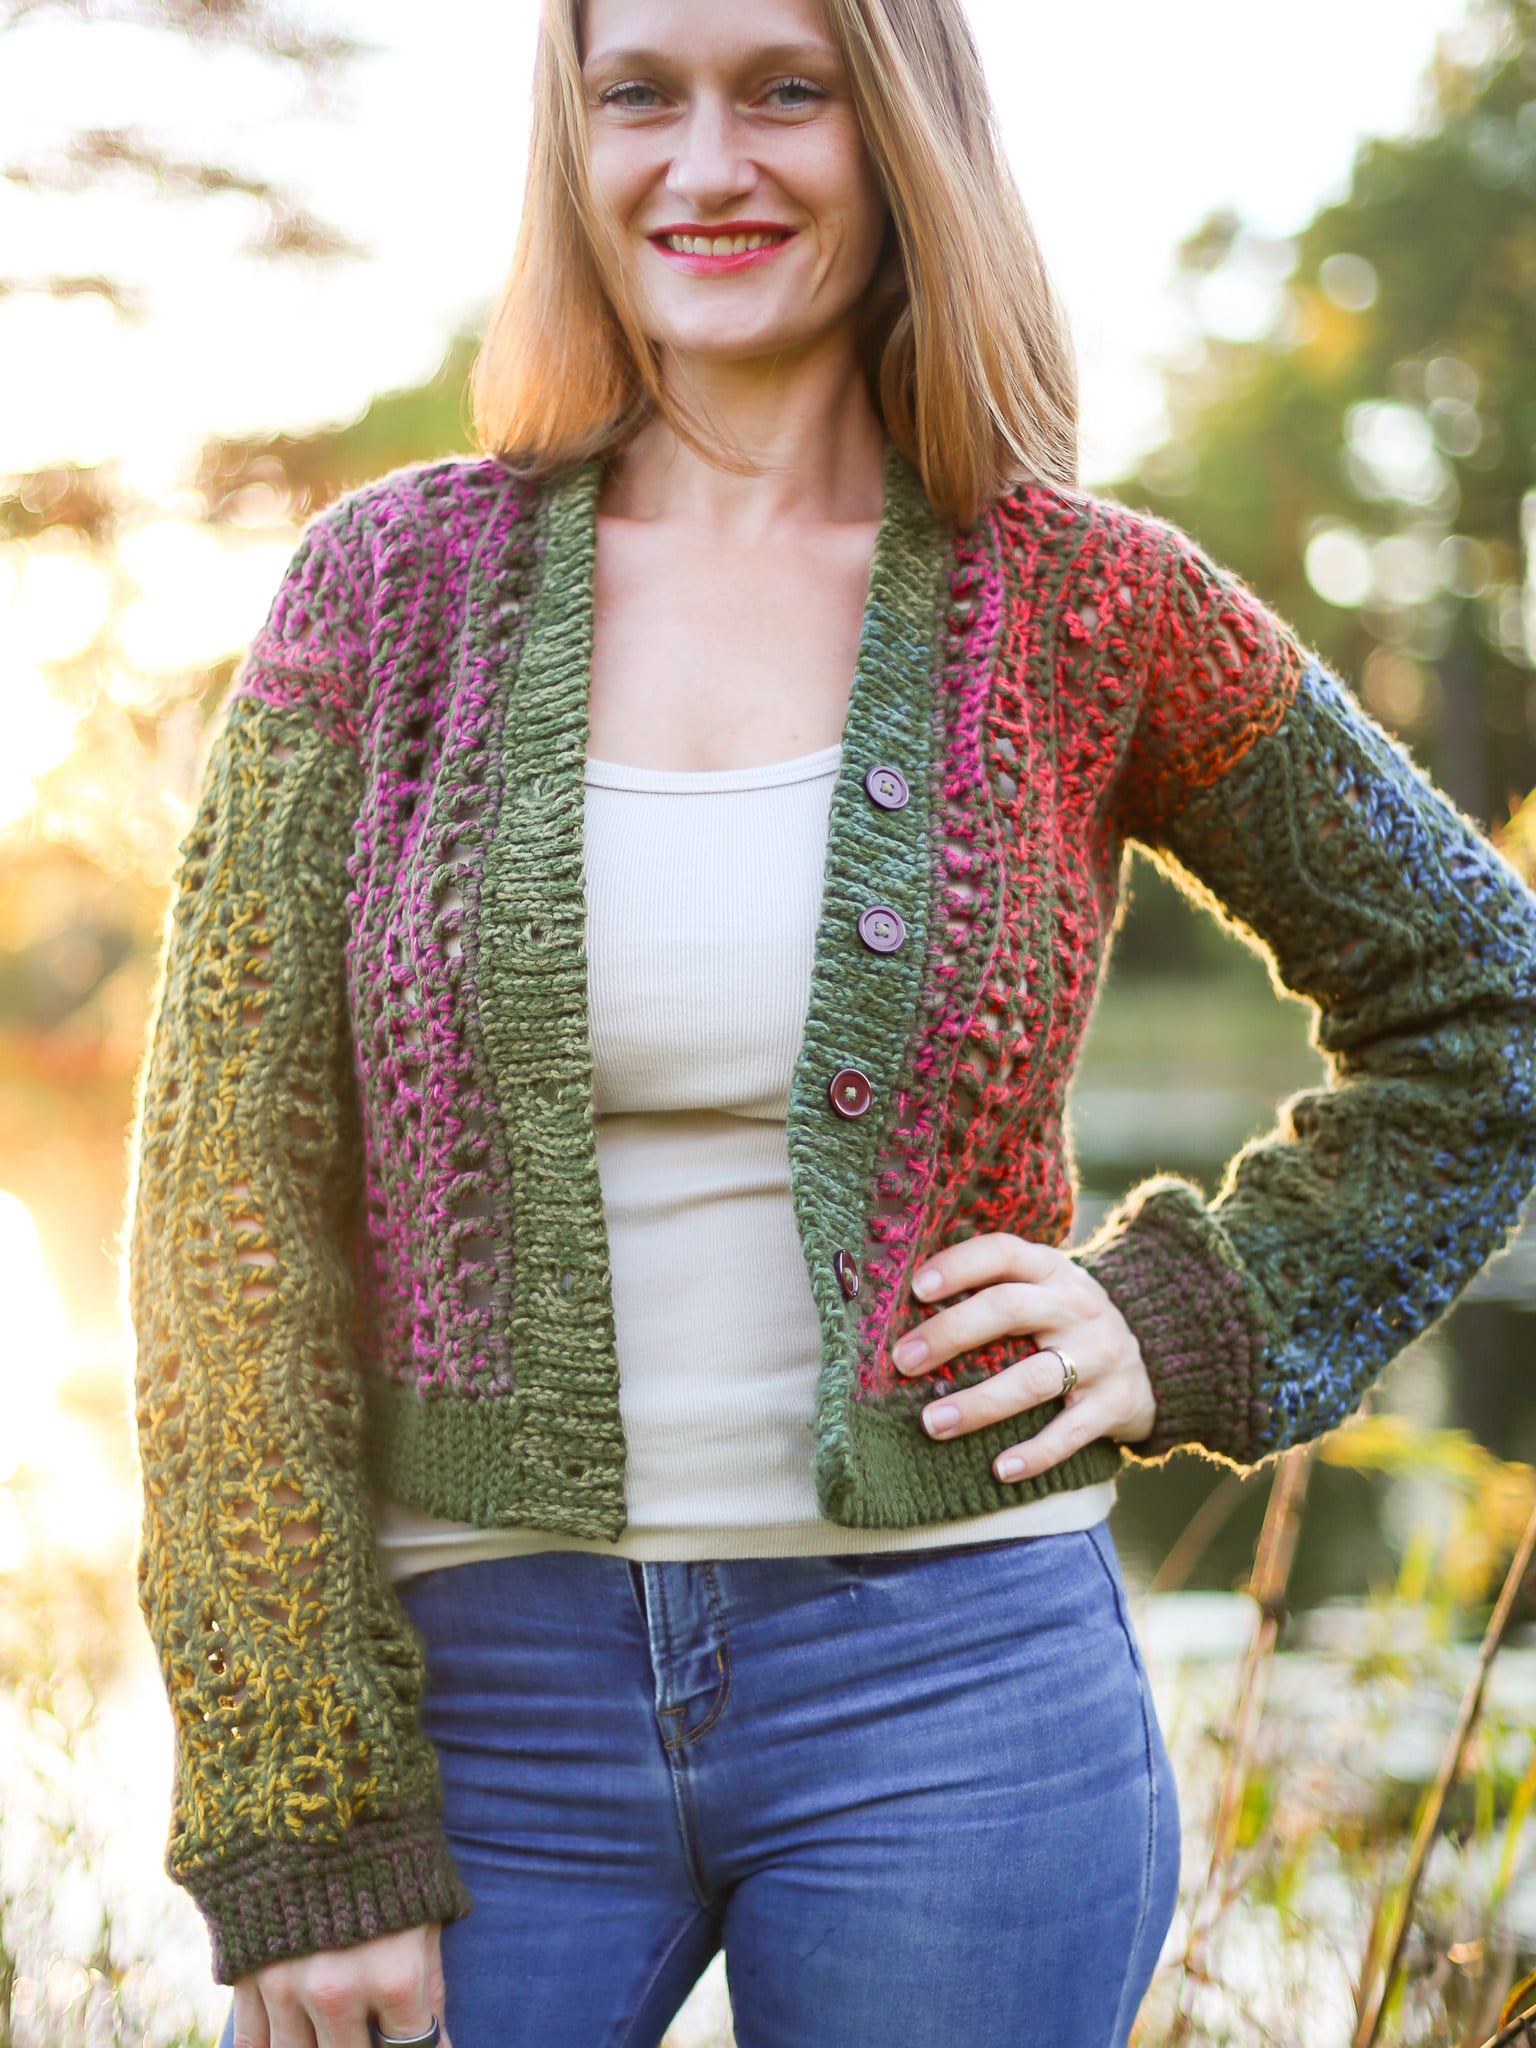
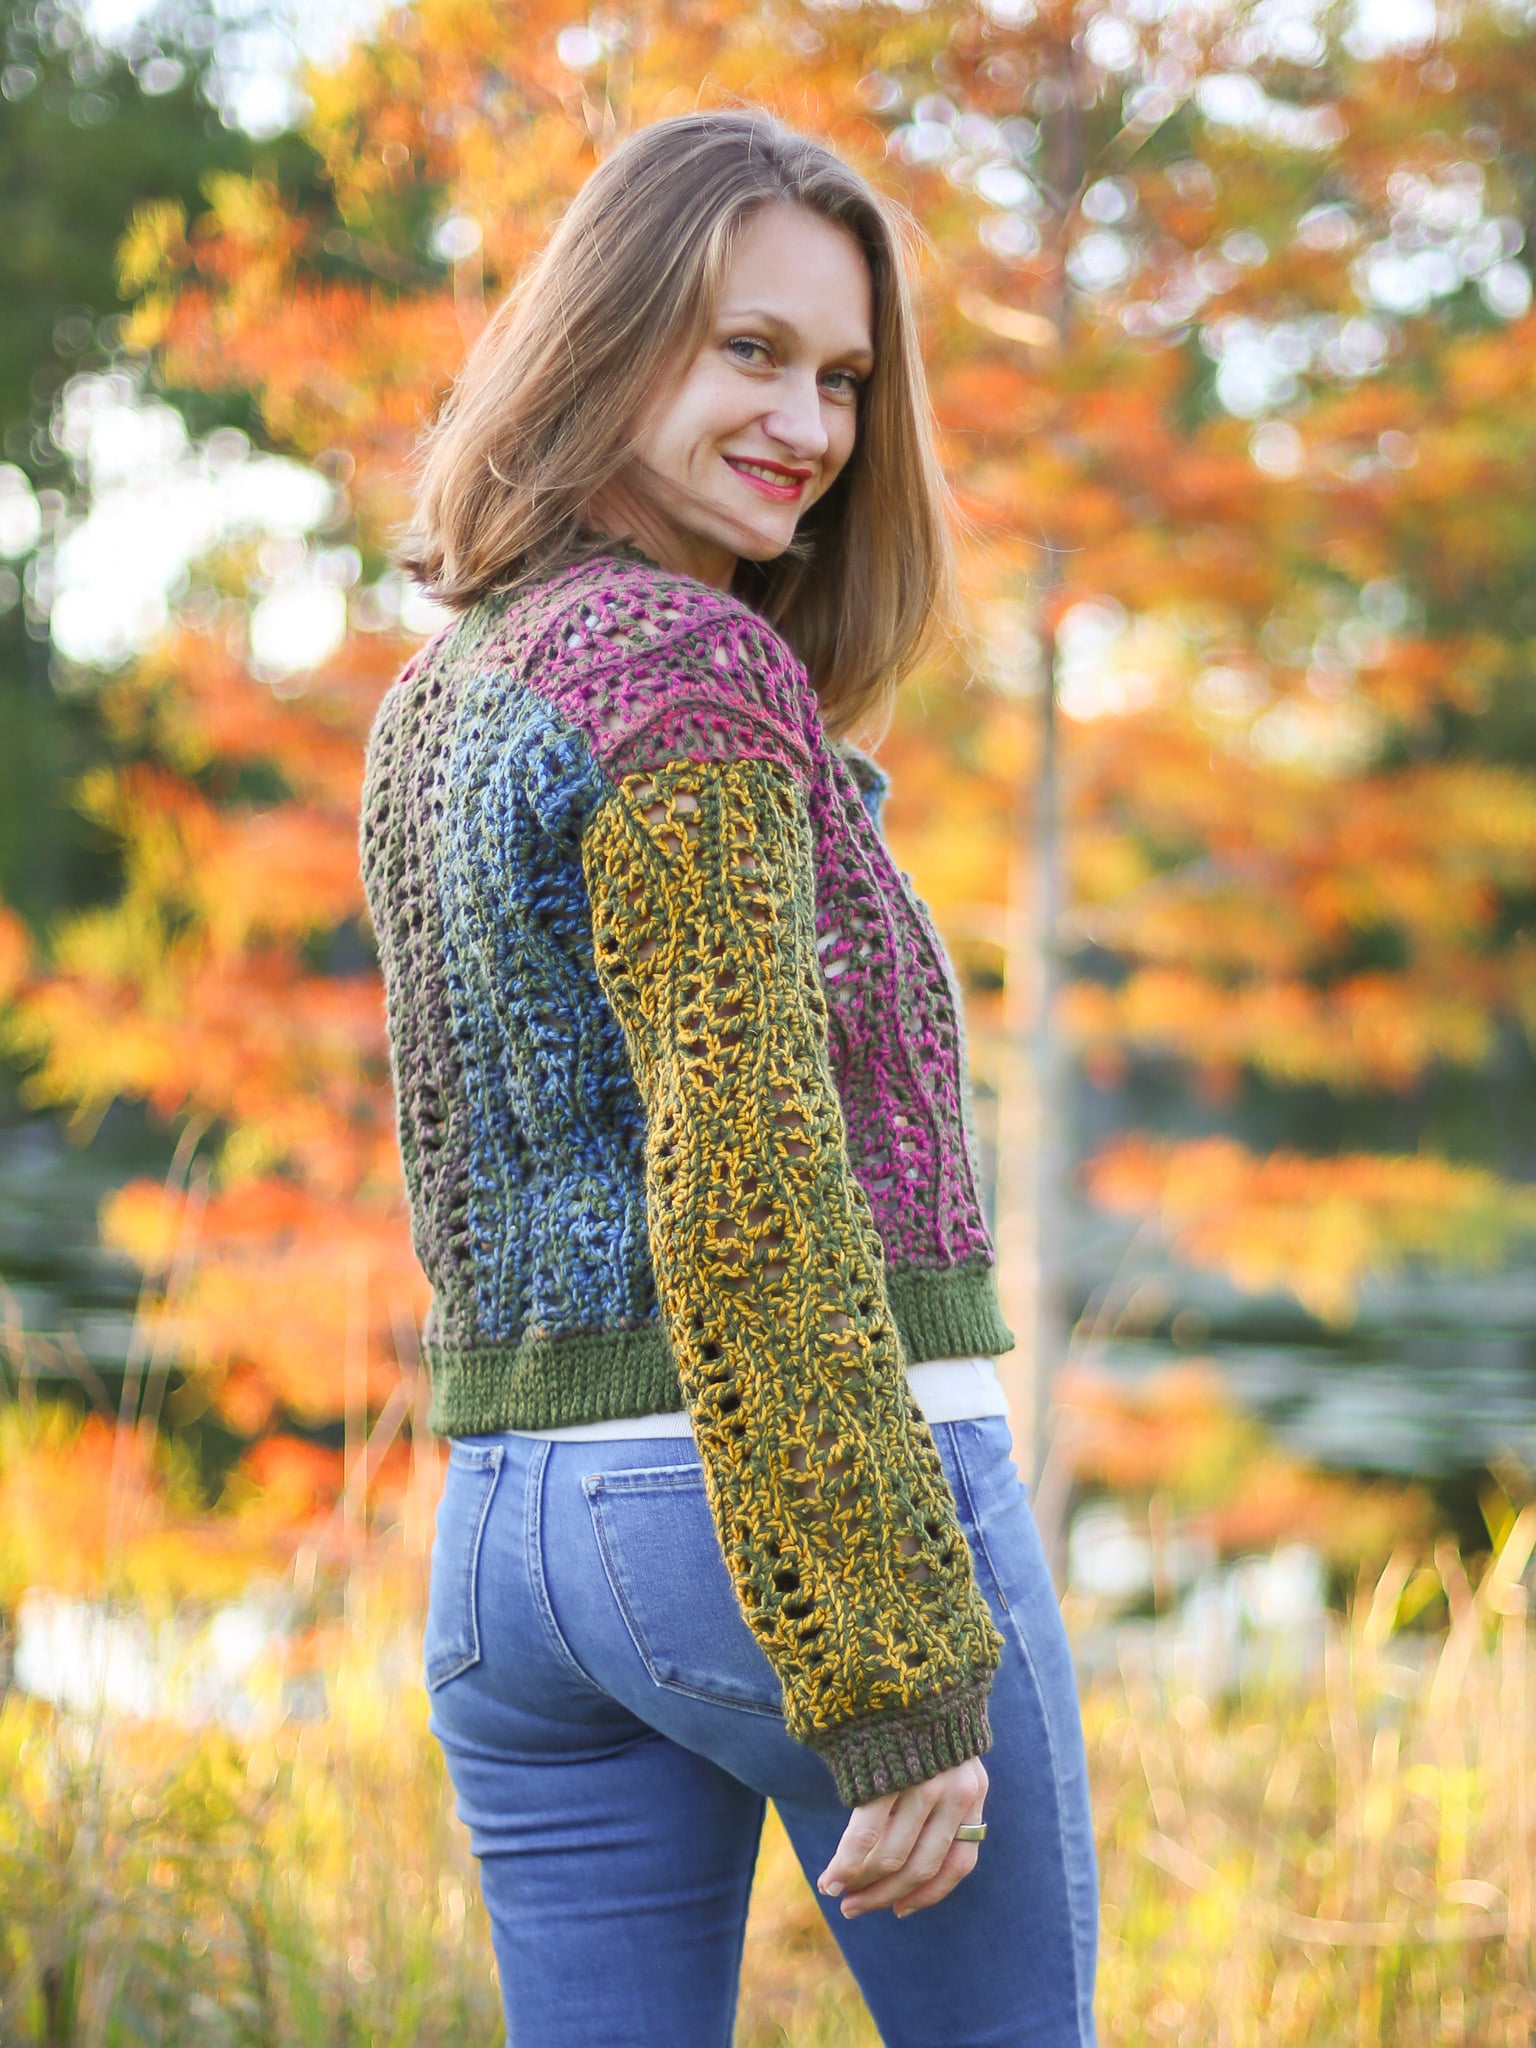
New to the Sunset Collection, meet the Lakeside Sunset Cardigan! While I made mine using Wool-Ease DK and Mandala this is a perfect Scrap Yarn Crochet Project too! We all have bin overflowing with leftover yarn somewhere, half skeins, mystery balls and tiny bits too pretty to throw away. So if you don’t want to buy new yarn this free scrap yarn crochet cardigan pattern can help you make more space in your stash and use up leftover yarn!
Use the Easy to Navigate Table of Contents below the first photo to get started on this crochet pattern, happy crocheting!
Best Bang for your Buck, get a Kit From Lion Brand that includes a printable ad-free pdf pattern and Yarn!
Get a printable pdf crochet pattern on my Etsy Shop or Ravelry!
Pattern Overview
This is an Intermediate Skill Level Crochet Cardigan Pattern that is advanced beginner friendly. There are no increases or decreases in the main body panels and it is made from all rectangles and seamed together. There are some decreases for the trims.
This pattern sample was made with Wool Ease DK as the main color solid and Mandala as the self striping yarn contrasting color that gives it a scrap yarn look!
If you don’t want to use the suggested yarn and use this as a stash busting project I would suggest to choose one main color that repeats throughout so the color blocking looks cohesive.
I designed this pattern with buttons but you can omit them. This would be a gray project to add pockets to as well!
Why You’ll Love This Scrap Yarn Cardigan
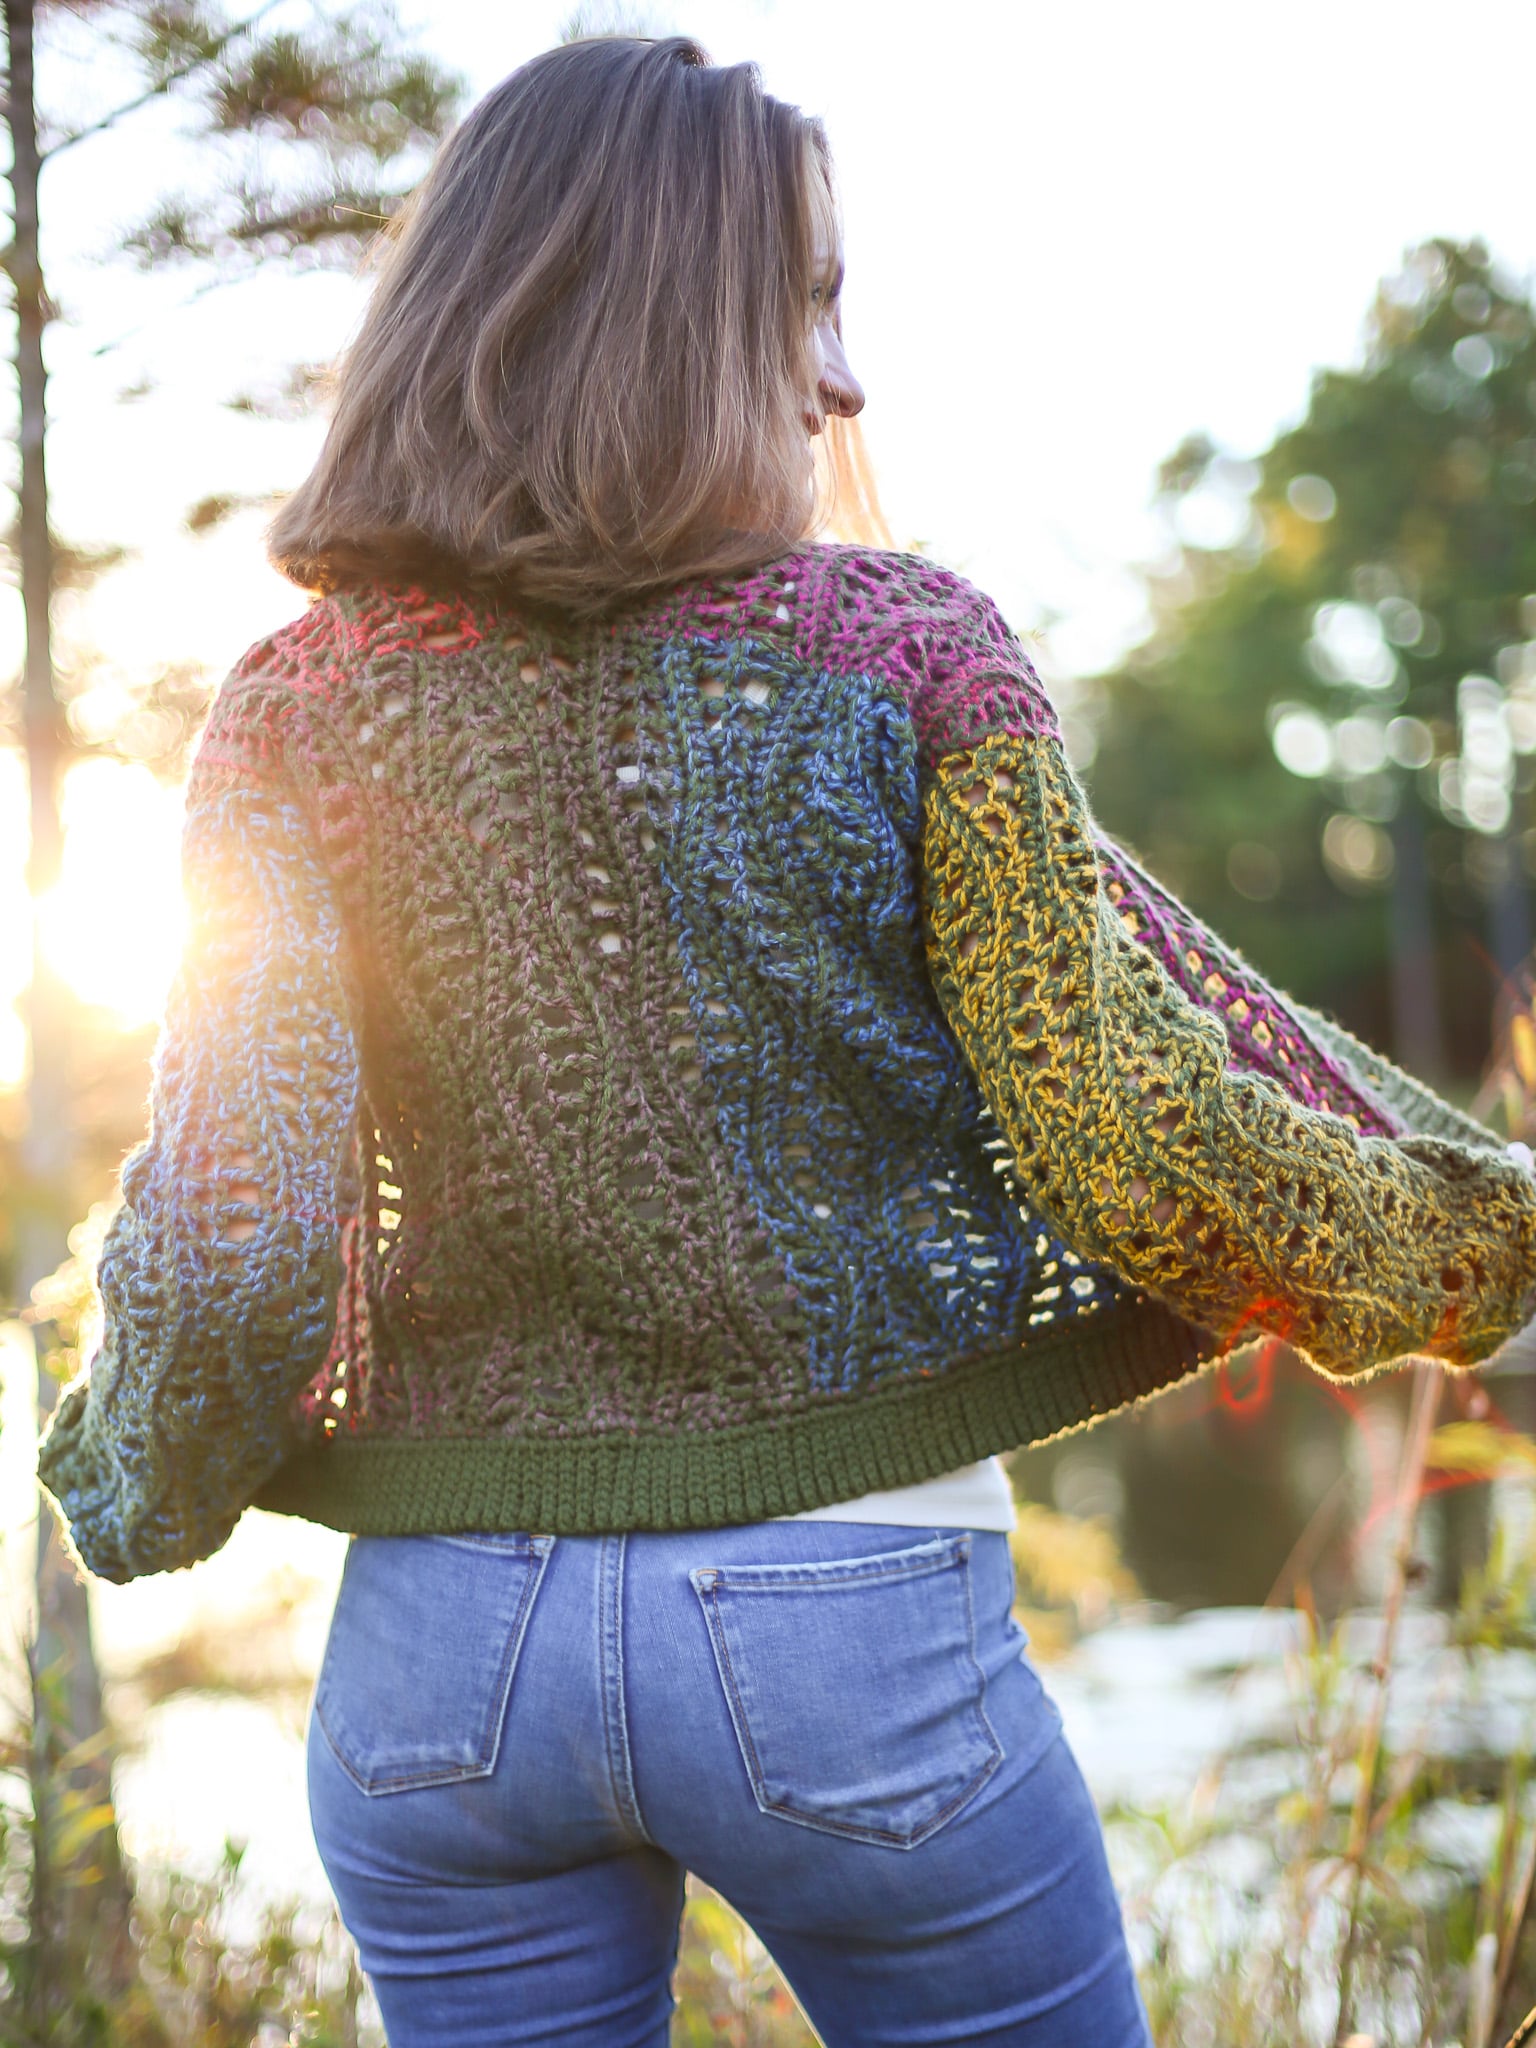
- This cardigan is made from five flat rectangles (back panel, two front panels, two sleeves) worked in a gorgeous waving stitch pattern and then seamed together.
- I designed this pattern to use Wool-Ease DK and Mandala to give you the scrap yarn project look without all the worry of choosing a color pallet. Just pick a Mandala color way you love and pick a complimentary color of Wool-Ease DK.
- Or turn this into a stash buster project to use up yarn scraps. Use dk weight scraps of yarn held double, or worsted weight scraps just be sure to check gauge with your mix of scraps.
- The Lakeside Sunset Cardigan is slightly oversized and features ribbing that elevates this design.
Yarn Substitutes and Choosing Colors
- Any DK weight yarn held double.
- When you hold two strand of yarn double (in the same weight) typically they are the equivalent of the next size up, so you should be able to you a 4 Medium Worsted Yarn of this crochet cardigan, just be sure to check your gauge.
Come find me on…
- Like my Facebook Page
- Join my Facebook group!
- Subscribe to my YouTube Channel for Free Crochet Tutorials
- Get PDFs on Etsy
- Get PDFs on Ravelry
- Sign Up for the Life and Yarn Newsletter for more free patterns!
- Please Note: Some links may be affiliate links that help to support the Life + Yarn Blog with a small commission at no added cost to you, thank you!
- Copyright 2026, Life and Yarn, Brianna Iaropoli. Pattern contents are NOT to be re-shared, DIRECT LINKS ONLY to this post for the pattern.
Materials
- Size 5.00 mm crochet hook
- Sample
- Lion Brand Wool-Ease DK – Color A
- 4 (5, 5) (6, 6) skeins – Olive [#636-172T]
- Lon Brand Mandala – Color B
- 2 (2, 2) (3, 3) skeins – Chimera [#525-204AW]
- #3 DK Weight 920 (1075, 1100) (1255, 1275) yards
EACH Color A & B - Yarn Needle
- Measuring Tape
Gauge
- Ch 18 and complete 8 rows in pattern.
- Blocked: 4 by 5 inches.
- Wether you are working with the recommended yarn, a yarn of similar fiber content or something different, gauge for this pattern along side your preferred blocking method is EXTREMELY important to make sure your cardigan is the right size, fits properly and you have enough yardage.
- Lion Brand’s Wool-Ease DK and Mandala holds their measurements well when combined, so be sure to check gauge with a different than suggested yarn(s) as it may grow significantly when blocked.
- Chain 18 and complete 8 rows in pattern for your gauge swatch.
- My BLOCKED gauge is 4 by 5 inches using a 5.00 mm hook.
- For this pattern I only did a light steam blocking to relax the fabric, open the stitches and straighten my edges.
- If using a different fiber, like 100% wool for example, you may need to change your hook and/or blocking method to reach the same Blocked/Finished Gauge.
Sizing
- XS/S (M/L, XL/2XL) (3/4XL, 5XL)

Tips for Sizing
- How to Adjust the Length of the Body: The length of your body is dictated by the number of stitches in this pattern. To add length you will add/subtract stitches to the Back Panel and Front Panels Starting Chains by 16’s
- How to Adjust the Width of the Body: The width of your body is dictated by the number of Rows in this pattern. To add/subtract width you will add/subtract Rows, you must end on a Row 4 or 8 so that you have a straight Row Edge not a Waving Row Edge for seaming.
- How to Adjust the Neck Opening: To adjust the Neck Opening you will need to do more or less rows on your body panels.
- How to Adjust the Sleeves: The sleeve circumference is dictated by the number of rows, add or subtract rows, be sure to do the same for each sleeve. If you would like shorter or longer sleeves you will need to add or subtract Stitches by 16’s or work more rounds in the “Cuff” section.
- IMPORTANT NOTE: Any changes to sizing will affect your yardage, buy an extra skein if you plan to adjust sizing to avoid running out of yarn or lot color variations.
- Be sure to block every panel to the same size before seaming to avoid crooked and mismatched pieces.
Stitch Descriptions and Abbreviations
- Chain Stitch – ch
- Stitch(es) – st(s)
- Skip – sk
- Slip Stitch – sl st
- Single Crochet – sc
- Half Double Crochet – hdc
- Double Crochet – dc
- Treble Crochet – tr
- Back Loop Only – blo – Work the designated stitch as normal but only use the back loop.
Pattern Notes
- * Designates a repeat.
- “sc 1” means to single crochet in the next stitch.
- “sc 2” means to single crochet in each of the next 2 stitches.
- “2 sc” means to single crochet twice in the next stitch to create an increase.
- The right side has the ridges formed by working in the blo.
- Stitch count is one less than the starting chain for each size. It does not change throughout the pattern. (Multiple of 16 + 2)
- Front Panels are longer than the Back Panels to drop the Back Neck.
- Pattern is worked with BOTH yarns held together as a double strand.
- Fiber caution: If you plan to machine wash, avoid mixing regular wool with acrylic or superwash. Regular wool can felt and shrink while the rest stays the same size.
Scrap Yarn Crochet Cardigan Pattern
Back Panel – Color A and B Held Double
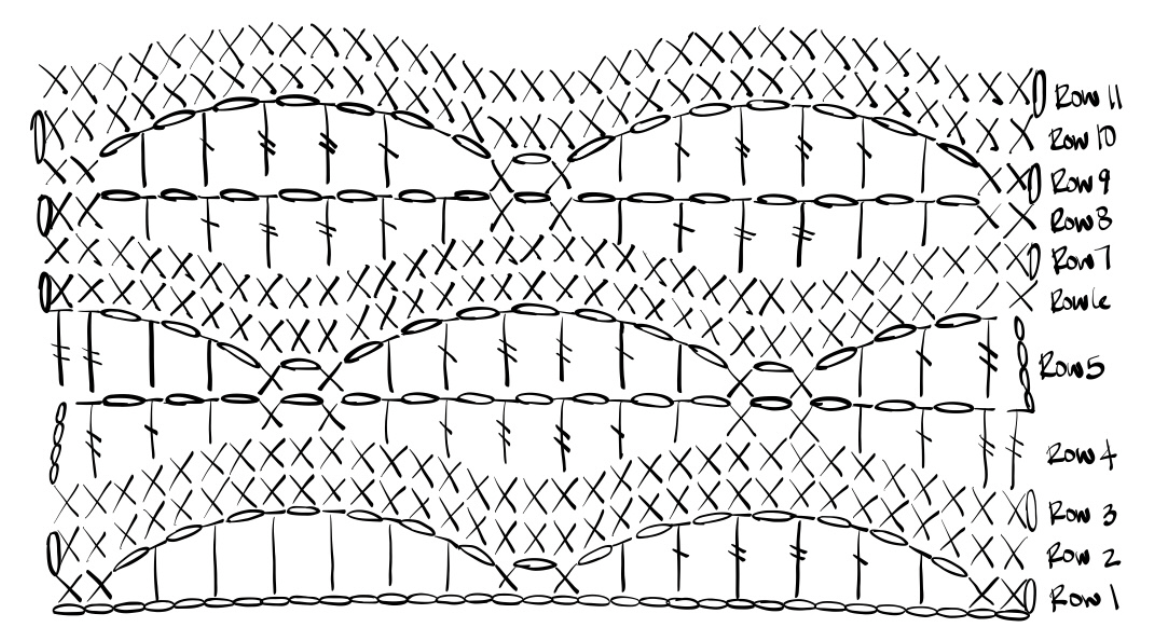
Chain 50
Row 1 – Sc in second chain from hook, sc in next, (ch 1, sk 1), hdc in next, (ch 1, sk 1), dc in next, (ch 1, sk 1), tr in next, (ch 1, sk 1), tr in next, (ch 1, sk 1), dc in next, (ch 1, sk 1), hdc in next, (ch 1, sk 1), sc in next, (ch 1, sk 1), repeat from to until 1 sc remains, omit last ch 1 from repeat and sc in last ch.
Row 2 – Turn, ch 1, sc in each ch-1 sp and each st across.
Row 3 – Turn, ch 1, sc in first st, sc blo until 1 st remains, sc in last st.
Row 4 – Turn, ch 4 (counts as tr), sk first sc, tr in next sc, (ch 1, sk 1), dc in next sc, (ch 1, sk 1) hdc in next sc, (ch 1, sk 1), sc in next sc, (ch 1, sk 1), sc in next sc, (ch 1, sk 1), hdc in next sc, (ch 1, sk 1), dc in next sc, (ch 1, sk 1), tr in next sc, (ch 1, sk 1), tr in next sc, (ch 1, sk 1), dc in next sc, (ch 1, sk 1), hdc in next sc, (ch 1, sk 1), sc in next sc, (ch 1, sk 1), repeat from to until 8 sts remain, sc in next sc, (ch 1, sk 1), hdc in next sc, (ch 1, sk 1), dc in next sc, (ch 1, sk 1), tr in each of last 2-sc sts.
Row 5 – Turn, ch 4 (counts as tr), sk first tr, tr in next tr, (ch 1, sk 1), dc in next dc, (ch 1, sk 1), hdc in next hdc, (ch 1, sk 1), sc in next sc, (ch 1, sk 1), sc in next sc, (ch 1, sk 1), hdc in next hdc, (ch 1, sk 1), dc in next dc, (ch 1, sk 1), tr in next tr, (ch 1, sk 1), tr in next tr, (ch 1, sk 1), dc in next dc, (ch 1, sk 1), hdc in next hdc, (ch 1, sk 1), sc in next sc, (ch 1, sk 1), repeat from to until 8 sts remain, sc in next sc, (ch 1, sk 1), hdc in next hdc, (ch 1, sk 1), dc in next dc, (ch 1, sk 1), tr in each of last 2-tr sts.
Row 6 – Turn, ch 1, sc in each ch-1 sp and each st across.
Row 7 – Turn, ch 1, sc in first st, sc blo until 1 st remains, sc in last st.
Row 8 – Turn, ch 1, sc 2, (ch 1, sk 1), hdc in next sc, (ch 1, sk 1), dc in next sc, (ch 1, sk 1), tr in next sc, (ch 1, sk 1), tr in next sc, (ch 1, sk 1), dc in next sc, (ch 1, sk 1), hdc in next sc, (ch 1, sk 1), sc in next sc, (ch 1, sk 1), sc in next sc, (ch 1, sk 1), hdc in next sc, (ch 1, sk 1), dc in next sc, (ch 1, sk 1), tr in next sc, (ch 1, sk 1), tr in next sc, (ch 1, sk 1), dc in next sc, (ch 1, sk 1), hdc in next sc, (ch 1, sk 1), repeat from to until 2 sts remain, sc in each of last 2 sts.
Row 9 – Turn, ch 1, sc 2, (ch 1, sk 1), hdc in next hdc, (ch 1, sk 1), dc in next dc, (ch 1, sk 1), tr in next tr, (ch 1, sk 1), tr in next tr, (ch 1, sk 1), dc in next dc, (ch 1, sk 1), hdc in next hdc, (ch 1, sk 1), sc in next sc, (ch 1, sk 1), sc in next sc, (ch 1, sk 1), hdc in next hdc, (ch 1, sk 1), dc in next dc, (ch 1, sk 1), tr in next tr, (ch 1, sk 1), tr in next tr, (ch 1, sk 1), dc in next dc, (ch 1, sk 1), hdc in next hdc, (ch 1, sk 1), repeat from to until 2 sts remain, sc in each of last 2 sts.
Rows 10 to 36 (40, 44) (48, 52) Repeat Rows 2 to 9, ending on a Row 4 (8, 4) (8, 4) Repeat, finish off.
Front Panels – Make 2 – Color A and B Held Double
Chain 66 then:
Row 1 to 9 – Follow Back Panel Instructions.
Rows 10 to 16 (20, 20) (24, 24) – Repeat Rows 2 to 9, ending on a Row 8 (4, 4) (8, 8) Repeat, finish off.
Sleeve Panels – Make 2 – Color A and B Held Double
Chain 66 (66, 66) (50, 50) then:
Row 1 to 9 – Follow Back Panel Instructions.
Rows 10 to 28 (32, 32) (36, 36) – Repeat Rows 2 to 9, ending on a Row 4 (8, 8) (4, 4) Repeat, finish off.
Assembly
- Lightly Steam Block all Panels to relax your stitches focusing on the Row Ends so that you can align them properly.
- With Wrong Sides Facing lay your Front Panels on your Back Panels and using a Mattress Stitch seam your Front Panels to your Back Panels to form the Shoulder Seams.
- Fold your Sleeve Panels into tubes with the Right Sides out and Seam Row 1 to your Final Row to form the Sleeves.
- Working from the Waist up seam your Front Panels to your Back Panel leaving the necessary amount open to attach the sleeve, approximately 6.5 (8.5, 8.5) (10.5, 10.5) inches.
- Attach your Sleeves to your Body. Here you will be seaming Row Ends to tops of Stitches, it is very important that you check for alignment so that you do not have any bunching in your sleeves.
- Move onto Body Trim.
Note: If you do not like slip stitch ribbing you can use back and front post double crochet ribbing.
Waist Trim – Color A and B Held Double
- With Right Sides facing and using Color A and B reattach your yarn in the bottom corner of the Waist and single crochet evenly around before adding the ribbing at the bottom.
- Then chain 8, turn so that the Wrong Side of the cardigan is facing you, sl st in the second chain from the hook and each next chain back to the cardigan. [7 total sl sts]
- Sl st in the next st of the cardigan, turn, skip first sl st, sl st blo next 7 sts.
- Turn, ch 1, sl st blo in next 7 sl sts.
- Repeat Steps 3 and 4 to opposite bottom corner of Waist, finish off.
Sleeve Trim – Color A and B Held Double
- With Right Sides facing and using Color A and B reattach your yarn on one side of the Sleeve Seam and single crochet evenly around, if you would like you can do a second continuous round with decreases to shrink the Cuff for the ribbing on the sleeves.
- Then chain 6, turn so that the Wrong Side of the cardigan is facing you, sl st in the second chain from the hook and each next chain back to the cardigan. [5 total sl sts]
- Sl st in the next st of the cardigan, turn, skip first sl st, sl st blo next 5 sts.
- Turn, ch 1, sl st blo in next 5 sl sts.
- Repeat Steps 3 and 4 to end, seam to first row of Trim, finish off.
Optional: You may add decreases to the Sleeve Cuff for a more fitted cuff.
Decrease Row Instructions: Sl st 2 in each of the next 2 sts of the cardigan, turn, skip 2-sl sts, sl st blo in each next sl st.
Collar Trim – Side 1 – Color A and B Held Double
- First you will need to place a stitch marker at decrease locations on your Front Panel as follows:
- Using stitch markers starting from the Back of the Neck count 15 sts, place a stitch marker, place another stitch marker every 5 stitches for a total of 5 stitch markers. Do this on both sides, this will be where you will place decrease ribbing rows.
- Using Color A and B reattach your yarn to the bottom of your Cardigan in the Waist Trim.
- Then chain 8, turn so that you can work up on the Front Panel towards the Neck, sl st in the second chain from the hook and each next chain back to the cardigan. [7 total sl sts]
- Sl st in the next st of the cardigan, turn, skip first sl st, sl st blo in remaining sts.
- Turn, ch 1, sl st blo in each next sl st.
- Decrease Row Instructions: Sl st 2 in each of the next 2 sts of the cardigan, turn, skip 2-sl sts, sl st blo in each next sl st.
- Repeat Steps 5 and 6 to end but working a Decrease Row at each Stitch Marker so that each section will decrease by 1 stitch.
Note: On Sizes M/L and 3/4XL the Front Panels are exactly half the Back Panel so there is not a gap in the Back Neck, you will need to add more decrease rows to taper and join in the trim. You can either do them gradually in the 15 sts left OR at the very end decrease to no stitches and join based on your fit preference.
Collar Trim – Side 2 – Optional Buttons – Color A and B Held Double
- First you will need to place a stitch marker at decrease locations on your Front Panel just as you did on your “Collar Trim – Side 1”
- Using stitch markers from the Back of the Neck count 15 sts, place a stitch marker, place another stitch marker every 5 stitches for a total of 5 stitch markers. Do this on both sides, this will be where you will place decrease ribbing rows.
- Next sew your buttons in place on the Collar Trim you just created.
- Once placed use stitch markers to note the location of buttons holes on the Collar Trim side that has yet to be worked.
- Using Color A and B reattach your yarn to the bottom of your Cardigan in the Waist Trim.
- Then chain 8, turn so that you can work up on the Front Panel towards the Neck, sl st in the second chain from the hook and each next chain back to the cardigan. [7 total sl sts]
- Sl st in the next st of the cardigan, turn, skip first sl st, sl st blo in remaining sts.
- Turn, ch 1, sl st blo in each next sl st.
- Decrease Row Instructions: Sl st 2 in each of the next 2 sts of the cardigan, turn, skip 2-sl sts, sl st blo in each next sl st.
- Button Hole Instructions: When you reach the location of a button you will need to skip stitches to create an opening. For EXAMPLE, I needed to skip 2 sts and create a 2-ch opening for my buttons to fit. So where I needed an opening I did “ch 1, sl st 2, (ch 2, sk 2), sl st 3” for Step 8, then for Step 7 “Sl st in the next st of the cardigan, turn, sk first sl st, sl st 7 blo” using the chains as well.
- Repeat Steps 7 and 8 to end but working a Decrease Row or Button Hole at Stitch Markers
Note: On Sizes M/L and 3/4XL the Front Panels are exactly half the Back Panel so there is not a gap in the Back Neck, you may/will need to add more decease rows to taper and join in the trim.
I hope you loved this easy scrap yarn crochet project but if you like a different textured cardigan that uses cables try the Diamond Trellis heirloom Cardigan. Maybe you would like a more easy crochet cardigan? Try this Moss Stitch Cardigan that uses weight 4 medium yarn and would be another great project for random scrap yarn!