Free Big Floppy Crochet Wide Brim Sun Hat Pattern for Summer
Make this Crochet Wide Brim Sun Hat Pattern perfect for Sunny Days using Single Crochet Stitches and worsted weight cotton yarn! This semi floppy sun hat is a perfect beach hat with lots of customization options!
You only need knowledge of basic stitches to make this classic sun hat with stripes. Scroll below to use the written free crochet pattern, Happy Crocheting!
Best Bang for your Buck, get a Kit From Lion Brand includes printable PDF and Yarn!
Get an ad-free PDF Version on Etsy or Ravelry!

You Need to Make This Crochet Hat Pattern!
Summer hats are a great way to dress up any outfit and to help you stay cool in the warmer months. I especially love a wide brim sun hat to make sure I have ample shade on my face to protect my face from the sun. Sun hats are one of my favorite things for sun protection!
You can finish the sun hat brim in a ton of ways! Omit the wire all together and have a super floppy hat, use only one strand like my sample so you have a semi-floppy brim or use two strands for a more solid brim.
Check out the difference between these two sun hats, the striped sun hat uses one strand of beading wire while the solid sun hat uses two strands of the same wire, huge difference!

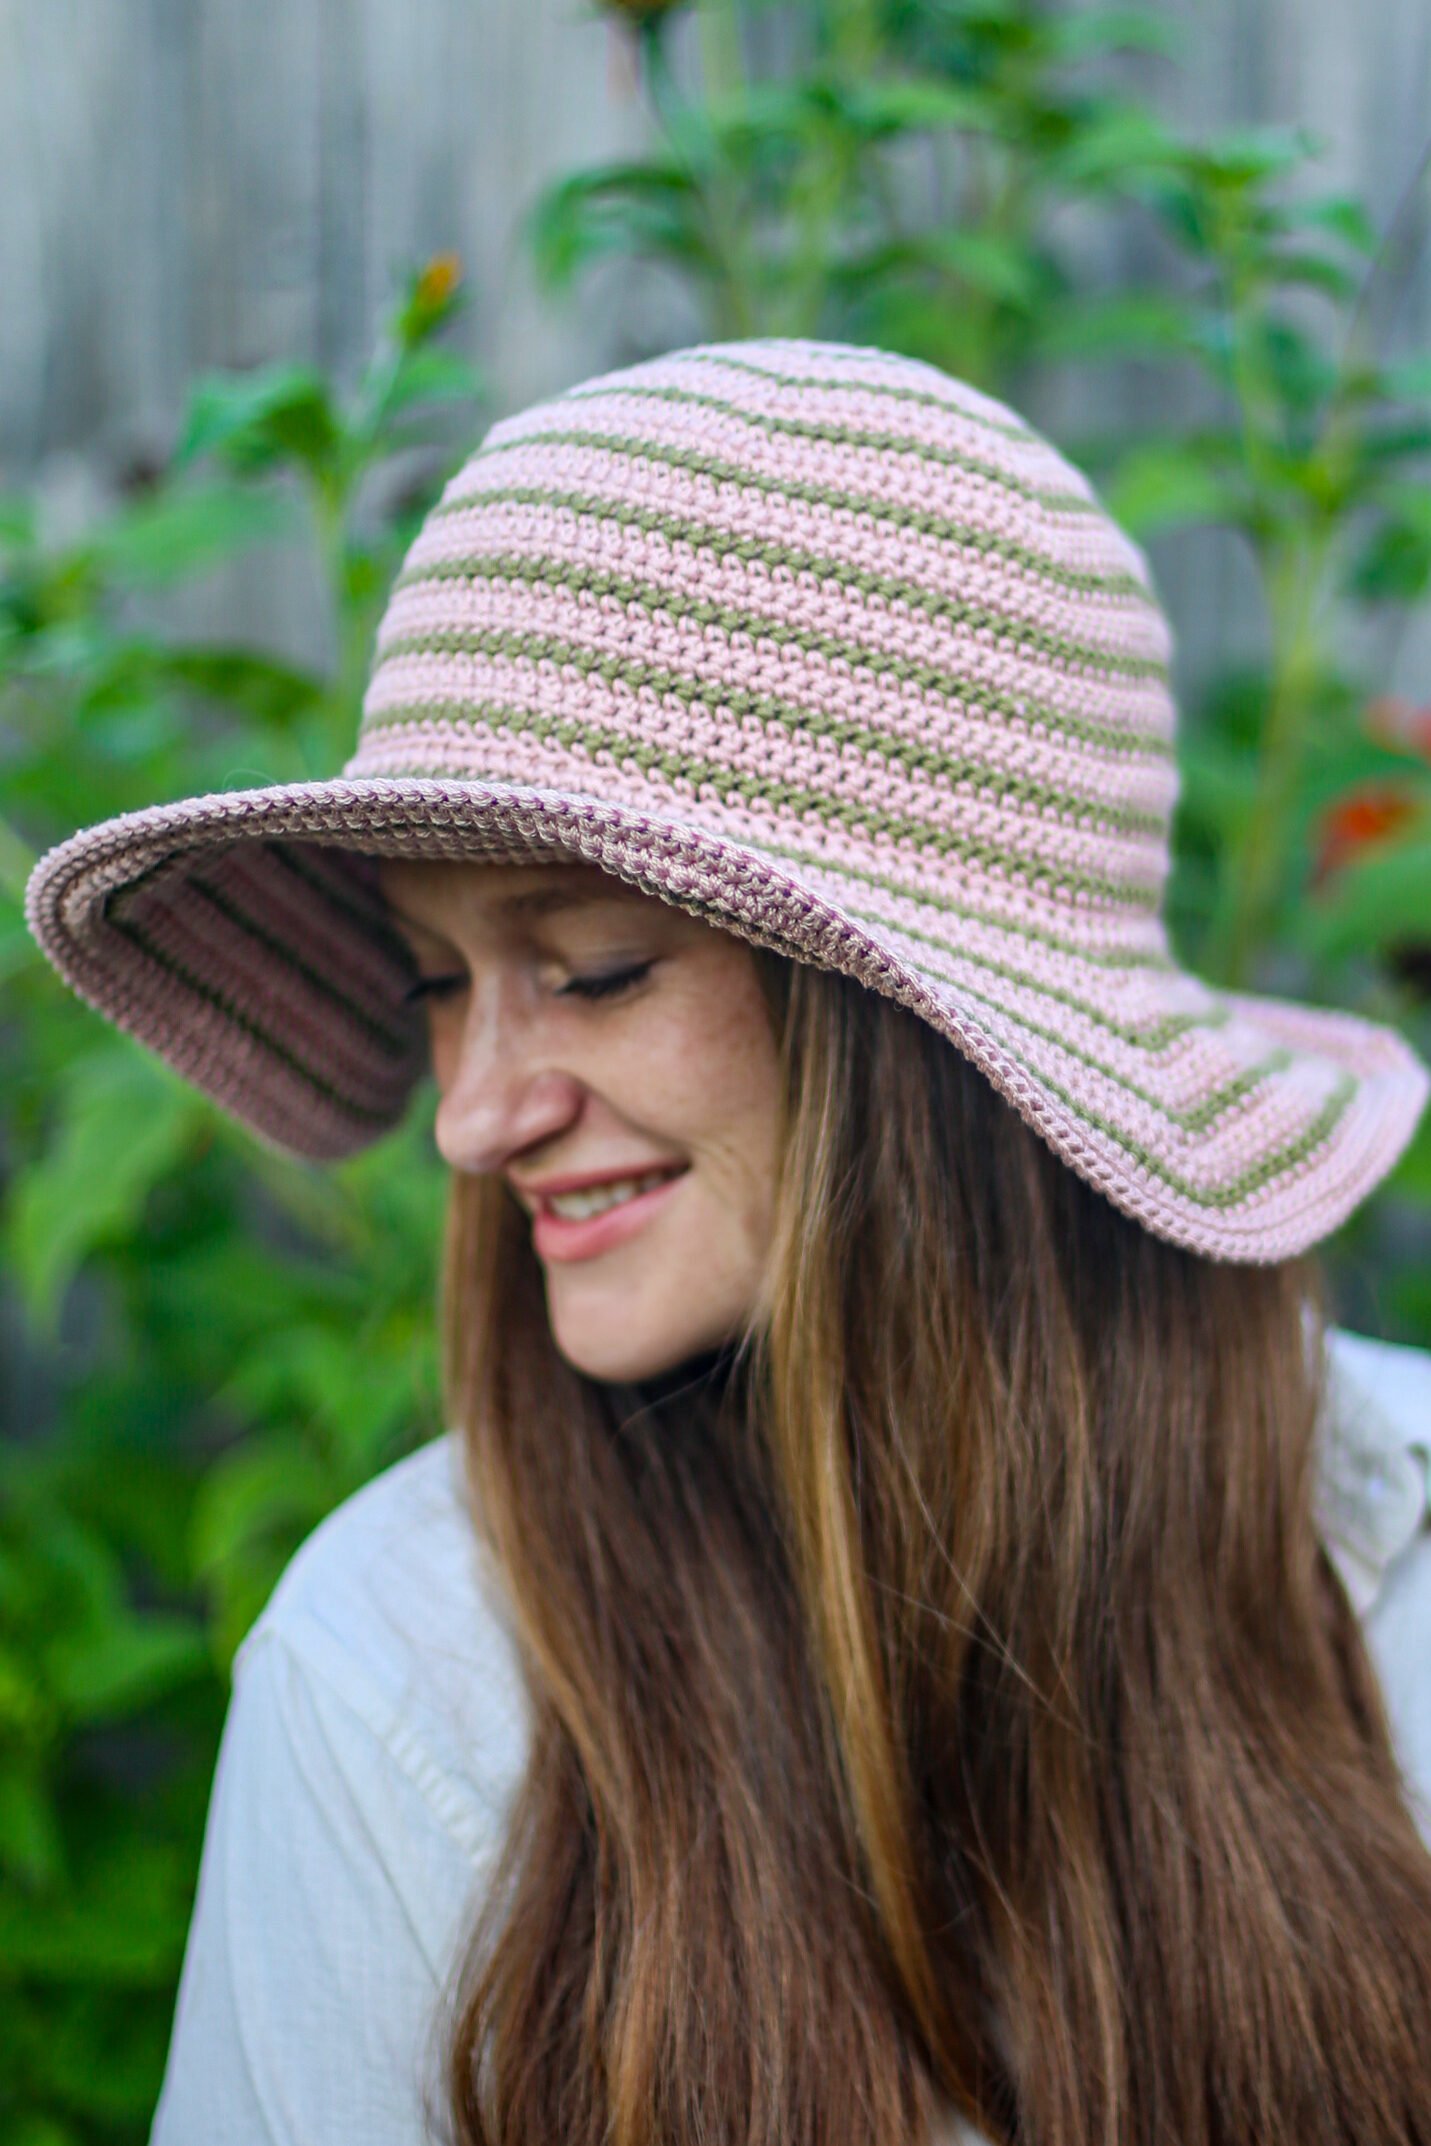
There are so many styles of crochet sun hats, if you love trendy bucket hats you can do less rows to make this gorgeous sun hat brim the perfect size.
Would you like to see this crochet pattern up close? Watch my video sharing about this project and let know in the comments if you want a video tutorial for this wide brim sun hat!
How to Adjust for Different Head Sizes
You can easily adjust this summer crochet sun hat for smaller sizes if needed. If you have a smaller head here’s how to do it:
- Measure the circumference of your head.
- As you are working your rounds for the top of the hat (flat circle) check the circumference every few rounds and when you reach the circumference needed is when you stop doing increase rounds.
- Then you will continue down with the pattern to make the sides of the hat.
- Once you reach a comfortable depth on the sides reference the brim of the hat instructions BUT you will need to go back to the Top of Hat instructions and continue with the next increase round from where you left off.
Please note that you may have to adjust your stripes and the colors of each round may shift if you play with sizing.
To make things easy, know that you there is always 3 rounds of Color A between each round of Color B.

Helpful Tips to Crochet a Sun Hat
Firstly, stitch markers. Using a stitch marker will be the easiest way to keep track of your first stitch in each round so that the sizing for your hat doesn’t get wonky.
While this pattern uses simple stitches, sometimes working in the round and changing colors can be frustrating, especially for a beginner crocheter, but I promise you can do it. Just take it slow, round by round and keep checking your stitch count.
When it comes to choosing yarn, I believe natural fibers are good choice for this perfect project for summer.
But mostly, have fun playing around with choosing your favorite colors, maybe match it to a beach bag?
Yarn Substitutes
Personally I think the recommended yarn and/or natural fibers are the best yarn for this project but if you want to shop your stash or aren’t a fan of 24/7 Cotton you have options! If you have a dk weight yarn on hand you can hold it double to meet gauge for this pattern! Try some of these options below:
- 24/7 Cotton DK – Held Double
- Pima Cotton
- Lion Brand Rewind Yarn
Come find me on…
- Like my Facebook Page
- Join my Facebook group!
- Subscribe to my YouTube Channel for Free Crochet Tutorials
- Get PDFs on Etsy
- Get PDFs on Ravelry
- Sign Up for the Life and Yarn Newsletter for more free modern crochet free patterns!
- Please Note: Some links may be affiliate links that help to support the Life + Yarn Blog with a small commission at no added cost to you, thank you!
Materials
- 4.50 mm Crochet Hook
- 2 Skeins of Lion Brand 24/7 Cotton in Beechnut [761-123AZ] – Color A
- 1 Skein of Lion Brand 24/7 Cotton in Bayleaf [761-171V] – Color B
- #4 Worsted Weight Yarn
Color A – 279 yards
Color B – 90 yards - Yarn Needle
- Optional: 7 Strand 20 Gauge Beading Wire to make the brim of your sun hat sturdy or some millinery wire.You can grab some like I used on Amazon to check out your local hardware store or the jewelry aisle.
Gauge
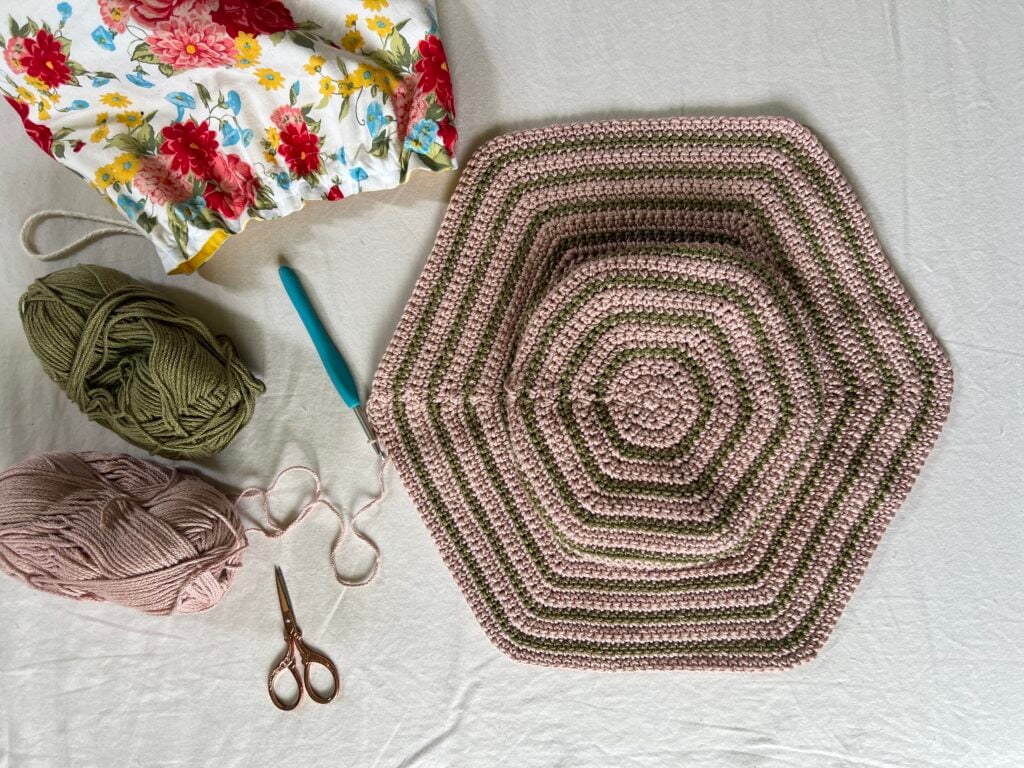
- First 9 Rounds of will produce a flat circle with a 4” diameter.
- If you experience any gauge issues, like your circle doesn’t lay flat and is pinching up like a bowl you need to go up a hook size, if it is wavy you need to go down to a smaller hook size.
Sizing
- Adult Small (Large): 21-22 (22-23) inch heads. Adult Large will fit most men. I am wearing the large as I don’t like anything tight on my head and I that lots of wiggle room.
Stitch Descriptions and Abbreviations
- Chain Stitch – ch
- Slip Stitch – sl st
- Stitch(es) – st(s)
- Skip – sk
- Single Crochet – sc
- Back Post Single Crochet – BPsc
Pattern Notes
- * Designates a repeat.
- Pattern is written in US Terms.
- Turn at the end of Rounds.
- All Rounds are Sl St to join in the first sc st and then ch 1 to begin the next round, ch 1 does not count as a stitch.
- Adding the beading wire to the last round in the brim is optional however, not using it will change the look of the hat making it more floppy. You could forgo the wire and add later, but it is easier to crochet over the wire than it is to thread it in.
- “sc 1” means to single crochet in the next stitch.
- “sc 2” means to single crochet in each of the next 2 stitches.
- “2 sc” means to single crochet twice in the next stitch to create an increase.
- The Wrong Side of Color B is the Right Side of the hat.
Crochet Wide Brim Sun Hat Pattern
Top of Hat
Color A
Round 1 – Ch 2, 6 sc into 2nd chain from hook. [6 sts]
*Sl st to join and ch 1 on each round.
Round 2 – 2 sc in each st. [12 sts]
Round 3 – *Sc 1, 2 sc in next st, repeat from* to end. [18 sts]
Round 4 – *Sc 2, 2 sc in next st, repeat from* to end. [24 sts]
Round 5 – *Sc 3, 2 sc in next st, repeat from* to end. [30 sts]
Switch to Color B
Round 6 – *Sc 4, 2 sc in next st, repeat from* to end. [36 sts]
Switch to Color A
Round 7 – *Sc 5, 2 sc in next st, repeat from* to end. [42 sts]
Round 8 – *Sc 6, 2 sc in next st, repeat from* to end. [48 sts]
Round 9 – *Sc 7, 2 sc in next st, repeat from* to end. [54 sts]
Switch to Color B
Round 10 – *Sc 8, 2 sc in next st, repeat from* to end. [60 sts]
Switch to Color A
Round 11 – *Sc 9, 2 sc in next st, repeat from* to end. [66 sts]
Round 12 – *Sc 10, 2 sc in next st, repeat from* to end. [72 sts]
Round 13 – *Sc 11, 2 sc in next st, repeat from* to end. [78 sts]
Switch to Color B
Round 14 – *Sc 12, 2 sc in next st, repeat from* to end. [84 sts]
Switch to Color A
Final Round for Small: Round 15 – *Sc 13, 2 sc in next st, repeat from* to end. [90 sts]
Final Round for Large: Round 16 – *Sc 14, 2 sc in next st, repeat from* to end. [96 sts]
Continue to “Body of Hat”.
Body of Hat
The next set of rounds will create the Body of the Hat. You may add or subtract rounds if you want the Body of the Hat deeper or more shallow. For this section the pattern continues with the “*Sl st to join and ch 1 on each round” as the first set of rounds did for the “Top of Hat” section. Be sure to turn at the end of each round.
Color Changes Size Small
Rounds 1 and 2 – Color A | Round 3 – Color B | Rounds 4 to 6 – Color A | Round 7 – Color B | Rounds 8 to 10 – Color A | Round 11 – Color B | Rounds 12 to 14 – Color A | Round 15 – Color B | Round 16 – Color A
Color Changes Size Large
Round 1 – Color A | Round 2 – Color B | Rounds 3 to 5 – Color A | Round 6 – Color B | Rounds 7 to 9 – Color A | Round 10 – Color B | Rounds 11 to 13 – Color A | Round 14 – Color B | Rounds 15 to 17 – Color A | Round 18 – Color B | Round 19 – Color A
Next 16 (19) Rounds – Sc around in each st. [90 (96) sts] Remember to Sl St to join, ch 1 and turn.
The Body of the Hat will measure approximately 3.75 (4.25) inches tall.
This next set of rounds will move back to creating the rest of the flat circle. You may customize this section by adding or subtracting rounds to make the Brim of the Hat as large as you would like. Size Small has an Extra Catchup Round and which will be in Color A before continuing either the striping pattern.
Brim of Hat
Continue with Color A – Brim Foundation Round – BPsc in each st around to end. [90 (96) sts]
Size Small Only: Extra Round – *Sc 14, 2 sc in next st, repeat from* to end. [96 sts]
Round 1 – *Sc 15, 2 sc in next st, repeat from* to end. [102 sts]
Switch to Color B
Round 2 – *Sc 16, 2 sc in next st, repeat from* to end. [108 sts]
Switch to Color A
Round 3 – *Sc 17, 2 sc in next st, repeat from* to end. [114 sts]
Round 4 – *Sc 18, 2 sc in next st, repeat from* to end. [120 sts]
Round 5 – *Sc 19, 2 sc in next st, repeat from* to end. [126 sts]
Switch to Color B
Round 6 – *Sc 20, 2 sc in next st, repeat from* to end. [132 sts]
Switch to Color A
Round 7 – *Sc 21, 2 sc in next st, repeat from* to end. [138 sts]
Round 8 – *Sc 22, 2 sc in next st, repeat from* to end. [144 sts]
Round 9 – *Sc 23, 2 sc in next st, repeat from* to end. [150 sts]
Switch to Color B
Round 10 – *Sc 24, 2 sc in next st, repeat from* to end. [156 sts]
Switch to Color A
Round 11 – *Sc 25, 2 sc in next st, repeat from* to end. [162 sts]
Round 12 – *Sc 26, 2 sc in next st, repeat from* to end. [168 sts]
Round 13 – *Sc 27, 2 sc in next st, repeat from* to end. [174 sts]
Switch to Color B
Round 14 – *Sc 28, 2 sc in next st, repeat from* to end. [180 sts]
Switch to Color A
Round 15 – *Sc 29, 2 sc in next st, repeat from* to end. [186 sts]
Round 16 – *Sc 30, 2 sc in next st, repeat from* to end. [192 sts]
Round 17 Optional Instructions Below – Sc evenly around working over the beading wire if you have chosen to do so, finish off. [192 sts]
Round 18 – Surface slip stitch in the last round created.
Optional: Take your beading wire and lay it around the brim of your hat to get an accurate length needed. Add 2 inches so that you have some overlap on the wire, cut your wire. Hold your wire along the top of Round 16 so that you can crochet over it with Round 17. Leave about inch out so that it does not slip out of your first stitch. When you get close to finishing Round 17 make sure all the ends of wire are laying properly so that you can crochet over them. Then move your stitches around the wire to adjust the brim.
Looking for other free crochet sun hat patterns? Check out my other summer sun hat!