Free Crochet Coat Pattern with Pockets – Interlocking Crochet
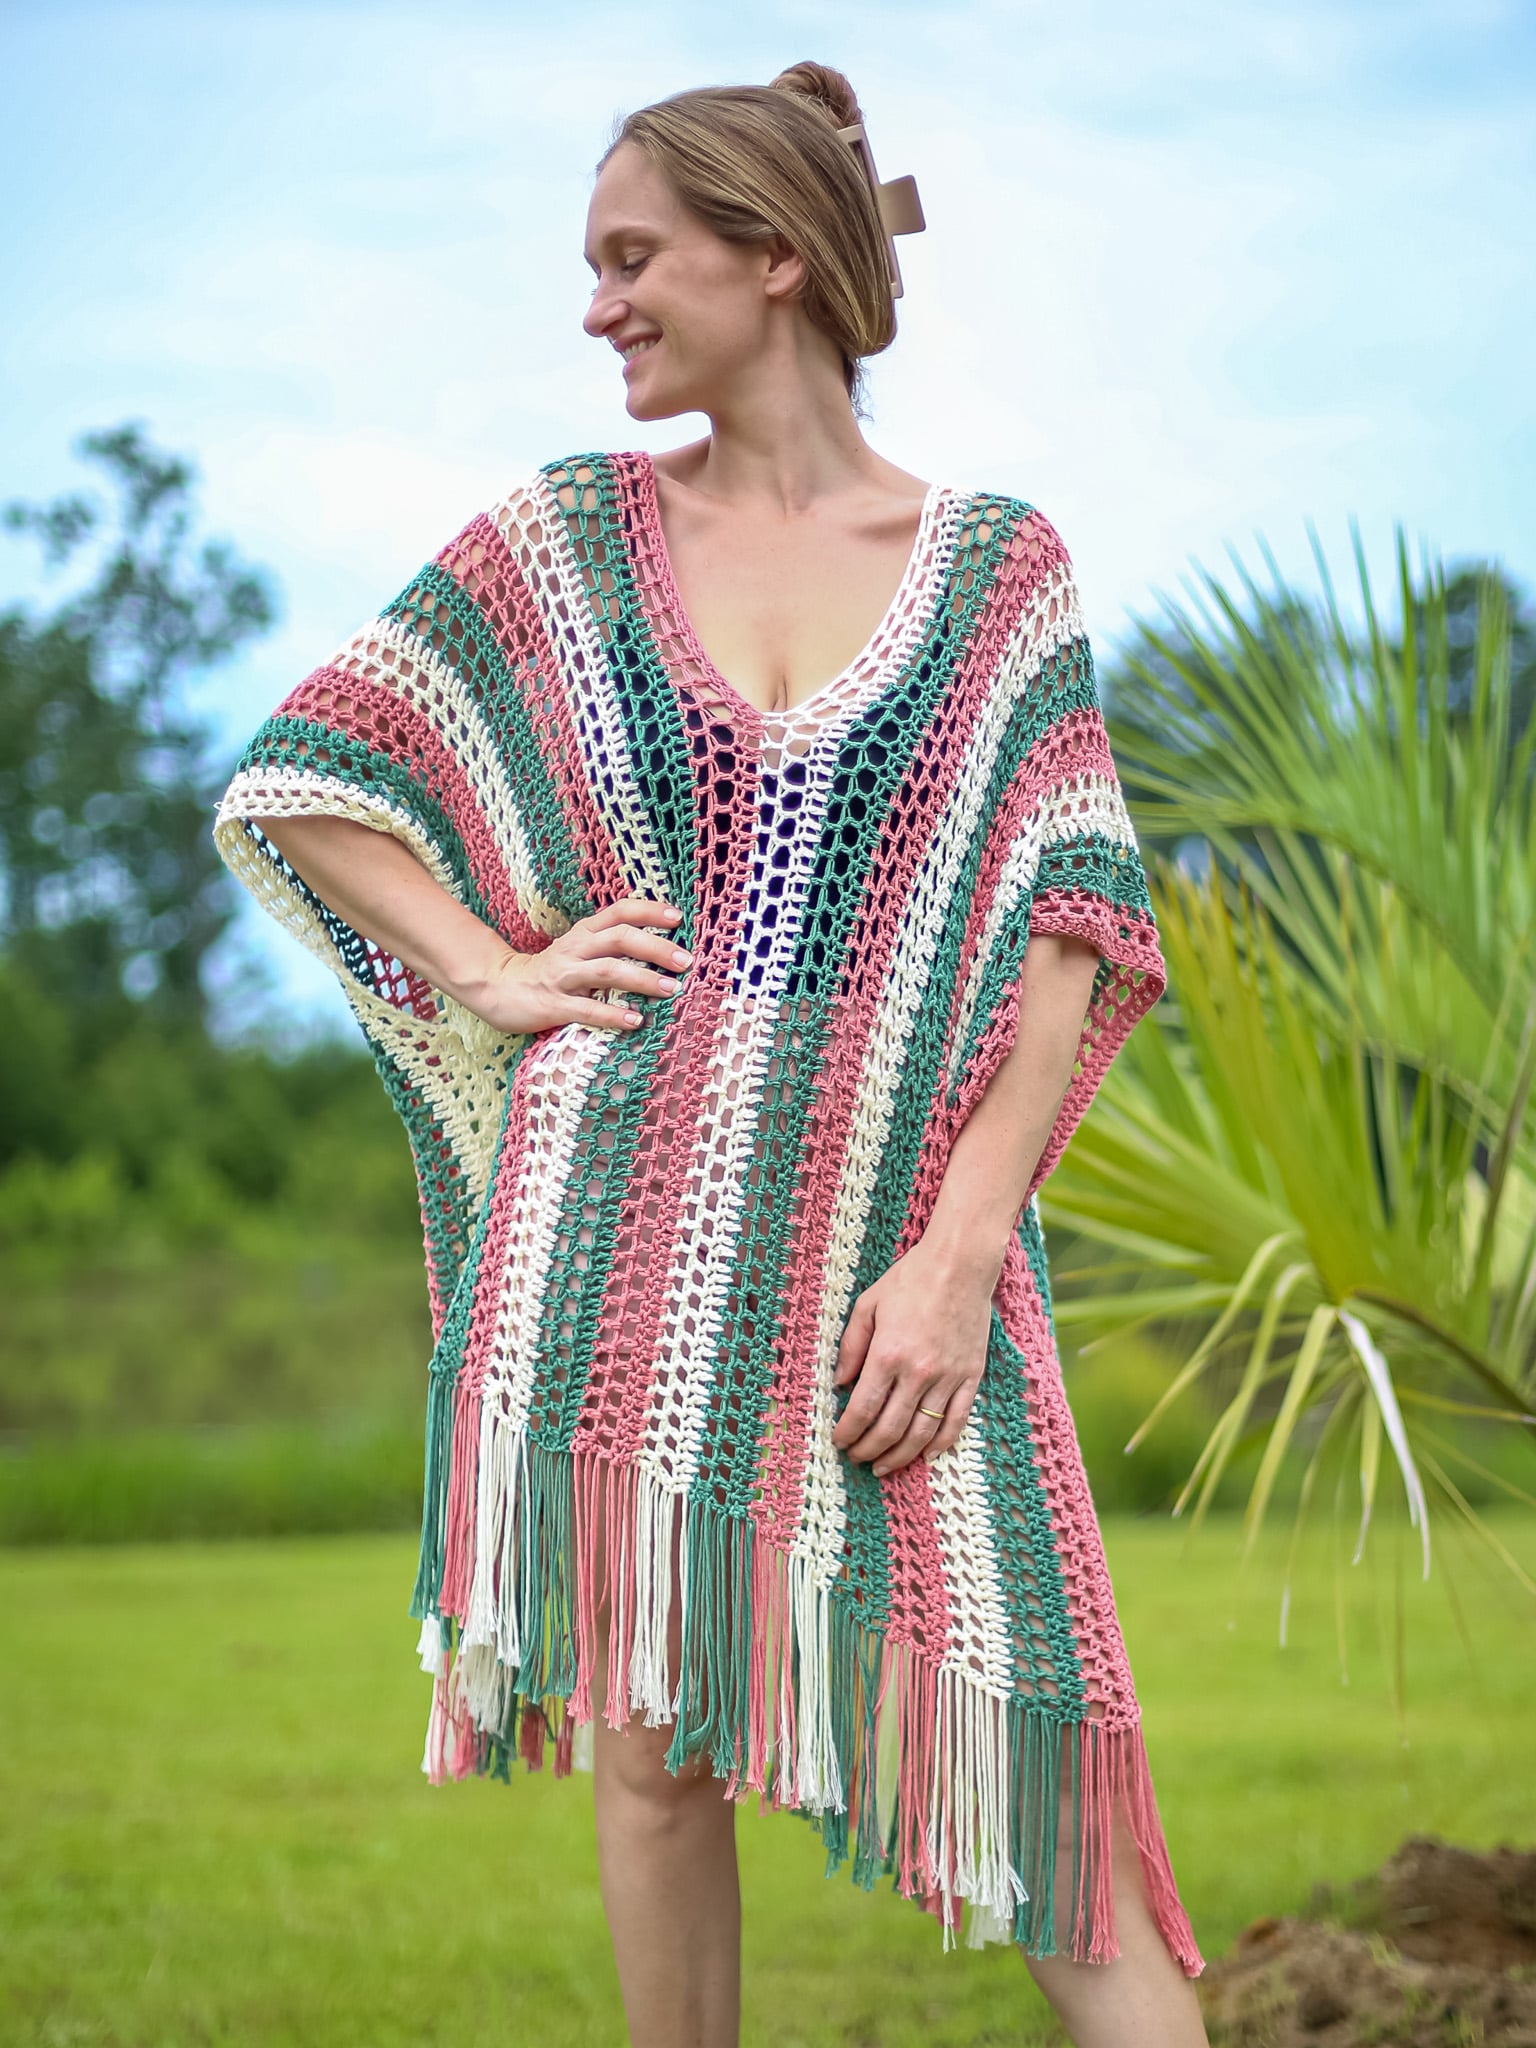
What’s better than one crochet coat? TWO! This gorgeous crocheted coatigan made with the interlocking crochet technique makes two beautiful patterns meaning you have no wrong side on this crochet jacket and can wear it two ways!
Since this crochet stitch is reversible, each side has a different pattern with a strong contrast! You are going to love creating this free crochet coat pattern using interlocking crochet! This double sided crochet jacket might be a bit of a challenge but it will be a very fun project and I am sure you can do it with the help of this full step-by-step video tutorial!
Best Bang for your Buck, get a Kit From Lion Brand includes a printable ad-free pdf pattern and yarn!
Get a printable pdf crochet pattern on my Etsy Shop or Ravelry!
Watch the Video Tutorial on YouTube.

Pattern Description and Crochet Tips
This pattern is designated as an Advanced Skill Level pattern because this special crochet technique can be hard to understand at first but watching the row by row instructions for a visual will be super helpful!
For this pattern I have written it for NINE sizes! XS (S, M, L, XL, 2XL, 3XL, 4XL, 5XL) There is a helpful sizing chart below and I explain how to adjust using the repeat row below if changes are needed to make smaller or larger sizes.
When choosing your yarns for this project be sure to pick contrasting colors to really make the stitch pattern for this cozy coat pop, remember each opposite side is different!
For my crochet jacket I chose as solid for my main color (Wool-Ease DK in Taupe) and a self striping yarn for my second color (Mandala in Dragon) it does all the work for you, giving the effect of crochet color work. Be sure to check out my yarn sub section below for other yarn options.
Lion Brand Mandala has very long color changes. I would highly recommend working all of your panels at once to avoid having large blocks of color so that the entire coat looks cohesive.
Be sure to place a stitch marker in the last st of the end of each row before switching to the next color so that your stitches do not get dropped.
We never work in the chain spaces in this pattern, we only in the double crochet stitches and the turning chain.
Interlocking crochet is one of a few wonderful crochet techniques that creates a reversible fabric if you do not like the mosaic option.

Pattern Description and Construction
This Crochet Coat Pattern is made with five rectangular panels. Each rectangular panel is made first, blocked if you choose and then seamed together.
Believe it or not, once you get the hang of this interlocking crochet stitch it is an easy stitch even for beginners and the panels do not take a long time to make. Just make sure you place a stitch marker at the end of each row so that you don’t loose your last stitch when working your next row.
Blocking will help make sure the outer edge each rectangular panel is straight and you can seam your panels together evenly.
If you are using the recommended yarn it will block out significantly if you chose to steam or wet block. This will allow you to really customize your fit.
This crochet coatigan has seamless pockets. They are optional and may be skipped if you like.
If you would like to add button holes you can dose when you add the color.

What is Interlocking Crochet
Interlocking Crochet is a technique that is also called mosaic crochet, double filet crochet, interweave or intermeshing. However you call it, one thing is for sure, it is gorgeous! This special crochet technique creates double-sided designs!
This is a crochet technique where you create two layers of fabric (filet mesh) and work them together at the same time so that the rows are woven or interlocked!
It is important to note that each row is actually two and the patterns are created by some stitches being worked in front and some in back but never mixing the stitches of your two separate colors. Noted as dcb (double crochet in back) and dcf (double crochet in front). These stitches are explained further below.
I hope you enjoy this pattern and be sure to watch my YouTube Video Tutorial if you need some help!
How to Adjust Sizing
There are two multiples for this interlocking crochet blanket pattern.
For Color A the Multiple is 4 plus 4. For Color B it is 2 stitches less than the foundation chain for Color A or 4 plus 2.
So if you notice the gauge swatch is 20 stitches (16 + 4) for Color A and 18 stitches (20 – 2 or 16 + 2) for color B.
As far as yardage goes you will need pretty close to even amounts of each color. Always get a bit more than needed so you don’t have to worry about dye lots later.
Yarn Substitutes
For this pattern I used Lion Brand’s Wool-Ease DK and Mandala, both DK weight yarns.
- Feels Like Alpaca and Mandala
- 24.7 Cotton DK has some lovely solid and multi colors you can combine if you have a wool allergy or would like this coat for spring and summer!
- Superwash Merino has a great color line up and you could pick two solid contrasting colors for a more subtle coat.
Come find me on…
- Like my Facebook Page
- Join my Facebook group!
- Subscribe to my YouTube Channel for Free Crochet Video Tutorials
- Get PDFs on Etsy
- Get PDFs on Ravelry
- Sign Up for the Life and Yarn Newsletter for more modern free crochet patterns! New Patterns are released frequently!
Materials
- 5.00 mm Crochet Hook
- 4 (4, 4, 5, 5, 5, 5, 6, 6) Skeins of Lion Brand Wool-Ease DK in Taupe [636-125Y] – Color A
- 1 (1, 1, 2, 2, 2, 2, 2, 2) Skeins of Lion Brand Mandala in Dragon [525-230F] – Color B
- 2 Stitch Markers
Gauge
- Chain 20 for Foundation Row A
- Chain 18 for Foundation Row B
- Follow pattern for first repeat (Rows 1-6)
- Swatch will measure 4 by 4 inches including Foundation Rows.
Sizing
- Sizes – XS (S, M, L, XL, 2XL, 3XL, 4XL, 5XL)
- See chart for size specifics.
- Blocking and Waist/Collar Trim will add about 6-8 inches of positive ease to bust and length.
Stitch Descriptions and Abbreviations
- Chain Stitch – ch
- Stitch(es) – st(s)
- Skip – sk
- Stitch Marker – SM
- Single Crochet – sc
- Half Double Crochet – hdc
- Double Crochet – dc
- Half Double Crochet 2 Together – hdc2tog – Work to HDC stitches together to form one stitch for a decrease.
- Double Crochet in Front – dcf – Work your double crochet as your normally would from the front. Sometimes this requires pulling the stitch through the corresponding window of the opposite color. To do this your will yarn over, bring your hook to the front, go through the window to pick up the dc needing to be worked on the back, insert your hook, pull the stitch through the window to the front, then complete your double crochet stitch as normal.
- Double Crochet in Back – dcb – Work your double crochet as your normally would from the back. Sometimes this requires pulling the stitch through the corresponding window of the opposite color. To do this your will yarn over, bring your hook to the back, go through the window to pick up the dc needing to be worked on the front, insert your hook, pull the stitch through the window to the back, then complete your double crochet stitch as normal.
- Foundation Single Crochet – Fsc – Chain 2, insert hook into 2nd chain from hook, yarn over and pull up a loop (2 loops on hook), yarn over, draw through 1 loop, (2 loops on hook with 1 ch created), yarn over, draw through all loops (1 loop on hook, 1 foundation single crochet with chain at the bottom). *Insert hook to the bottom of the stitch you just made, it will look like the top or “V” of a stitch, yarn over, pull up 1 loop (2 loops on hook), yarn over, draw through 1 loop (2 loops on hook with 1 ch created), yarn over, draw through all loops;* repeat from * to * for desired amount of stitches.
Pattern Notes
- * Designates a repeat.
- “sc 1” means to single crochet in the next stitch.
- “sc 2” means to single crochet in each of the next 2 stitches.
- “2 sc” means to single crochet twice in the next stitch to create an increase.
- Ch 4 counts as first dc and ch-1 sp throughout.
- When working rows you will only work your stitches in the color you are currently using (ex. Color A only creates stitches in the previous Color A Row) and work through, in front or in back of the color you are not using, never around the other color.
- Row Instructions give two sets of instructions noted as Row “1A” and Row “1B”. The A and B Reference the color you are working with, so each row is really two rows worked in succession.
- I HIGHLY RECOMMEND working all panels at the SAME TIME so that you get all of the color changes from the Mandala on each of your panels. Otherwise you will have very large blocks of color and not have the desired color work effect.

Back Panel
Foundation Row A
Ch 72 (76, 84, 92, 100, 112, 116, 128, 136) dc in 6th ch from hook, *ch 1, sk 1, dc in next, repeat from * to end, place SM.
Foundation Row B
Ch 70 (74, 82, 90, 98, 110, 114, 126, 134), dc in 6th ch from hook, *ch 1, sk 1, dc in next, repeat from * to end, place SM.
Note: Lay Foundation Row A on top of Foundation Row B with the working yarn at the same side so you may begin working Row 1A below followed by Row 1B.
Note: Be sure to take the working yarn from Foundation Row B and drop it to the front so that you can work your Row 1B on the Front (Right Side) of your project.
Note: Place a SM at the end of each row before starting the next.
Bring Color B Working Yarn to Front.
Row 1A
Ch 4, dcb in next dc, *ch 1, dcf in next dc, ch 1, dcb in next dc, repeat from * to last dc, ch 1, dcf in last dc (t-ch).
Note: When working this row for the first time the stitch placement can be tricky before the pattern becomes easy to see. The first stitch (dcb in next dc) will be picked up between the first and second dc of Foundation Row B then the rest of the stitch placements are easy.
Row 1B
Ch 4, dcf in next dc, *ch 1, dcf in next dc, repeat from * to end. Turn entire piece.
Bring Color B Working Yarn to Front.
Row 2A
Ch 4, dcf in next dc, *ch 1, dcb in next dc, ch 1, dcf in next dc, repeat from * to last dc, ch 1, dcf in last dc (t-ch).
Row 2B
Ch 4, dcf in next dc, *ch 1, dcf in next dc, repeat from * to end. Turn entire piece.
Bring Color B Working Yarn to Back.
Row 3A
Ch 4, dcf in next dc, *ch 1, dcf in next dc, repeat from * to end.
Row 3B
Ch 4, dcb in next dc, *ch 1, dcb in next dc, repeat from * to end. Turn entire piece.
Bring Color B Working Yarn to Back.
Row 4A
Ch 4, dcf in next dc, *ch 1, dcb in next dc, ch 1, dcf in next dc, repeat from * to last dc, ch 1, dcb in last dc (t-ch).
Row 4B
Ch 4, dcb in next dc, *ch 1, dcb in next dc, repeat from * to end. Turn entire piece.
Bring Color B Working Yarn to Back.
Row 5A
Ch 4, dcb in next dc, *ch 1, dcf in next dc, ch 1, dcb in next dc, repeat from * to last dc, ch 1, dcb in last dc (t-ch).
Row 5B
Ch 4, dcb in next dc, *ch 1, dcb in next dc, repeat from * to end. Turn entire piece.
Bring Color B Working Yarn to Front.
Row 6A
Ch 4, dcb in next dc, *ch 1, dcb in next dc, repeat from * to end.
Row 6B
Ch 4, dcf in next dc, *ch 1, dcf in next dc, repeat from * to end. Turn entire piece.
Repeat Rows 1A/B to 6A/B 6 (6, 6, 6, 6, 7, 7, 7, 7) more times. You will see a total of 14 (14, 14, 14, 14, 16, 16, 16, 16) “Square” Rows on one side of your work. Continue to “Final Row” instructions below.
Final Row with Color A
Ch 1, sc in first dc of Color A, sc around ch-1 of Color A and in first dc of Color B, *sc in next dc of Color A and around next ch-1 of Color b, sc around next ch-1 of Color A and in next dc of Color B, repeat from * to end with last sc being placed in the 3rd ch of tch-4, finish off.
Front Panels – Make 2
Foundation Row A
Ch 32 (36, 40, 44, 48, 52, 56, 60, 64) dc in 6th ch from hook, *ch 1, sk 1, dc in next, repeat from * to end, place SM.
Foundation Row B
Ch 30 (34, 38, 42, 46, 50, 54, 58, 62), dc in 6th ch from hook, *ch 1, sk 1, dc in next, repeat from * to end, place SM.
Continue with Back Panel Instructions above for Rows 1A/B to Rows 6A/B.
Repeat Rows 1A/B to 6A/B 6 (6, 6, 6, 6, 7, 7, 7, 7) more times. You will see a total of 14 (14, 14, 14, 14, 16, 16, 16, 16) “Square” Rows on one side of your work. Continue to “Final Row” instructions below.
Final Row with Color A
Ch 1, sc in first dc of Color A, sc around ch-1 of Color A and in first dc of Color B, *sc in next dc of Color A and around next ch-1 of Color b, sc around next ch-1 of Color A and in next dc of Color B, repeat from * to end with last sc being placed in the 3rd ch of tch-4, finish off.
Sleeve Panels – Make 2
Foundation Row A
Ch 56 (56, 60, 60, 64, 72, 80, 84, 88, 88) dc in 6th ch from hook, *ch 1, sk 1, dc in next, repeat from * to end, place SM.
Foundation Row B
Ch 54 (54, 58, 58, 62, 70, 78, 82, 86, 86), dc in 6th ch from hook, *ch 1, sk 1, dc in next, repeat from * to end, place SM.
Continue with Back Panel Instructions above for Rows 1A/B to Rows 6A/B.
Repeat Rows 1A/B to 6A/B 5 (5, 5, 5, 5, 4, 4, 4, 3) more times. You will see a total of 12 (12, 12, 12, 12, 10, 10, 10, 8) “Square” Rows on one side of your work. Continue to “Final Row” instructions below for Sizes XS to XL and 5XL.
For Sizes 2XL to 4XL Rows 1A/B to Rows 3A/B, you will now see 11 “Square” Rows on one side of your work. Now move onto “Final Row” instructions below.
Final Row with Color A
Ch 1, sc in first dc of Color A, sc around ch-1 of Color A and in first dc of Color B, *sc in next dc of Color A and around next ch-1 of Color b, sc around next ch-1 of Color A and in next dc of Color B, repeat from * to end with last sc being placed in the 3rd ch of tch-4, finish off.
Pockets – Make 4
Color A
Row 1 – Fsc 23.
Row 2 – Turn, ch 1, sc across.
Color B
Row 3 – Turn, ch 1, sc across.
Row 4 – Turn, ch 1, hdc2tog, hdc to end, 2 hdc in last st.
Row 5 – Turn, ch 1, 2 hdc in first st, hdc until 2 sts remain, hdc2tog.
Rows 6 to 11 – Repeat Rows 4 and 5.
Rows 12 to 18 – Turn, ch 1, hdc2tog, hdc until 2 sts remain, hdc2tog. Finish off in final row.
Seam two Pocket Panels together using the Row Ends while leaving Row 1 open. Steam or block your pockets focusing on your seams if they feel stiff. Remember, we want them to be reversible!
Assembly
- You may assemble these pieces in anyway you like but be sure to have the correct sides facing each other so that your coat is truly reversible.
- You will want to make sure that your seam your panels together as seamlessly as possible so that both sides look finished.
- I used what I like to call a flat mattress stitch in row ends and a mattress stitch in the shoulders.
- When attaching the pockets be sure that they are high enough in your coat so that they don’t hang past the bottom of the waist. I attached mine at the 5th square from the bottom.
- I started with the shoulders, attached the arms and then worked down from the armpit to attach the pockets and finally finished after the pockets to the waist.
- Weave in all of your ends and then move onto waist trimming.
Trim – Waist
- With right sides facing using Color A reattach your yarn in Color A Foundation Row 1 and using the same method of the Final Row on your Panel Pieces bring Color A and Color B together using single crochet stitches.
- When you reach the end of the waist, ch 2, turn, and dc across in each single crochet stitch created.
- Again, when you reach the end of the waist, ch 2, turn, and dc across in each double crochet stitch created, finish off.
Trim – Collar
- With right sides facing using Color A reattach your yarn in the side of Color A in the last dc created in the Waist Trim.
- Ch 2, dc evenly in the row ends of the Waist Trim and First Front Panel, dc in each open stitch at the neck in the back panel, then dc evenly down the side of the Second Front Panel to the bottom on the Waist Trim.
- Ch 2, turn, dc in each dc to end.
- Repeat Step 2 for 3 more rows of double crochet stitches, finish off.
Cuffs
With right sides facing using Color A reattach your yarn in Color A Foundation Row 1 and using the same method of the Final Row on your Panel Pieces bring Color A and Color B together using single crochet stitches, slip stitch to join, finish off, weave in all ends.
Finishing
Once your coat it full assembled and your ends are woven in give it a good steam blocking focusing on your seams so that everything lays nicely. This will ensure that your coat is perfectly reversible! Enjoy!